Removal [11/2023 - ]: Procedure
WARNING: This page is about a different variant/trim than selected.
- PERFORM RESOLVER INITIALIZATION
NOTE:
If it is necessary to replace the hybrid vehicle transaxle assembly, make sure to perform resolver initialization before starting work.
Refer to UTILITY [11/2023 - ]
- REMOVE ENGINE ASSEMBLY WITH TRANSAXLE
Refer to REMOVAL [11/2023 - ]
- REMOVE FUEL DELIVERY GUARD
Refer to PROCEDURE - Step 39
- INSTALL ENGINE HANGERS
Refer to PROCEDURE - Step 40
- REMOVE STEERING GEAR HEAT INSULATOR
Refer to PROCEDURE - Step 9
- DISCONNECT ENGINE WIRE
- Rear side:
- Disconnect the wire harness connector from the rack and pinion power steering gear assembly.
 Courtesy of © TOYOTA, LICENSE AGREEMENT TMS1002 Courtesy of © TOYOTA, LICENSE AGREEMENT TMS1002
|
HINT:
Release the lock before rotating the lock lever.
- Remove the 2 bolts to disconnect the engine wire.
- Disengage the 6 clamps to disconnect the engine wire.
- Front side:
- Remove the 2 bolts to disconnect the engine wire.
 Courtesy of © TOYOTA, LICENSE AGREEMENT TMS1002 Courtesy of © TOYOTA, LICENSE AGREEMENT TMS1002
|
- DISCONNECT HV AIR CONDITIONING WIRE
- Remove the 2 bolts to disconnect the HV air conditioning wire from the hybrid vehicle transaxle assembly.
 Courtesy of © TOYOTA, LICENSE AGREEMENT TMS1002 Courtesy of © TOYOTA, LICENSE AGREEMENT TMS1002
|
- Disengage the guide to disconnect the HV air conditioning wire from the hybrid vehicle transaxle assembly.
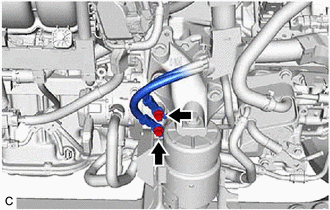
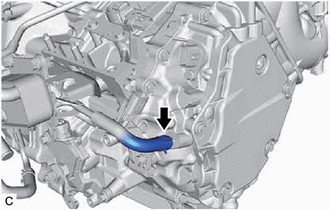
- DISCONNECT WATER HOSE
- Disengage the clamp to disconnect the water hose.
 Courtesy of © TOYOTA, LICENSE AGREEMENT TMS1002 Courtesy of © TOYOTA, LICENSE AGREEMENT TMS1002
|
- REMOVE TRANSAXLE UNDER STOPPER BRACKET
- Remove the 4 bolts and transaxle under stopper bracket from the hybrid vehicle transaxle assembly.
 Courtesy of © TOYOTA, LICENSE AGREEMENT TMS1002 Courtesy of © TOYOTA, LICENSE AGREEMENT TMS1002
|
- REMOVE STARTER HOLE INSULATOR
- Remove the 2 bolts and starter hole insulator from the engine assembly.
 Courtesy of © TOYOTA, LICENSE AGREEMENT TMS1002 Courtesy of © TOYOTA, LICENSE AGREEMENT TMS1002
|
- REMOVE FLYWHEEL HOUSING SIDE COVER
- Remove the flywheel housing side cover from the engine assembly.
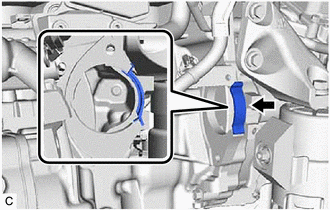 Courtesy of © TOYOTA, LICENSE AGREEMENT TMS1002 Courtesy of © TOYOTA, LICENSE AGREEMENT TMS1002
|
- REMOVE FRONT FRAME ASSEMBLY
Refer to PROCEDURE - Step 7
- REMOVE FRONT ENGINE MOUNTING INSULATOR
Refer to PROCEDURE - Step 49
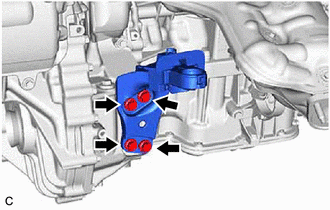
- REMOVE FRONT ENGINE MOUNTING BRACKET
- Remove the 3 bolts and front engine mounting bracket from the hybrid vehicle transaxle assembly.
 Courtesy of © TOYOTA, LICENSE AGREEMENT TMS1002 Courtesy of © TOYOTA, LICENSE AGREEMENT TMS1002
|
- REMOVE REAR ENGINE MOUNTING INSULATOR
Refer to PROCEDURE - Step 50
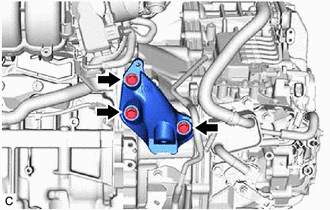
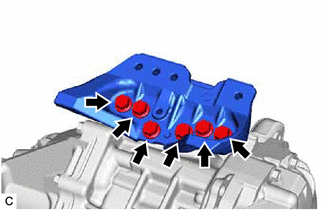
- REMOVE REAR ENGINE MOUNTING BRACKET
- Remove the 4 bolts and rear engine mounting bracket from the hybrid vehicle transaxle assembly.
 Courtesy of © TOYOTA, LICENSE AGREEMENT TMS1002 Courtesy of © TOYOTA, LICENSE AGREEMENT TMS1002
|
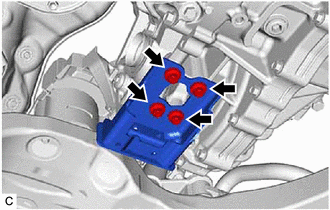
- REMOVE HYBRID VEHICLE TRANSAXLE ASSEMBLY
- Remove the 8 bolts and hybrid vehicle transaxle assembly from the engine assembly.
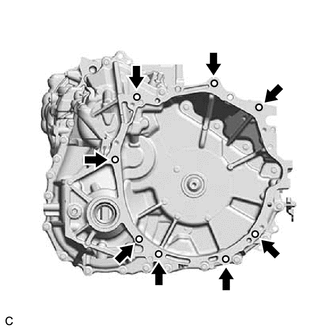 Courtesy of © TOYOTA, LICENSE AGREEMENT TMS1002 Courtesy of © TOYOTA, LICENSE AGREEMENT TMS1002
|
NOTE:
- To avoid damaging the knock pins, do not pry between the hybrid vehicle transaxle assembly and engine assembly.
- To prevent the splines of the transmission input damper assembly from becoming misaligned, do not allow the hybrid vehicle transaxle assembly to hit the transmission input damper assembly during hybrid vehicle transaxle assembly removal and installation.
- REMOVE MOTOR CABLE
See step 2
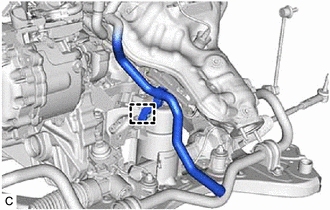
- DISCONNECT OUTLET MOTOR HOSE
See step 12
- REMOVE MOTOR COOLING COOLER
- Slide the clip and disconnect the No. 1 motor cooling hose from the tube connector.
 Courtesy of © TOYOTA, LICENSE AGREEMENT TMS1002 Courtesy of © TOYOTA, LICENSE AGREEMENT TMS1002
|
- Remove the 3 bolts and motor cooling cooler from the No. 1 transmission control cable bracket.
 Courtesy of © TOYOTA, LICENSE AGREEMENT TMS1002 Courtesy of © TOYOTA, LICENSE AGREEMENT TMS1002
|
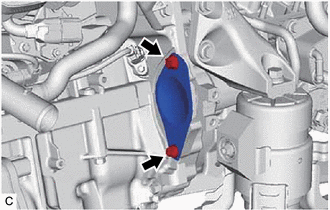
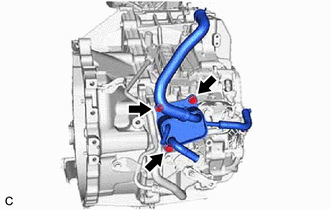
- REMOVE MOTOR COOLING PIPE ASSEMBLY
- Remove the oil cooler union bolt and gasket to disconnect the motor cooling pipe assembly from the hybrid vehicle transaxle assembly.
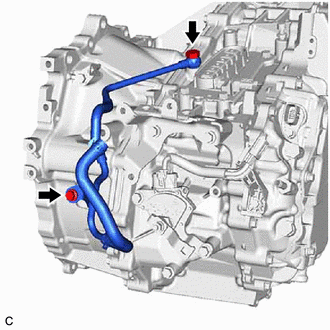 Courtesy of © TOYOTA, LICENSE AGREEMENT TMS1002 Courtesy of © TOYOTA, LICENSE AGREEMENT TMS1002
|
- Remove the bolt and motor cooling pipe assembly from the hybrid vehicle transaxle assembly.
- REMOVE NO. 1 TRANSMISSION CONTROL CABLE BRACKET
- Remove the 2 bolts and No. 1 transmission control cable bracket from the hybrid vehicle transaxle assembly.
 Courtesy of © TOYOTA, LICENSE AGREEMENT TMS1002 Courtesy of © TOYOTA, LICENSE AGREEMENT TMS1002
|
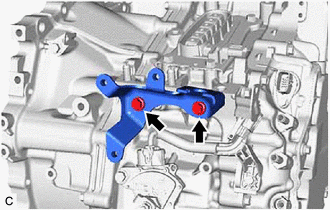
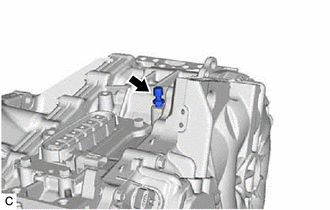
- REMOVE NO. 3 INVERTER BRACKET
- Remove the 6 bolts and No. 3 inverter bracket from the hybrid vehicle transaxle assembly.
 Courtesy of © TOYOTA, LICENSE AGREEMENT TMS1002 Courtesy of © TOYOTA, LICENSE AGREEMENT TMS1002
|
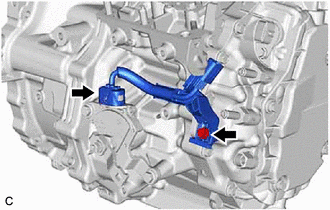
- REMOVE TRANSMISSION WIRE
- Disconnect the connector.
 Courtesy of © TOYOTA, LICENSE AGREEMENT TMS1002 Courtesy of © TOYOTA, LICENSE AGREEMENT TMS1002
|
- Remove the bolt and transmission wire from the hybrid vehicle transaxle assembly.
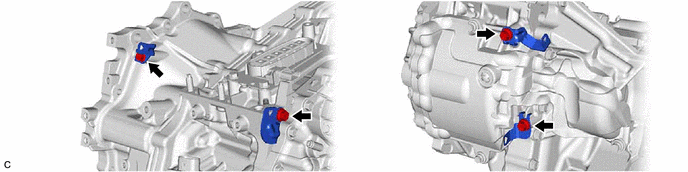
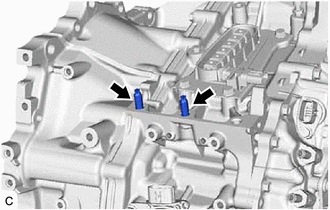
- REMOVE WIRE HARNESS CLAMP BRACKET
- Remove the 4 bolts and 4 wire harness clamp brackets from the hybrid vehicle transaxle assembly.
 Courtesy of © TOYOTA, LICENSE AGREEMENT TMS1002 Courtesy of © TOYOTA, LICENSE AGREEMENT TMS1002
|
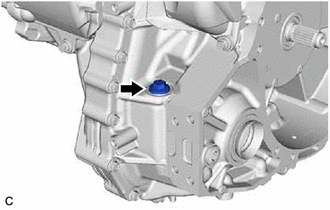
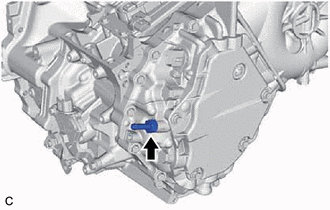
- REMOVE TRANSAXLE HOUSING PLUG
- Remove the transaxle housing plug and gasket from the hybrid vehicle transaxle assembly.
 Courtesy of © TOYOTA, LICENSE AGREEMENT TMS1002 Courtesy of © TOYOTA, LICENSE AGREEMENT TMS1002
|
- REMOVE STUD BOLT
- Using a E10 "TORX" socket wrench, remove the 2 stud bolts from the hybrid vehicle transaxle assembly.
 Courtesy of © TOYOTA, LICENSE AGREEMENT TMS1002 Courtesy of © TOYOTA, LICENSE AGREEMENT TMS1002
|
- REMOVE TRANSAXLE BREATHER PLUG
HINT:
Perform this procedure only when replacement of the transaxle breather plug is necessary.
- Remove the transaxle breather plug from the hybrid vehicle transaxle assembly.
 Courtesy of © TOYOTA, LICENSE AGREEMENT TMS1002 Courtesy of © TOYOTA, LICENSE AGREEMENT TMS1002
|
- REMOVE TUBE CONNECTOR
HINT:
Perform this procedure only when replacement of the tube connector or O-ring is necessary.
- Remove the tube connector from the hybrid vehicle transaxle assembly.
 Courtesy of © TOYOTA, LICENSE AGREEMENT TMS1002 Courtesy of © TOYOTA, LICENSE AGREEMENT TMS1002
|
- Remove the O-ring from the tube connector.
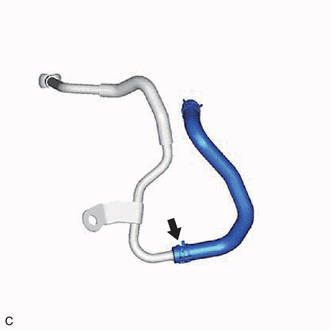
- REMOVE OUTLET MOTOR HOSE
HINT:
Perform this procedure only when replacement of the outlet motor hose or motor cooling pipe assembly is necessary.
- Slide the clip and remove the outlet motor hose from the motor cooling pipe assembly.
 Courtesy of © TOYOTA, LICENSE AGREEMENT TMS1002 Courtesy of © TOYOTA, LICENSE AGREEMENT TMS1002
|