On-Vehicle Inspection [11/2023 - ]: Procedure
WARNING: This page is about a different variant/trim than selected.
- REMOVE FRONT WHEEL OPENING EXTENSION PAD LH
Refer to PROCEDURE - Step 7
- REMOVE FRONT WHEEL OPENING EXTENSION PAD RH
Refer to PROCEDURE - Step 8
- REMOVE NO. 1 ENGINE UNDER COVER
Refer to PROCEDURE - Step 9
- REMOVE NO. 2 ENGINE UNDER COVER ASSEMBLY
Refer to PROCEDURE - Step 10
- INSPECT HYBRID TRANSAXLE FLUID
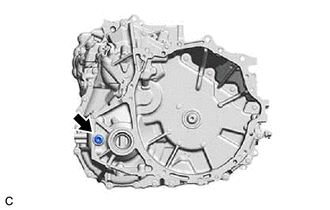
- Using a 10 mm hexagon socket wrench, remove the filler plug and gasket from the hybrid vehicle transaxle assembly.
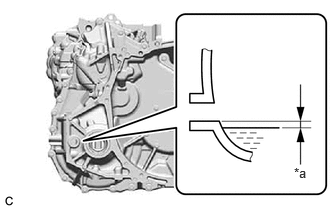
- Check that the hybrid transaxle fluid level is between 0 to 10 mm (0 to 0.394 in.) from the bottom lip of the filler plug opening.
*a 0 to 10 mm (0 to 0.394 in.) NOTE:- When inspecting the hybrid transaxle fluid, make sure that the vehicle is level.
- Be sure to directly check that the hybrid transaxle fluid level is within the specified range.
- Driving the vehicle with an insufficient or excessive amount of hybrid transaxle fluid may damage the hybrid vehicle transaxle assembly.
- If the hybrid transaxle fluid was replaced or if hybrid transaxle fluid was added, make sure to recheck the hybrid transaxle fluid level after driving the vehicle.
- Check for leaks if the hybrid transaxle fluid level is low. (If there are no hybrid transaxle fluid leaks but the hybrid transaxle fluid level is low, add hybrid transaxle fluid.)
See step 6
- Using a 10 mm hexagon socket wrench, install the filler plug and a new gasket to the hybrid vehicle transaxle assembly.
Torque: 50 N.m (510 kgf/cm, 37 ft.lbf)
- Using a 10 mm hexagon socket wrench, remove the filler plug and gasket from the hybrid vehicle transaxle assembly.
- INSPECT FOR HYBRID TRANSAXLE FLUID LEAK
- INSTALL NO. 2 ENGINE UNDER COVER ASSEMBLY
Refer to PROCEDURE - Step 60
- INSTALL NO. 1 ENGINE UNDER COVER
Refer to PROCEDURE - Step 61
- INSTALL FRONT WHEEL OPENING EXTENSION PAD RH
Refer to PROCEDURE - Step 63
- INSTALL FRONT WHEEL OPENING EXTENSION PAD LH
Refer to PROCEDURE - Step 62