Removal [12/2019 - 10/2022]: Procedure
- REMOVE FRONT WHEEL OPENING EXTENSION PAD LH
Refer to PROCEDURE - Step 8 [12/2019 - 09/2020] , or refer to PROCEDURE - Step 8 [09/2020 - 10/2022]
- REMOVE FRONT WHEEL OPENING EXTENSION PAD RH
Refer to PROCEDURE - Step 9 [12/2019 - 09/2020] , or refer to PROCEDURE - Step 9 [09/2020 - 10/2022]
- REMOVE NO. 1 ENGINE UNDER COVER
Refer to PROCEDURE - Step 10 [12/2019 - 09/2020] , or refer to PROCEDURE - Step 10 [09/2020 - 10/2022]
- REMOVE REAR ENGINE UNDER COVER LH
Refer to PROCEDURE - Step 11 [12/2019 - 09/2020] , or refer to PROCEDURE - Step 11 [09/2020 - 10/2022]
- REMOVE REAR ENGINE UNDER COVER RH
Refer to PROCEDURE - Step 12 [12/2019 - 09/2020] , or refer to PROCEDURE - Step 12 [09/2020 - 10/2022]
- DRAIN ENGINE COOLANT
Refer to PROCEDURE - Step 1
- REMOVE WINDSHIELD WIPER MOTOR AND LINK ASSEMBLY
Refer to REMOVAL [12/2019 - ]
- REMOVE FENDER SPLASH SHIELD SUB-ASSEMBLY REAR LH
Refer to PROCEDURE - Step 3
- REMOVE FENDER SPLASH SHIELD SUB-ASSEMBLY REAR RH
HINT:
Perform the same procedure as for the LH side.
- REMOVE FRONT FENDER SPLASH SHIELD SEAL FRONT LH
Refer to PROCEDURE - Step 5
- REMOVE FRONT FENDER SPLASH SHEILD SEAL FRONT RH
HINT:
Perform the same procedure as for the LH side.
- REMOVE FRONT UPPER SUSPENSION TO COWL BRACE SUB-ASSEMBLY LH
Refer to PROCEDURE - Step 7
- REMOVE FRONT UPPER SUSPENSION TO COWL BRACE SUB-ASSEMBLY RH
HINT:
Perform the same procedure as for the LH side.
- REMOVE COWL VENTILATOR PANEL SUB-ASSEMBLY
Refer to PROCEDURE - Step 9
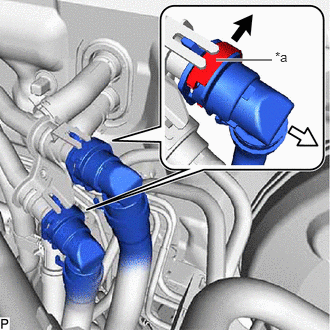
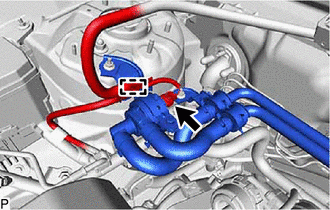
- DISCONNECT WATER BY-PASS HOSE ASSEMBLY
- Pull out the retainer to disengage the lock claws and pull off the water by-pass hose assembly from the heater water pump assembly.
*a Retainer 
Pull out 
Pull off - Check that there is no foreign matter on the sealing surfaces of the disconnected water lines. Clean them if necessary.
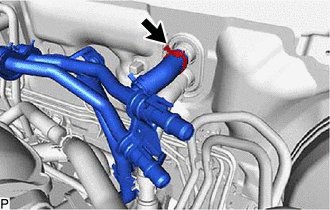
- Cover the disconnected heater water pump assembly and water by-pass hose assembly connector with plastic bags to prevent damage and contamination.
- Pull out the retainer to disengage the lock claws and pull off the water by-pass hose assembly from the heater water pump assembly.
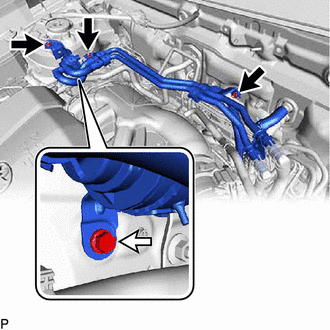
- REMOVE HEATER WATER PUMP ASSEMBLY
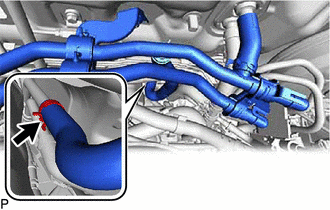
- Using pliers, grip the claws of the clip and slide the clip to disconnect the water hose.NOTE:
- Do not apply excessive force to the water hose.
- Prepare a drain pan or cloth in case the coolant leaks.
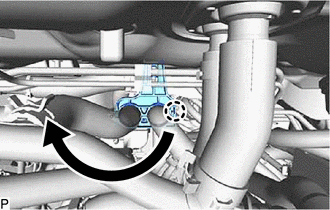
- Disengage the claw and move the piping clamp as shown in the illustration.
- Using pliers, grip the claws of the clip and slide the clip to disconnect the water hose.NOTE:
- Do not apply excessive force to the water hose.
- Prepare a drain pan or cloth in case the coolant leaks.
- Disconnect the connector.
- Disengage the clamp.
- Remove the 3 nuts, bolt and heater water pump assembly.
Nut Bolt
- Using pliers, grip the claws of the clip and slide the clip to disconnect the water hose.