Installation [12/2019 - ]: Procedure
- INSTALL REAR UPPER SHOCK ABSORBER BRACKET
HINT:
Perform this procedure only when replacement of the rear upper shock absorber bracket is necessary.
- Install the rear upper shock absorber bracket to the vehicle with the 3 nuts.
Torque: 68 N.m (693 kgf/cm, 50 ft.lbf)
- Install the rear upper shock absorber bracket to the vehicle with the 3 nuts.
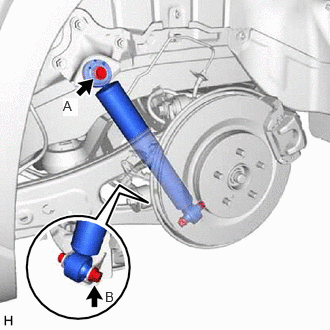
- TEMPORARILY INSTALL REAR SHOCK ABSORBER ASSEMBLY
- Temporarily install the rear shock absorber assembly with the 2 bolts and nut.
*a Protector NOTE:- Ensure that the protector faces the front of the vehicle.
- Insert the bolt with the threaded end facing the rear of the vehicle.
- Because the nut has its own stopper, do not turn the nut. Tighten the bolt with the nut secured.
- Temporarily install the rear shock absorber assembly with the 2 bolts and nut.
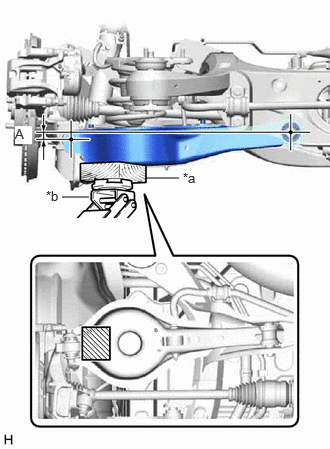
- STABILIZE SUSPENSION
- Using a jack and wooden block, apply load to the suspension so that the rear No. 2 suspension arm assembly is positioned as shown in the illustration.
Standard Length (A)
19.5 mm (0.768 in.)
WARNING:Do not jack up the rear No. 2 suspension arm assembly too high as the vehicle may fall.
NOTE:- When jacking up the rear No. 2 suspension arm assembly, be sure to jack it up slowly.
- Make sure to perform this operation with the vehicle kept as low as possible.
*a Wooden Block *b Jack 
Wooden Block Placement Location
- Using a jack and wooden block, apply load to the suspension so that the rear No. 2 suspension arm assembly is positioned as shown in the illustration.
- INSTALL REAR SHOCK ABSORBER ASSEMBLY
- INSTALL REAR SUSPENSION ARM COVER
- INSTALL REAR WHEEL
Refer to PROCEDURE - Step 1 [12/2019 - 10/2022] , or refer to PROCEDURE - Step 1 [10/2022 - ]
- PERFORM INITIALIZATION
Parking Assist Monitor System Refer to CALIBRATION [12/2019 - 10/2022] , or refer to CALIBRATION [10/2022 - ] Panoramic View Monitor System Refer to CALIBRATION [12/2019 - 10/2022] , or refer to CALIBRATION [10/2022 - 11/2023] , or refer to CALIBRATION [11/2023 - ] Lighting System (EXT) (w/ AFS) Refer to INITIALIZATION [12/2019 - 11/2023] , or refer to INITIALIZATION [11/2023 - ]