Installation [12/2019 - ]: Procedure
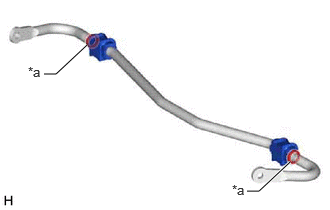
- INSTALL REAR STABILIZER BUSHING
- INSTALL REAR STABILIZER BRACKET
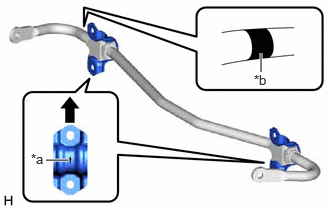
- Install the 2 rear stabilizer brackets to the 2 rear stabilizer bushings.NOTE:
- Be sure to install the rear stabilizer brackets so that each arrow mark faces the upper side of the vehicle.
- Ensure that the identification mark faces the right side of the vehicle.
*a Arrow Mark *b Identification Mark 
Upper Side of the Vehicle
- Install the 2 rear stabilizer brackets to the 2 rear stabilizer bushings.
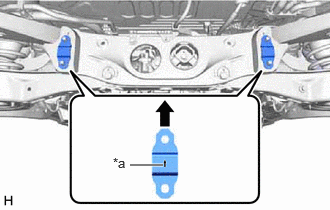
- INSTALL REAR LOWER STABILIZER BRACKET
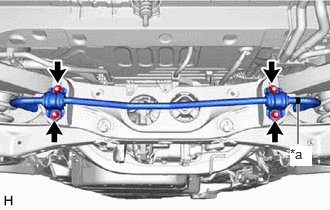
- INSTALL REAR STABILIZER BAR
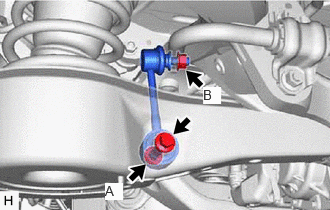
- TEMPORARILY INSTALL REAR STABILIZER LINK ASSEMBLY LH
- Temporarily install the rear stabilizer link assembly LH to the rear stabilizer bar with the nut (B).
- Temporarily install the rear stabilizer link assembly to the rear No. 2 suspension arm assembly with the bolt and nut (A).NOTE:
- Because the nut (A) has its own stopper, do not turn the nut (A). Tighten the bolt with the nut (A) secured.
- Insert the bolt with the threaded end facing the front of the vehicle.
- Temporarily install the rear stabilizer link assembly LH to the rear stabilizer bar with the nut (B).
- TEMPORARILY INSTALL REAR STABILIZER LINK ASSEMBLY RH
HINT:
Perform the same procedure as for the LH side.
- STABILIZE SUSPENSION
See step 3
- INSTALL REAR STABILIZER LINK ASSEMBLY LH
- Install the rear stabilizer link assembly LH to the rear stabilizer bar with the nut (B).
Torque: 90 N.m (918 kgf/cm, 66 ft.lbf)
HINT:
If the ball joint turns together with the nut (B), use a 6 mm hexagon socket wrench to hold the stud bolt.
- Install the rear stabilizer link assembly to the rear No. 2 suspension arm assembly with the bolt and nut (A).
Torque: 70 N.m (714 kgf/cm, 52 ft.lbf)
NOTE:Because the nut (A) has its own stopper, do not turn the nut (A). Tighten the bolt with the nut (A) secured.
- Install the rear stabilizer link assembly LH to the rear stabilizer bar with the nut (B).
- INSTALL REAR STABILIZER LINK ASSEMBLY RH
HINT:
Perform the same procedure as for the LH side.
- INSTALL REAR SUSPENSION ARM COVER LH
- INSTALL REAR SUSPENSION ARM COVER RH
HINT:
Perform the same procedure as for the LH side.
- INSTALL REAR WHEEL
Refer to PROCEDURE - Step 1 [12/2019 - 10/2022] , or refer to PROCEDURE - Step 1 [10/2022 - ]