Installation [12/2019 - ]: Procedure
- INSTALL WINDSHIELD WIPER MOTOR ASSEMBLY
- Using a T30 "TORX" socket wrench, install the windshield wiper motor assembly with the 2 bolts.
Torque: 7.5 N.m (76 kgf/cm, 66 in.lbf)
- Using a T30 "TORX" socket wrench, install the windshield wiper motor assembly with the 2 bolts.
- INSTALL FRONT WIPER CRANK SUB-ASSEMBLY
- Connect the windshield wiper motor assembly connector.
- Turn the ignition switch to ON.
- Operate the wiper and stop the windshield wiper motor assembly at the automatic stop position.
- Turn the ignition switch off.
- Disconnect the windshield wiper motor assembly connector.
- Temporarily install the front wiper crank sub-assembly to the windshield wiper motor assembly with the nut.
- Temporarily install the No. 1 wiper link rod to the pivot of the front wiper crank sub-assembly.
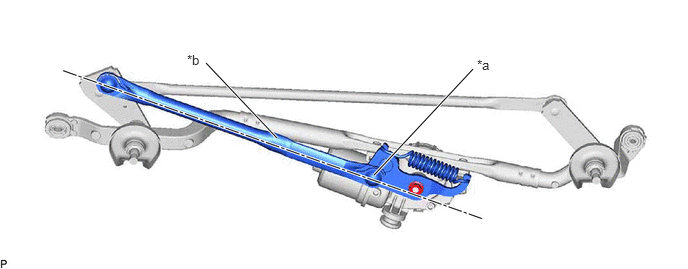
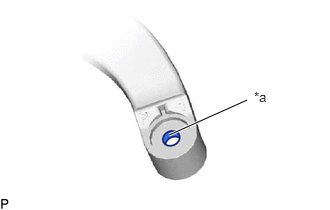
- Align the nut and pivot of the front wiper crank sub-assembly with the No. 1 wiper link rod as shown in the illustration.
*a Pivot of Front Wiper Crank Sub-assembly *b No. 1 Wiper Link Rod - Tighten the nut to install the front wiper crank sub-assembly.
Torque: 17.2 N.m (175 kgf/cm, 13 ft.lbf)
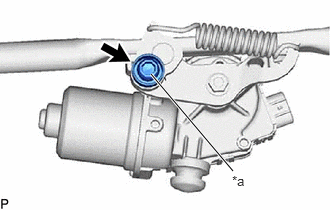
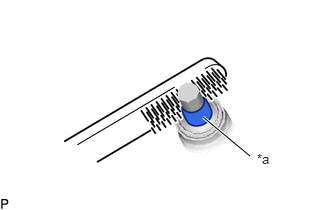
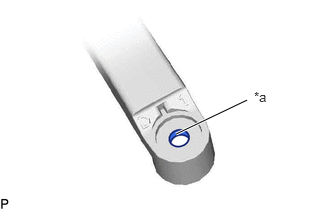
- Apply MP grease to the pivot of the front wiper crank sub-assembly.
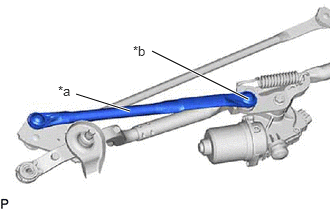
*a Pivot of Front Wiper Crank Sub-assembly - Connect the No. 1 wiper link rod to the pivot of the front wiper crank sub-assembly.
*a No. 1 Wiper Link Rod *b Pivot of Front Wiper Crank Sub-assembly
- INSTALL WINDSHIELD WIPER MOTOR AND LINK ASSEMBLY
- Engage the motor grommet as shown in the illustration.
 Courtesy of © TOYOTA, LICENSE AGREEMENT TMS1002
*a Motor Grommet NOTE:Be careful not to damage the windshield glass when installing the windshield wiper motor and link assembly.
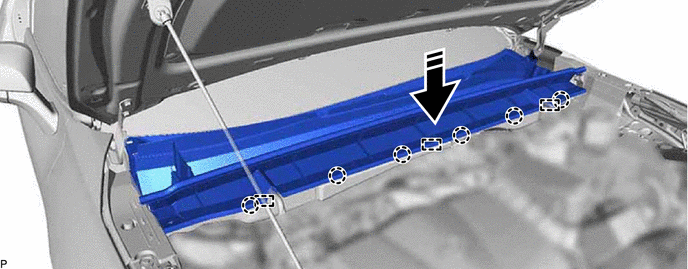
- Install the windshield wiper motor and link assembly with the 2 bolts.
Torque: 7.0 N.m (71 kgf/cm, 62 in.lbf)
HINT:
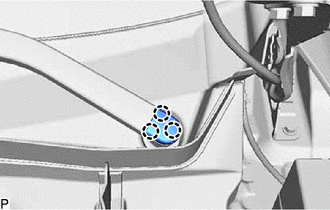
Tighten the bolts in the order shown in the illustration.
- Connect the connector.
- Engage the motor grommet as shown in the illustration.
- INSTALL COWL TOP VENTILATOR LOUVER SUB-ASSEMBLY
- Engage the guide.
- Engage the cowl top ventilator louver sub-assembly to the windshield glass as shown in the illustration.

Install in this Direction - - NOTE:Make sure to engage the guide securely, otherwise the cowl top ventilator louver sub-assembly may pop up when engaging it to the windshield glass.
- Engage the 3 guides and 6 claws to temporarily install the cowl top ventilator louver sub-assembly as shown in the illustration.
Install in this Direction - - NOTE:Make sure that the cowl top ventilator louver sub-assembly does not contact the vehicle body, otherwise it may be damaged.
- Install the 2 clips.
- Engage the guide.
- INSTALL FRONT FENDER TO COWL SIDE SEAL LH
- Engage the guide and 5 claws to install the fender to cowl side seal LH.
- INSTALL FRONT FENDER TO COWL SIDE SEAL RH
HINT:
Use the same procedure as for the LH side.
- INSTALL FRONT WIPER ARM AND BLADE ASSEMBLY RH
- When reusing the front wiper arm and blade assembly RH:
- When reusing the windshield wiper motor and link assembly:
- Turn the ignition switch to ON.
- Operate the windshield wiper motor assembly and stop the windshield wiper motor and link assembly at the automatic stop position.
- Turn the ignition switch off.
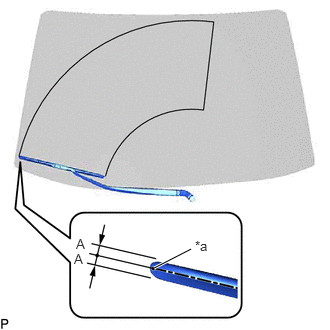
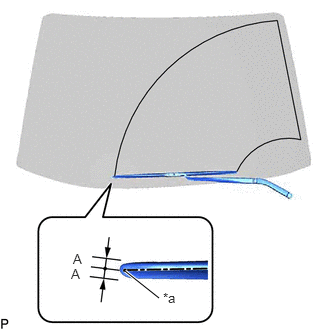
- Install the front wiper arm and blade assembly RH with the nut to the position shown in the illustration.
*a Alignment Mark Torque: 24 N.m (245 kgf/cm, 18 ft.lbf)
HINT:
Hold the wiper arm by hand while tightening the nut.
Reference Measurement
Area Measurement A 10 mm (0.394 in.)
- INSTALL FRONT WIPER ARM AND BLADE ASSEMBLY LH
- When reusing the front wiper arm and blade assembly LH:
- When reusing the windshield wiper motor and link assembly:
- Install the front wiper arm and blade assembly LH with the nut to the position shown in the illustration.
*a Alignment Mark Torque: 24 N.m (245 kgf/cm, 18 ft.lbf)
HINT:
Hold the wiper arm by hand while tightening the nut.
Reference Measurement
Area Measurement A 10 mm (0.394 in.) - Turn the ignition switch to ON.
- Operate the windshield wipers while spraying washer fluid onto the windshield glass. Make sure that the windshield wipers function properly and the wipers do not contact the vehicle body.
- Turn the ignition switch off.
- Lift each wiper arm twice after the wipers stop and check the wiper set position.
- INSTALL FRONT WIPER ARM HEAD CAP