- REMOVE FOG LIGHT ASSEMBLY LH
Refer to PROCEDURE - Step 2 [09/2020 - 11/2023]
, or refer to PROCEDURE - Step 2 [11/2023 - ]
- REMOVE FOG LIGHT ASSEMBLY RH
HINT:
Use the same procedure as for the LH side.
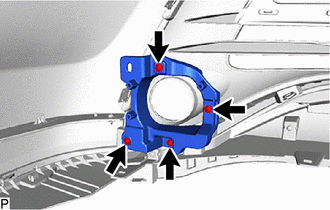
- REMOVE FOG LIGHT BRACKET LH
- Remove the 4 screws and fog light bracket LH.
 Courtesy of © TOYOTA, LICENSE AGREEMENT TMS1002 Courtesy of © TOYOTA, LICENSE AGREEMENT TMS1002
|
- REMOVE FOG LIGHT BRACKET RH
HINT:
Use the same procedure as for the LH side.
- REMOVE MILLIMETER WAVE RADAR SENSOR ASSEMBLY
Refer to PROCEDURE - Step 2 [09/2020 - 11/2023]
, or refer to PROCEDURE - Step 2 [11/2023 - ]
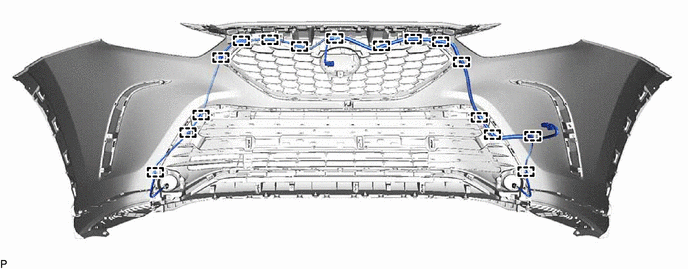
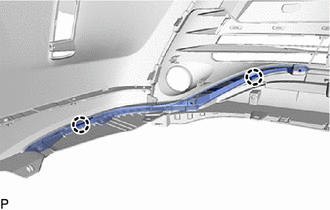
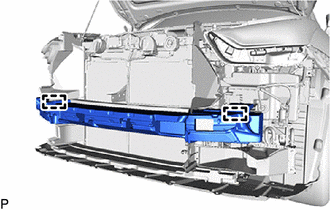
- REMOVE NO. 4 ENGINE ROOM WIRE
- Disengage the 16 clamps to remove the No. 4 engine room wire.
 Courtesy of © TOYOTA, LICENSE AGREEMENT TMS1002 Courtesy of © TOYOTA, LICENSE AGREEMENT TMS1002
|
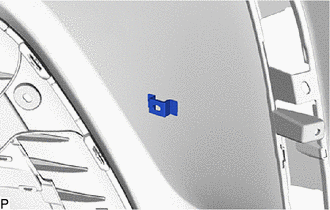
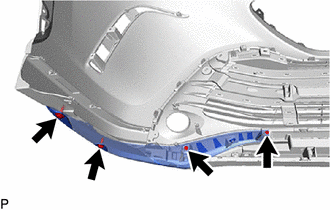
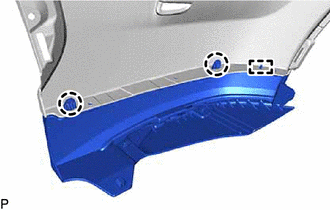
- REMOVE ULTRASONIC SENSOR CLIP
- Remove the ultrasonic sensor clip.
 Courtesy of © TOYOTA, LICENSE AGREEMENT TMS1002 Courtesy of © TOYOTA, LICENSE AGREEMENT TMS1002
|
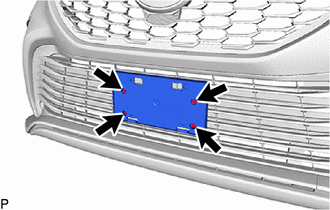
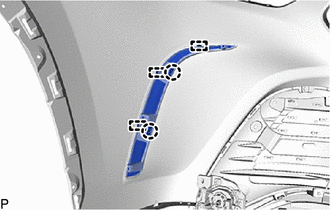
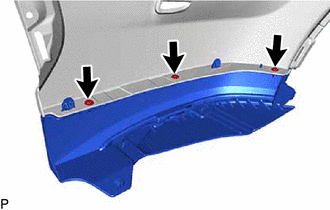
- REMOVE FRONT BUMPER EXTENSION MOUNTING BRACKET
- Remove the 4 screws and front bumper extension mounting bracket.
 Courtesy of © TOYOTA, LICENSE AGREEMENT TMS1002 Courtesy of © TOYOTA, LICENSE AGREEMENT TMS1002
|
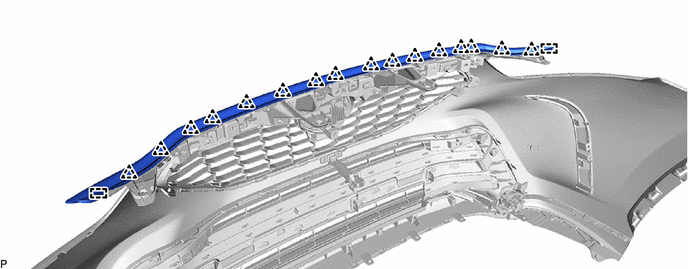
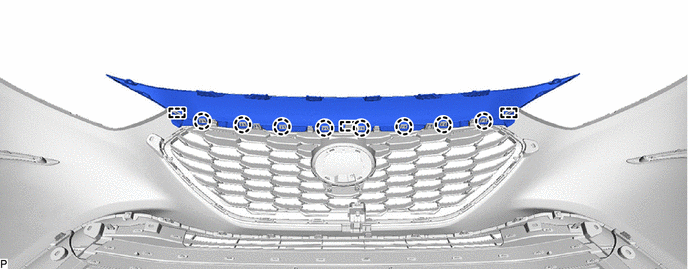
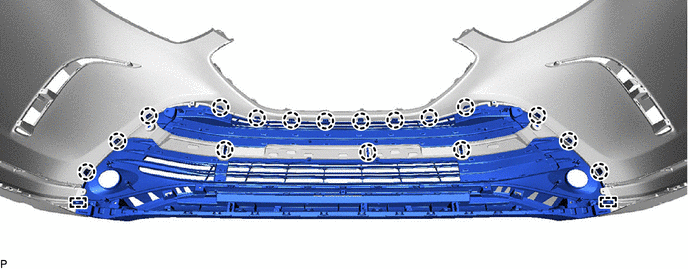
- REMOVE HOOD TO RADIATOR GRILLE SEAL
- Disengage the 2 guides and 16 clips to remove the hood to radiator grille seal.
 Courtesy of © TOYOTA, LICENSE AGREEMENT TMS1002 Courtesy of © TOYOTA, LICENSE AGREEMENT TMS1002
|
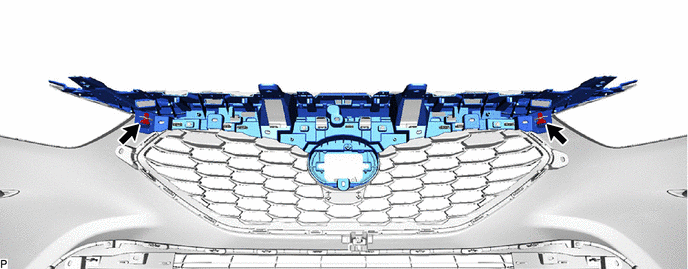
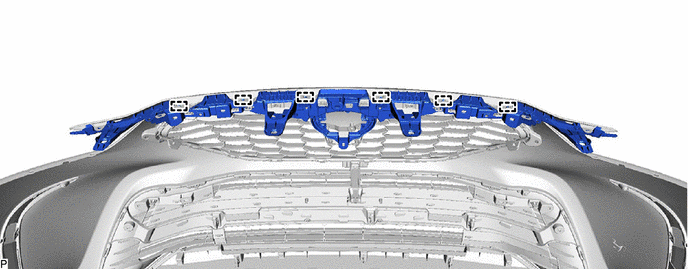
- REMOVE RADIATOR GRILLE BRACKET
- Remove the 2 clips.
 Courtesy of © TOYOTA, LICENSE AGREEMENT TMS1002 Courtesy of © TOYOTA, LICENSE AGREEMENT TMS1002
|
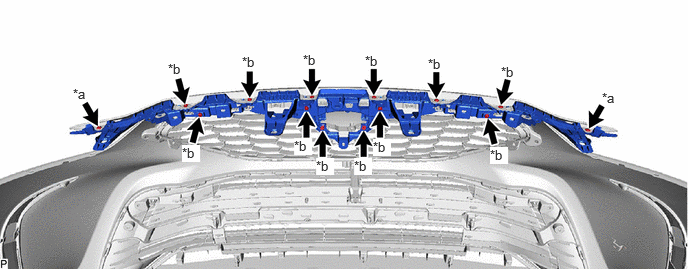
- Remove the 2 clips and 12 screws.
 Courtesy of © TOYOTA, LICENSE AGREEMENT TMS1002 Courtesy of © TOYOTA, LICENSE AGREEMENT TMS1002
|
- Disengage the 4 claws and 3 guides.
 Courtesy of © TOYOTA, LICENSE AGREEMENT TMS1002 Courtesy of © TOYOTA, LICENSE AGREEMENT TMS1002
|
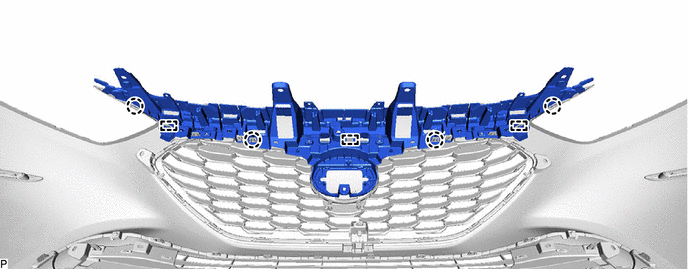
- Disengage the 6 guides to remove the radiator grille bracket.
 Courtesy of © TOYOTA, LICENSE AGREEMENT TMS1002 Courtesy of © TOYOTA, LICENSE AGREEMENT TMS1002
|
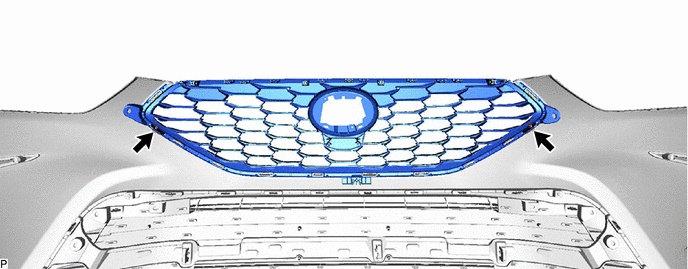
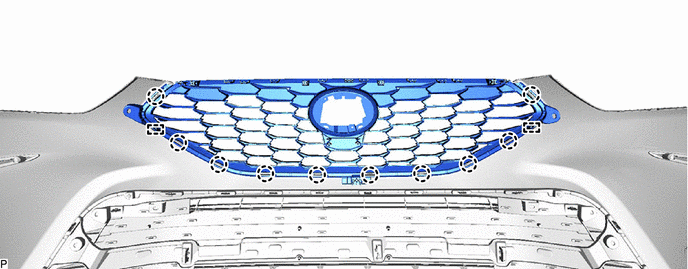
- REMOVE FRONT BUMPER MOULDING
- Disengage the 8 claws and 3 guides to remove the front bumper moulding.
 Courtesy of © TOYOTA, LICENSE AGREEMENT TMS1002 Courtesy of © TOYOTA, LICENSE AGREEMENT TMS1002
|
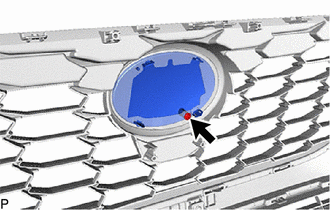
- REMOVE RADIATOR GRILLE (OR FRONT PANEL) EMBLEM
- Remove the screw.
 Courtesy of © TOYOTA, LICENSE AGREEMENT TMS1002 Courtesy of © TOYOTA, LICENSE AGREEMENT TMS1002
|
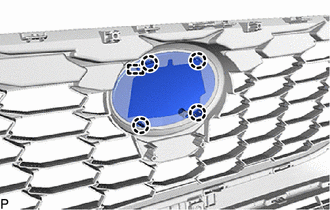
- Disengage the 4 claws and guide to remove the radiator grille (or front panel) emblem.
 Courtesy of © TOYOTA, LICENSE AGREEMENT TMS1002 Courtesy of © TOYOTA, LICENSE AGREEMENT TMS1002
|
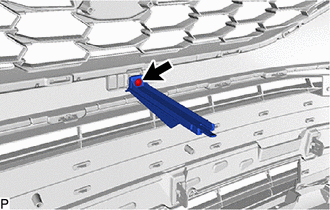
- REMOVE NO. 1 FRONT BUMPER LOWER RETAINER
- Remove the screw and No. 1 front bumper lower retainer.
 Courtesy of © TOYOTA, LICENSE AGREEMENT TMS1002 Courtesy of © TOYOTA, LICENSE AGREEMENT TMS1002
|
- REMOVE RADIATOR GRILLE SUB-ASSEMBLY
- Remove the 2 clips.
 Courtesy of © TOYOTA, LICENSE AGREEMENT TMS1002 Courtesy of © TOYOTA, LICENSE AGREEMENT TMS1002
|
- Disengage the 10 claws and 2 guides to remove the radiator grille sub-assembly.
 Courtesy of © TOYOTA, LICENSE AGREEMENT TMS1002 Courtesy of © TOYOTA, LICENSE AGREEMENT TMS1002
|
- REMOVE NO. 2 FRONT BUMPER EXTENSION INSERT LH
- Remove the 3 screws.
 Courtesy of © TOYOTA, LICENSE AGREEMENT TMS1002 Courtesy of © TOYOTA, LICENSE AGREEMENT TMS1002
|
- Disengage the 2 claws and 3 guides to remove the No. 2 front bumper extension insert LH.
 Courtesy of © TOYOTA, LICENSE AGREEMENT TMS1002 Courtesy of © TOYOTA, LICENSE AGREEMENT TMS1002
|
- REMOVE NO. 2 FRONT BUMPER EXTENSION INSERT RH
HINT:
Use the same procedure as for the LH side.
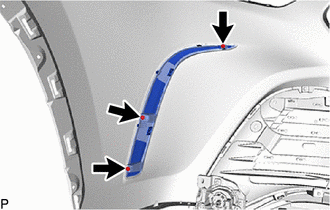
- REMOVE FRONT BUMPER SIDE MOULDING LH
- Remove the 4 screws.
 Courtesy of © TOYOTA, LICENSE AGREEMENT TMS1002 Courtesy of © TOYOTA, LICENSE AGREEMENT TMS1002
|
- Disengage the 2 claws to remove the front bumper side moulding LH.
 Courtesy of © TOYOTA, LICENSE AGREEMENT TMS1002 Courtesy of © TOYOTA, LICENSE AGREEMENT TMS1002
|
- REMOVE FRONT BUMPER SIDE MOULDING RH
HINT:
Use the same procedure as for the LH side.
- REMOVE LOWER RADIATOR GRILLE SUB-ASSEMBLY
- Remove the 2 screws.
 Courtesy of © TOYOTA, LICENSE AGREEMENT TMS1002 Courtesy of © TOYOTA, LICENSE AGREEMENT TMS1002
|
- Disengage the 17 claws and 2 guides to remove the lower radiator grille sub-assembly from the front bumper cover.
 Courtesy of © TOYOTA, LICENSE AGREEMENT TMS1002 Courtesy of © TOYOTA, LICENSE AGREEMENT TMS1002
|
- REMOVE FRONT BUMPER FILLER LH
- Remove the 3 screws.
 Courtesy of © TOYOTA, LICENSE AGREEMENT TMS1002 Courtesy of © TOYOTA, LICENSE AGREEMENT TMS1002
|
- Disengage the 2 claws and guide to remove the front bumper filler LH.
 Courtesy of © TOYOTA, LICENSE AGREEMENT TMS1002 Courtesy of © TOYOTA, LICENSE AGREEMENT TMS1002
|
- REMOVE FRONT BUMPER FILLER RH
HINT:
Use the same procedure as for the LH side.
- REMOVE FRONT BUMPER ENERGY ABSORBER
HINT:
Perform this procedure only when replacement of the front bumper energy absorber is necessary.
- Disengage the 2 guides to remove the front bumper energy absorber.
 Courtesy of © TOYOTA, LICENSE AGREEMENT TMS1002 Courtesy of © TOYOTA, LICENSE AGREEMENT TMS1002
|
- REMOVE FRONT BUMPER LOWER ABSORBER
HINT:
Perform this procedure only when replacement of the front bumper lower absorber is necessary.
See step 26
- REMOVE FRONT BUMPER REINFORCEMENT SUB-ASSEMBLY
HINT:
Perform this procedure only when replacement of the front bumper reinforcement sub-assembly is necessary.
See step 27
- REMOVE NO. 2 FRONT BUMPER REINFORCEMENT
HINT:
Perform this procedure only when replacement of the No. 2 front bumper reinforcement is necessary.
See step 28
- REMOVE FRONT BUMPER SIDE STAY LH
HINT:
Perform this procedure only when replacement of the front bumper side stay LH is necessary.
See step 29
- REMOVE FRONT BUMPER SIDE STAY RH
HINT:
Use the same procedure as for the LH side.