Installation [12/2019 - ]: Procedure
WARNING: This page is about a different variant/trim than selected.
- INSTALL AIR FUEL RATIO SENSOR
HINT:
Perform "Inspection After Repair" after replacing the air fuel ratio sensor.
Refer to INITIALIZATION [12/2019 - 10/2021] , or refer to INITIALIZATION [10/2021 - ]
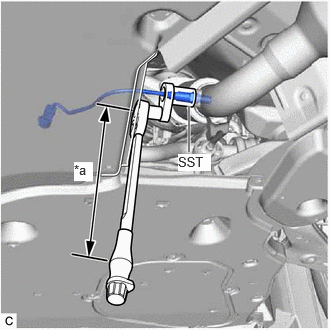
- Using SST, install the air fuel ratio sensor to the front exhaust pipe assembly (TWC: Rear Catalyst).
*a Torque Wrench Fulcrum Length - SST: 09224-00012
Specified tightening torque
Torque: 44 N.m (449 kgf/cm, 32 ft.lbf)
NOTE:If the air fuel ratio sensor has been struck or dropped, replace it.
HINT:
- Calculate the torque wrench reading when changing the fulcrum length of the torque wrench.
Refer to PRECAUTION [12/2019 - 11/2023] , or refer to PRECAUTION [11/2023 - ]
- When using SST (fulcrum length of 30 mm (1.18 in.)) + torque wrench (fulcrum length of 180 mm (7.09 in.)):
37.7 N.m (384 kgf/cm, 28 ft.lbf)
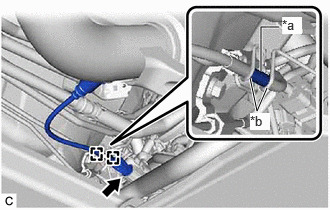
- Connect the air fuel ratio sensor connector.
*a Tube *b Wire Harness Clamp - Engage the 2 wire harness clamps so that the tube is positioned as shown in the illustration.
- Using SST, install the air fuel ratio sensor to the front exhaust pipe assembly (TWC: Rear Catalyst).
- INSPECT FOR EXHAUST GAS LEAK
Refer to PROCEDURE - Step 6 [12/2019 - 10/2022] , or refer to PROCEDURE - Step 6 [10/2022 - ]
- PERFORM INITIALIZATION
- Perform "Inspection After Repair" after replacing the air fuel ratio sensor.
Refer to INITIALIZATION [12/2019 - 10/2021] , or refer to INITIALIZATION [10/2021 - ]
- Perform "Inspection After Repair" after replacing the air fuel ratio sensor.