DTC P05A0-74: Active Grille Air Shutter "A" Actuator Slipping [12/2019 - 10/2021]: Procedure
- PERFORM UTILITY USING GTS (GRILL SHUTTER CONTROL MODE SWITCHING)
- According to the display on the GTS, change the grille shutter control mode from normal mode to maintenance mode.
Body Electrical > Grill Shutter > Utility
Tester Display Grill Shutter Control Mode Switching Result
Proceed to NEXT
Result:
NEXT
See step 2
- According to the display on the GTS, change the grille shutter control mode from normal mode to maintenance mode.
- PERFORM ACTIVE TEST USING GTS (GRILL SHUTTER OPERATION)
- According to the display on the GTS, perform the Active Test and read the Data List.
Body Electrical > Grill Shutter > Active Test
Active Test Display Shutter Closing Operation Lock Detection Data List Display Close Motor Lock End Shaft SW Standard
Active Test Item Data List Item Close Motor Lock End Shaft SW Shutter Closing Operation Lock Detection Detected Fully Closed Position - According to the display on the GTS, perform the Active Test and read the Data List.
Body Electrical > Grill Shutter > Active Test
Active Test Display Shutter Opening Operation Lock Detection Data List Display Open Motor Lock End Shaft SW Standard
Active Test Item Data List Item Open Motor Lock End Shaft SW Shutter Opening Operation Lock Detection Detected Fully Open Position HINT:
Perform "Grill Shutter Control Mode Switching and Grill Shutter Initialization" after replacing the swing grille actuator assembly.
Refer to INITIALIZATION [12/2019 - 10/2021]
Result
Proceed to OK NG
Result:
OK
REPLACE SWING GRILLE ACTUATOR ASSEMBLY
Refer to PROCEDURE - Step 2
Result:
NG
See step 3
- According to the display on the GTS, perform the Active Test and read the Data List.
- INSPECT SWING GRILLE ACTUATOR ASSEMBLY AND RADIATOR SHUTTER SUB-ASSEMBLY
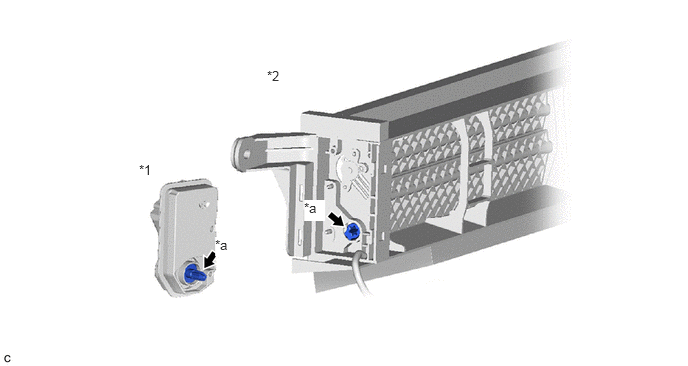
*1 Swing Grille Actuator Assembly *2 Radiator Shutter Sub-assembly *a Area to be inspected - - - Remove the radiator shutter sub-assembly.
Refer to PROCEDURE - Step 5 [12/2019 - 09/2020] , or refer to PROCEDURE - Step 5 [09/2020 - 10/2021]
- Remove the swing grille actuator assembly.
Refer to PROCEDURE - Step 2
- Check the connecting parts of the swing grille actuator assembly and radiator shutter sub-assembly shown in the illustration for wear and damage.
Result
Result Proceed to Swing grille actuator assembly is worn or damaged A Radiator shutter sub-assembly is worn or damaged B Normal C HINT:
Perform "Grill Shutter Control Mode Switching and Grill Shutter Initialization" after replacing the swing grille actuator assembly or radiator shutter sub-assembly.
Refer to INITIALIZATION [12/2019 - 10/2021]
Result:
A
REPLACE SWING GRILLE ACTUATOR ASSEMBLY
Refer to PROCEDURE - Step 2
Result:
B
REPLACE RADIATOR SHUTTER SUB-ASSEMBLY
Refer to PROCEDURE - Step 5 [12/2019 - 09/2020] , or refer to PROCEDURE - Step 5 [09/2020 - 10/2021]
Result:
C
See step 4
- Remove the radiator shutter sub-assembly.
- INSPECT RADIATOR SHUTTER SUB-ASSEMBLY (END SHAFT SWITCH)
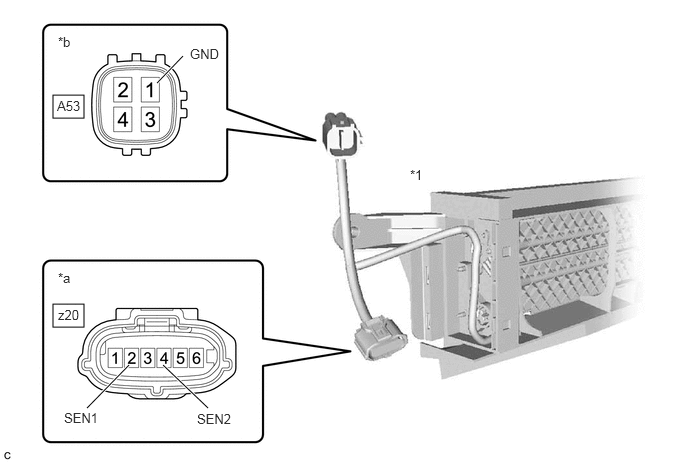
*1 Radiator Shutter Sub-assembly - - *a Front view of wire harness connector
(to Swing Grille Actuator Assembly)*b Component without harness connected
(Radiator Shutter Sub-assembly)- Remove the radiator shutter sub-assembly.
Refer to PROCEDURE - Step 5 [12/2019 - 09/2020] , or refer to PROCEDURE - Step 5 [09/2020 - 10/2021]
- Remove the swing grille actuator assembly.
Refer to PROCEDURE - Step 2
- Measure the resistance according to the value(s) in the table below.
Standard Resistance
Tester Connection Condition Specified Condition z20-2 (SEN-1) - A53-1 (GND) Grille shutter fully closed Below 1 Ω Grille shutter in any position other than fully closed 10 kΩ or higher z20-4 (SEN-2) - A53-1 (GND) Grille shutter fully open Below 1 Ω Grille shutter in any position other than fully open 10 kΩ or higher HINT:
Perform "Grill Shutter Control Mode Switching and Grill Shutter Initialization" after replacing the swing grille actuator assembly or radiator shutter sub-assembly.
Refer to INITIALIZATION [12/2019 - 10/2021]
Result
Proceed to OK NG
Result:
OK
REPLACE SWING GRILLE ACTUATOR ASSEMBLY
Refer to PROCEDURE - Step 2
Result:
NG
REPLACE RADIATOR SHUTTER SUB-ASSEMBLY
Refer to PROCEDURE - Step 5 [12/2019 - 09/2020] , or refer to PROCEDURE - Step 5 [09/2020 - 10/2021]
- Remove the radiator shutter sub-assembly.