Installation [11/2023 - ]: Procedure
- INSTALL HYBRID BATTERY TERMINAL BLOCK WARNING:
Be sure to wear insulated gloves.
- Install the hybrid battery terminal block to the HV battery with the nut.
*a Pin Torque: 7.5 N.m (76 kgf/cm, 66 in.lbf)
NOTE:Make sure to align the hole of the hybrid battery terminal block with the pin.
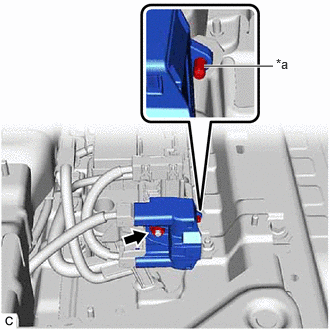
- Connect the 2 hybrid battery terminal block connectors.NOTE:
Make sure that the connectors are connected securely.
- Install the hybrid battery terminal block to the HV battery with the nut.
- INSTALL NO. 1 HYBRID BATTERY SHIELD SUB-ASSEMBLY WARNING:
Be sure to wear insulated gloves.
- Install the No. 1 hybrid battery shield sub-assembly with the 6 nuts.
Torque: 7.5 N.m (76 kgf/cm, 66 in.lbf)
- Install the electric vehicle battery plug assembly with the bolt.
Torque: 7.5 N.m (76 kgf/cm, 66 in.lbf)
- Install the No. 1 hybrid battery shield sub-assembly with the 6 nuts.
- CONNECT FLOOR WIRE WARNING:
Be sure to wear insulated gloves.
- Engage the 3 clamps.
- Connect the electric vehicle battery plug assembly connector.
- w/ 1500w Voltage Inverter
- Connect the shield ground with the nut.
Torque: 8.0 N.m (82 kgf/cm, 71 in.lbf)
- Engage the claw.
- Connect the 2 HV battery junction block assembly connectors.NOTE:
Make sure that the connectors are connected securely.
- Connect the shield ground with the nut.
- Connect the HV battery junction block assembly connector.NOTE:
Make sure that the connectors are connected securely.
- Engage the clamp.
- CONNECT FLOOR UNDER WIRE
Refer to PROCEDURE - Step 10
- INSTALL NO. 10 HV BATTERY SHIELD PANEL
Refer to PROCEDURE - Step 11
- INSTALL REAR FLOOR SILENCER
See step 7
- INSTALL FRONT FLOOR CARPET ASSEMBLY
See step 8
- INSTALL REAR CONSOLE BOX ASSEMBLY (for Captain Seat Type)
Refer to INSTALLATION [12/2019 - ]
- INSTALL REAR NO. 1 SEAT ASSEMBLY LH (for 60/40 Split Seat Type)
Refer to INSTALLATION [12/2019 - ]
- INSTALL REAR NO. 1 SEAT ASSEMBLY RH (for 60/40 Split Seat Type)
Refer to INSTALLATION [12/2019 - ]
- INSTALL REAR NO. 1 SEAT ASSEMBLY (for Captain Seat Type)
Refer to INSTALLATION [12/2019 - ]
- INSTALL SERVICE PLUG GRIP
Refer to INSTALLATION [11/2023 - ]
- PERFORM INITIALIZATION
Refer to WORK PROCEDURE [11/2023 - ]
- INITIALIZATION AFTER RECONNECTING AUXILIARY BATTERY TERMINAL
HINT:
When disconnecting and reconnecting the auxiliary battery, there is an automatic learning function that completes learning when the respective system is used.