Installation [12/2019 - ]: Procedure
- INSTALL FRONT DISC BRAKE ANTI-SQUEAL SHIM KIT NOTE:
- When replacing worn front disc brake pads, the front disc brake anti-squeal shims and front disc brake pad wear indicator plates must be replaced together with the front disc brake pads.
- Do not apply lubricants to the lining surface of the brake pad.
- Install the front disc brake pad wear indicator plates in the correct position and direction.
- Install the front disc brake anti-squeal shims in the correct position and direction.
- Check the front disc brake pad.
HINT:
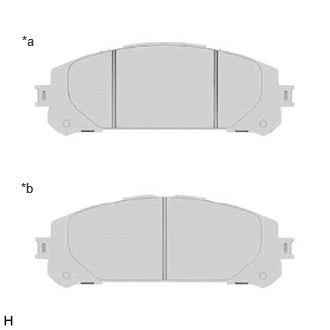
Use the illustration to identify the inner side front disc brake pad and outer side front disc brake pad so that they can be installed to the correct side of the caliper.
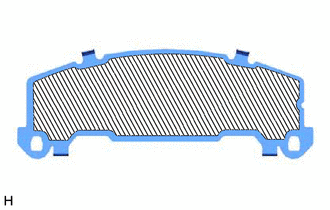
*a Outer Side *b Inner Side - Apply brake caliper grease (Part No. 08887-80609) to the location on the inside of the front No. 1 disc brake anti-squeal shim (outer side) shown in the illustration.

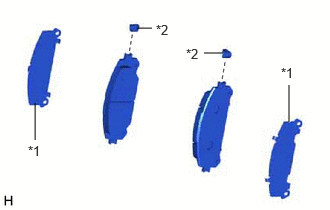
Brake Caliper Grease (Part No. 08887-80609) - Install the front No. 1 disc brake anti-squeal shim to each front disc brake pad.
*1 Front No. 1 Disc Brake Anti-squeal Shim *2 Front Disc Brake Pad Wear Indicator Plate - Install the front disc brake pad wear indicator plate to each front disc brake pad.
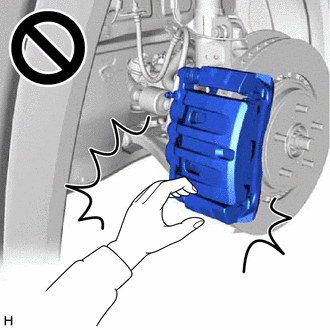
- INSTALL FRONT DISC BRAKE PAD WARNING:
- Be careful not to get pinched by the front disc brake cylinder assembly or other parts when installing the front disc brake pads.
- After lifting up the front disc brake cylinder assembly, secure it in place before performing any work on it.
- The front disc brake cylinder assembly could fall, pinching hands or fingers and causing injury.
- Push in the front disc brake pistons.NOTE:
- Make sure that the brake fluid does not overflow from the reservoir.
- Do not forcibly push in the front disc brake pistons.
- Install the 2 front disc brake pads to the front disc brake cylinder mounting.NOTE:
- Keep the friction surfaces of the front disc brake pads and front disc free from oil and grease.
- Install the front disc brake pad so that the pad wear indicator plate is mounted on the upper side of the vehicle.
- Install the 2 anti-squeal springs to the front disc brake pads.NOTE:
- When replacing the front disc brake pads with new ones, make sure to replace the anti-squeal springs at the same time.
- Be sure to install the anti-squeal springs into the front disc brake pad installation holes as far as they will go.
- Hold the front disc brake cylinder slide pin (lower side) and install the front disc brake cylinder assembly to the front disc brake cylinder mounting with the bolt.
Torque: 45 N.m (459 kgf/cm, 33 ft.lbf)
NOTE:- Install the front disc brake cylinder assembly while holding both of the front disc brake pads because the anti-squeal springs may fall off the front disc brake pads.
- Be sure that the anti-squeal springs are installed to the front disc brake pads.
- Depress the brake pedal several times. (for Gasoline Model)
- CONNECT CABLE TO NEGATIVE AUXILIARY BATTERY TERMINAL (for HV Model)
- Connect the reservoir level switch connector.
- Install the brake master cylinder reservoir assembly to the reservoir bracket with the bolt and nut.
Torque: 9.0 N.m (92 kgf/cm, 80 in.lbf)
- Engage the clamp to install the wire harness to the brake master cylinder reservoir assembly.
- Connect the cable to the negative (-) auxiliary battery terminal.
- Turn the ignition switch to ON (READY).
- Depress the brake pedal and release it.
- Clear the DTCs.
Refer to DTC CHECK / CLEAR [12/2019 - ]
- INSPECT BRAKE FLUID LEVEL IN RESERVOIR
for HV Model: Refer to ON-VEHICLE INSPECTION [12/2019 - ]
for Gasoline Model: Refer to ON-VEHICLE INSPECTION [12/2019 - ]
- INSTALL FRONT WHEEL