Installation [12/2019 - ]: Procedure
WARNING: This page is about a different variant/trim than selected.
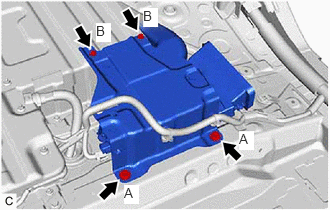
- INSTALL BATTERY COOLING BLOWER ASSEMBLY (for LH Side)
- Install the battery cooling blower assembly to the No. 2 battery cooling bracket with the 3 nuts.
Torque: 7.5 N.m (76 kgf/cm, 66 in.lbf)
NOTE:- Be sure not to touch the fan part of the battery cooling blower assembly.
- Do not lift the battery cooling blower assembly using the wire harness.
- Engage the clamp.
- Install the battery cooling blower assembly to the No. 2 battery cooling bracket with the 3 nuts.
- INSTALL NO. 1 HV BATTERY INTAKE DUCT LH
- Install the No. 1 HV battery intake duct LH to the battery cooling blower assembly with the clip.
- Engage the claw.
- INSTALL BLOWER SUB-ASSEMBLY (for LH Side)
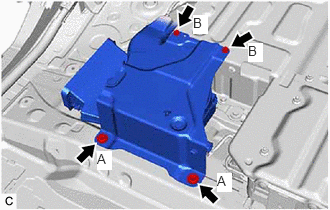
- INSTALL BATTERY COOLING BLOWER ASSEMBLY (for RH Side)
- Install the battery cooling blower assembly to the No. 1 battery cooling bracket with the 3 nuts.
Torque: 7.5 N.m (76 kgf/cm, 66 in.lbf)
NOTE:- Be sure not to touch the fan part of the battery cooling blower assembly.
- Do not lift the battery cooling blower assembly using the wire harness.
- Engage the clamp.
- Install the battery cooling blower assembly to the No. 1 battery cooling bracket with the 3 nuts.
- INSTALL NO. 1 HYBRID BATTERY INTAKE DUCT
- Install the No. 1 hybrid battery intake duct to the battery cooling blower assembly with the 2 clips.
- INSTALL BLOWER SUB-ASSEMBLY (for RH Side)
- INSTALL REAR FLOOR SILENCER
- Install the rear floor silencer with the 2 clips.
- INSTALL FRONT FLOOR CARPET ASSEMBLY
- Return the front floor carpet assembly to its original position.
- Install the 2 clips.
- INSTALL REAR CONSOLE BOX ASSEMBLY (for Captain Seat Type)
Refer to INSTALLATION [12/2019 - ]
- INSTALL REAR NO. 1 SEAT ASSEMBLY LH (for 60/40 Split Seat Type)
Refer to INSTALLATION [12/2019 - ]
- INSTALL REAR NO. 1 SEAT ASSEMBLY RH (for 60/40 Split Seat Type)
Refer to INSTALLATION [12/2019 - ]
- INSTALL REAR NO. 1 SEAT ASSEMBLY (for Captain Seat Type)
Refer to INSTALLATION [12/2019 - ]