Seat Belt Status Display Malfunction [12/2019 - 10/2022]: Procedure
- CHECK SEAT BELT WARNING FUNCTION
- Check the seat belt warning function.
Refer to ON-VEHICLE INSPECTION [12/2019 - 11/2023]
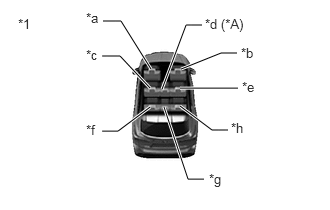
*A for 60/40 Split Seat Type (Rear No. 1 Seat) *1 Seat Belt Status Display (Combination Meter Assembly) *a Driver Seat *b Front Passenger Seat *c Rear No. 1 LH Seat *d Rear No. 1 Center Seat *e Rear No. 1 RH Seat *f Rear No. 2 LH Seat *g Rear No. 2 Center Seat *h Rear No. 2 RH Seat Result
Result Proceed to The seat belt status display (all seats) operates normally A The seat belt status display (all seats) does not operate normally B The driver seat belt status display does not operate normally C The front passenger seat belt status display does not operate normally The seat belt status display (rear No. 1 and rear No. 2 seats) does not operate normally D The seat belt status display (rear No. 1 RH seat) does not operate normally E The seat belt status display (rear No. 1 center seat) does not operate normally* F The seat belt status display (rear No. 1 LH seat) does not operate normally G The seat belt status display (rear No. 2 RH seat) does not operate normally H The seat belt status display (rear No. 2 center seat) does not operate normally I The seat belt status display (rear No. 2 LH seat) does not operate normally J - *: for 60/40 Split Seat Type (Rear No. 1 Seat)
Result:
A
USE SIMULATION METHOD TO CHECK. Refer to HOW TO PROCEED WITH TROUBLESHOOTING [12/2019 - ]
Result:
B
REPLACE COMBINATION METER ASSEMBLY. Refer to REMOVAL [12/2019 - ]
Result:
D
See step 3
Result:
E
See step 4
Result:
F
See step 7
Result:
G
See step 10
Result:
H
See step 13
Result:
I
See step 17
Result:
J
See step 22
Result:
C
See step 2
- Check the seat belt warning function.
- CHECK FRONT SEAT BELT WARNING LIGHT
- Check the front seat belt warning light operates normally.
Refer to ON-VEHICLE INSPECTION [12/2019 - 11/2023]
Result
Proceed to OK NG
Result:
OK
REPLACE COMBINATION METER ASSEMBLY. Refer to REMOVAL [12/2019 - ]
Result:
NG
GO TO OTHER DIAGNOSTIC PROCEDURE. Refer to PROBLEM SYMPTOMS TABLE [12/2019 - ]
- Check the front seat belt warning light operates normally.
- READ VALUE USING GTS
- Read the Data List according to the display on the GTS.
Body Electrical > Main Body > Data List
Tester Display Measurement Item Range Normal Condition Diagnostic Note RR Door Courtesy SW Rear door courtesy light switch RH ON or OFF ON: Rear door RH open
OFF: Rear door RH closed- RL Door Courtesy SW Rear door courtesy light switch LH ON or OFF ON: Rear door LH open
OFF: Rear door LH closed- Body Electrical > Main Body > Data List
Tester Display RR Door Courtesy SW RL Door Courtesy SW OK
ON or OFF appears on the GTS screen according to the rear door condition
Result
Proceed to OK NG
Result:
OK
REPLACE COMBINATION METER ASSEMBLY. Refer to REMOVAL [12/2019 - ]
Result:
NG
GO TO LIGHTING SYSTEM. Refer to HOW TO PROCEED WITH TROUBLESHOOTING [12/2019 - 11/2023]
- Read the Data List according to the display on the GTS.
- READ VALUE USING GTS
- Read the Data List according to the display on the GTS.
Body Electrical > Combination Meter > Data List
Tester Display Measurement Item Range Normal Condition Diagnostic Note Rear Right Seat Buckle / Occupant Detection Warning Switch Rear No. 1 seat belt RH buckle switch OFF or ON OFF: Rear No. 1 seat belt RH fastened
ON: Rear No. 1 seat belt RH unfastened- Body Electrical > Combination Meter > Data List
Tester Display Rear Right Seat Buckle / Occupant Detection Warning Switch Result
Result Proceed to ON or OFF does not appear on the GTS screen according to the rear seat belt condition OK ON or OFF appears on the GTS screen according to the rear seat belt condition NG
Result:
NG
REPLACE COMBINATION METER ASSEMBLY. Refer to REMOVAL [12/2019 - ]
Result:
OK
See step 5
- Read the Data List according to the display on the GTS.
- INSPECT REAR SEAT INNER BELT ASSEMBLY RH
for Captain Seat Type (Rear No. 1 Seat): Refer to INSPECTION [12/2019 - ]
for 60/40 Split Seat Type (Rear No. 1 Seat): Refer to INSPECTION [12/2019 - ]
Result
Proceed to OK NG Result:
NG
REPLACE REAR SEAT INNER BELT ASSEMBLY RH
for Captain Seat Type (Rear No. 1 Seat): Refer to REMOVAL [12/2019 - ]
for 60/40 Split Seat Type (Rear No. 1 Seat): Refer to REMOVAL [12/2019 - ]
Result:
OK
See step 6
- CHECK HARNESS AND CONNECTOR (REAR SEAT INNER BELT ASSEMBLY RH - COMBINATION METER ASSEMBLY AND BODY GROUND)
- Disconnect the H21 combination meter assembly connector.
- Measure the resistance according to the value(s) in the table below.
Standard Resistance
FOR 60/40 SPLIT SEAT TYPE (REAR NO. 1 SEAT)Tester Connection Condition Specified Condition f2-1 - H21-26 (RRSB) Always Below 1 Ω f2-1 or H21-26 (RRSB) - Body ground Always 10 kΩ or higher f2-4 - Body ground Always Below 1 Ω FOR CAPTAIN SEAT TYPE (REAR NO. 1 SEAT)Tester Connection Condition Specified Condition f2-3 - H21-26 (RRSB) Always Below 1 Ω f2-3 or H21-26 (RRSB) - Body ground Always 10 kΩ or higher f2-5 - Body ground Always Below 1 Ω Result
Proceed to OK NG
Result:
OK
REPLACE COMBINATION METER ASSEMBLY. Refer to REMOVAL [12/2019 - ]
Result:
NG
REPAIR OR REPLACE HARNESS OR CONNECTOR
- READ VALUE USING GTS
- Read the Data List according to the display on the GTS.
Body Electrical > Combination Meter > Data List
Tester Display Measurement Item Range Normal Condition Diagnostic Note Rear Center Seat Buckle / Occupant Detection Warning Switch Rear No. 1 seat belt center buckle switch OFF or ON OFF: Rear No. 1 seat belt center fastened
ON: Rear No. 1 seat belt center unfastened- Body Electrical > Combination Meter > Data List
Tester Display Rear Center Seat Buckle / Occupant Detection Warning Switch Result
Result Proceed to ON or OFF does not appear on the GTS screen according to the rear seat belt condition A ON or OFF appears on the GTS screen according to the rear seat belt condition B
Result:
B
REPLACE COMBINATION METER ASSEMBLY. Refer to REMOVAL [12/2019 - ]
Result:
A
See step 8
- Read the Data List according to the display on the GTS.
- INSPECT REAR SEAT INNER BELT ASSEMBLY (CENTER)
Refer to INSPECTION [12/2019 - ]
Result
Proceed to OK NG Result:
NG
REPLACE REAR SEAT INNER BELT ASSEMBLY (CENTER). Refer to REMOVAL [12/2019 - ]
Result:
OK
See step 9
- CHECK HARNESS AND CONNECTOR (REAR SEAT INNER BELT ASSEMBLY (CENTER) - COMBINATION METER ASSEMBLY AND BODY GROUND)
- Disconnect the H21 combination meter assembly connector.
- Measure the resistance according to the value(s) in the table below.
Standard Resistance
Tester Connection Condition Specified Condition f3-2 - H21-25 (RCSB) Always Below 1 Ω f3-2 or H21-25 (RCSB) - Body ground Always 10 kΩ or higher f3-5 - Body ground Always Below 1 Ω Result
Proceed to OK NG
Result:
OK
REPLACE COMBINATION METER ASSEMBLY. Refer to REMOVAL [12/2019 - ]
Result:
NG
REPAIR OR REPLACE HARNESS OR CONNECTOR
- READ VALUE USING GTS
- Read the Data List according to the display on the GTS.
Body Electrical > Combination Meter > Data List
Tester Display Measurement Item Range Normal Condition Diagnostic Note Rear Left Seat Buckle / Occupant Detection Warning Switch Rear No. 1 seat belt LH buckle switch OFF or ON OFF: Rear No. 1 seat belt LH fastened
ON: Rear No. 1 seat belt LH unfastened- Body Electrical > Combination Meter > Data List
Tester Display Rear Left Seat Buckle / Occupant Detection Warning Switch Result
Result Proceed to ON or OFF does not appear on the GTS screen according to the rear seat belt condition A ON or OFF appears on the GTS screen according to the rear seat belt condition B
Result:
B
REPLACE COMBINATION METER ASSEMBLY. Refer to REMOVAL [12/2019 - ]
Result:
A
See step 11
- Read the Data List according to the display on the GTS.
- INSPECT REAR SEAT INNER BELT ASSEMBLY LH
for Captain Seat Type (Rear No. 1 Seat): Refer to INSPECTION [12/2019 - ]
for 60/40 Split Seat Type (Rear No. 1 Seat): Refer to INSPECTION [12/2019 - ]
Result
Proceed to OK NG Result:
NG
REPLACE REAR SEAT INNER BELT ASSEMBLY LH
for Captain Seat Type (Rear No. 1 Seat): Refer to REMOVAL [12/2019 - ]
for 60/40 Split Seat Type (Rear No. 1 Seat): Refer to REMOVAL [12/2019 - ]
Result:
OK
See step 12
- CHECK HARNESS AND CONNECTOR (REAR SEAT INNER BELT ASSEMBLY LH - COMBINATION METER ASSEMBLY AND BODY GROUND)
- Disconnect the H21 combination meter assembly connector.
- Measure the resistance according to the value(s) in the table below.
Standard Resistance
Tester Connection Condition Specified Condition f6-3 - H21-24 (RLSB) Always Below 1 Ω f6-3 or H21-24 (RLSB) - Body ground Always 10 kΩ or higher f6-5 - Body ground Always Below 1 Ω Result
Proceed to OK NG
Result:
OK
REPLACE COMBINATION METER ASSEMBLY. Refer to REMOVAL [12/2019 - ]
Result:
NG
REPAIR OR REPLACE HARNESS OR CONNECTOR
- READ VALUE USING GTS
- Read the Data List according to the display on the GTS.
Body Electrical > Combination Meter > Data List
Tester Display Measurement Item Range Normal Condition Diagnostic Note 3rd Right Seat Buckle / Occupant Detection Warning Switch Rear No. 2 seat belt RH buckle switch OFF or ON OFF: Rear No. 2 seat belt RH fastened
ON: Rear No. 2 seat belt RH unfastened- Body Electrical > Combination Meter > Data List
Tester Display 3rd Right Seat Buckle / Occupant Detection Warning Switch Result
Result Proceed to ON or OFF does not appear on the GTS screen according to the rear seat belt condition A ON or OFF appears on the GTS screen according to the rear seat belt condition B
Result:
B
REPLACE COMBINATION METER ASSEMBLY. Refer to REMOVAL [12/2019 - ]
Result:
A
See step 14
- Read the Data List according to the display on the GTS.
- INSPECT REAR NO. 2 SEAT INNER BELT ASSEMBLY LH
Refer to INSPECTION [12/2019 - ]
Result
Proceed to OK NG Result:
NG
REPLACE REAR NO. 2 SEAT INNER BELT ASSEMBLY LH. Refer to REMOVAL [12/2019 - ]
Result:
OK
See step 15
- INSPECT REAR NO. 2 SEAT INNER BELT ASSEMBLY RH
Refer to INSPECTION [12/2019 - ]
Result
Proceed to OK NG Result:
NG
REPLACE REAR NO. 2 SEAT INNER BELT ASSEMBLY RH. Refer to REMOVAL [12/2019 - ]
Result:
OK
See step 16
- CHECK HARNESS AND CONNECTOR (REAR NO. 2 SEAT INNER BELT ASSEMBLY LH - COMBINATION METER ASSEMBLY AND BODY GROUND)
- Disconnect the H21 combination meter assembly connector.
- Measure the resistance according to the value(s) in the table below.
Standard Resistance
Tester Connection Condition Specified Condition M69-1 (+) - H21-3 (RRBT) Always Below 1 Ω M69-1 (+) or H21-3 (RRBT) - Body ground Always 10 kΩ or higher M69-4 (E) - Body ground Always Below 1 Ω Result
Proceed to OK NG
Result:
OK
REPLACE COMBINATION METER ASSEMBLY. Refer to REMOVAL [12/2019 - ]
Result:
NG
REPAIR OR REPLACE HARNESS OR CONNECTOR
- READ VALUE USING GTS
- Read the Data List according to the display on the GTS.
Body Electrical > Combination Meter > Data List
Tester Display Measurement Item Range Normal Condition Diagnostic Note 3rd Center Seat Buckle / Occupant Detection Warning Switch Rear No. 2 seat belt center buckle switch OFF or ON OFF: Rear No. 2 seat belt center fastened
ON: Rear No. 2 seat belt center unfastened- Body Electrical > Combination Meter > Data List
Tester Display 3rd Center Seat Buckle / Occupant Detection Warning Switch Result
Result Proceed to ON or OFF does not appear on the GTS screen according to the rear seat belt condition A ON or OFF appears on the GTS screen according to the rear seat belt condition B
Result:
B
REPLACE COMBINATION METER ASSEMBLY. Refer to REMOVAL [12/2019 - ]
Result:
A
See step 18
- Read the Data List according to the display on the GTS.
- INSPECT REAR NO. 2 SEAT INNER BELT ASSEMBLY LH
Refer to INSPECTION [12/2019 - ]
Result
Proceed to OK NG Result:
NG
REPLACE REAR NO. 2 SEAT INNER BELT ASSEMBLY LH. Refer to REMOVAL [12/2019 - ]
Result:
OK
See step 19
- INSPECT REAR NO. 2 SEAT INNER BELT ASSEMBLY RH
Refer to INSPECTION [12/2019 - ]
Result
Proceed to OK NG Result:
NG
REPLACE REAR NO. 2 SEAT INNER BELT ASSEMBLY RH. Refer to REMOVAL [12/2019 - ]
Result:
OK
See step 20
- INSPECT REAR NO. 2 SEAT INNER BELT ASSEMBLY (CENTER)
Refer to INSPECTION [12/2019 - ]
Result
Proceed to OK NG Result:
NG
REPLACE REAR NO. 2 SEAT INNER BELT ASSEMBLY (CENTER). Refer to REMOVAL [12/2019 - ]
Result:
OK
See step 21
- CHECK HARNESS AND CONNECTOR (REAR NO. 2 SEAT INNER BELT ASSEMBLY LH - COMBINATION METER ASSEMBLY AND BODY GROUND)
- Disconnect the H21 combination meter assembly connector.
- Measure the resistance according to the value(s) in the table below.
Standard Resistance
Tester Connection Condition Specified Condition M69-2 (+) - H21-23 (RCBT) Always Below 1 Ω M69-2 (+) or H21-23 (RCBT) - Body ground Always 10 kΩ or higher M69-5 (E) - Body ground Always Below 1 Ω Result
Proceed to OK NG
Result:
OK
REPLACE COMBINATION METER ASSEMBLY. Refer to REMOVAL [12/2019 - ]
Result:
NG
REPAIR OR REPLACE HARNESS OR CONNECTOR
- READ VALUE USING GTS
- Read the Data List according to the display on the GTS.
Body Electrical > Combination Meter > Data List
Tester Display Measurement Item Range Normal Condition Diagnostic Note 3rd Left Seat Buckle / Occupant Detection Warning Switch Rear No. 2 seat belt LH buckle switch OFF or ON OFF: Rear No. 2 seat belt LH fastened
ON: Rear No. 2 seat belt LH unfastened- Body Electrical > Combination Meter > Data List
Tester Display 3rd Left Seat Buckle / Occupant Detection Warning Switch Result
Result Proceed to ON or OFF does not appear on the GTS screen according to the rear seat belt condition A ON or OFF appears on the GTS screen according to the rear seat belt condition B
Result:
B
REPLACE COMBINATION METER ASSEMBLY. Refer to REMOVAL [12/2019 - ]
Result:
A
See step 23
- Read the Data List according to the display on the GTS.
- INSPECT REAR NO. 2 SEAT INNER BELT ASSEMBLY LH
Refer to INSPECTION [12/2019 - ]
Result
Proceed to OK NG Result:
NG
REPLACE REAR NO. 2 SEAT INNER BELT ASSEMBLY LH. Refer to REMOVAL [12/2019 - ]
Result:
OK
See step 24
- CHECK HARNESS AND CONNECTOR (REAR NO. 2 SEAT INNER BELT ASSEMBLY LH - COMBINATION METER ASSEMBLY AND BODY GROUND)
- Disconnect the H21 combination meter assembly connector.
- Measure the resistance according to the value(s) in the table below.
Standard Resistance
Tester Connection Condition Specified Condition M69-3 (+) - H21-13 (RLBT) Always Below 1 Ω M69-3 (+) or H21-13 (RLBT) - Body ground Always 10 kΩ or higher M69-6 (E) - Body ground Always Below 1 Ω Result
Proceed to OK NG
Result:
OK
REPLACE COMBINATION METER ASSEMBLY. Refer to REMOVAL [12/2019 - ]
Result:
NG
REPAIR OR REPLACE HARNESS OR CONNECTOR