Installation [12/2019 - ]: Procedure
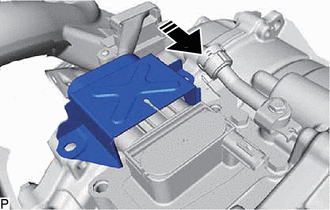
- INSTALL DIFFERENTIAL SUPPORT PROTECTOR
HINT:
Perform this procedure only when replacement of the differential support protector or front differential support assembly is necessary.
- Install the differential support protector to the front differential support assembly with the 2 bolts.
Torque: 7.0 N.m (71 kgf/cm, 62 in.lbf)
- Install the differential support protector to the front differential support assembly with the 2 bolts.
- INSTALL REAR TRACTION MOTOR FILLER PLUG
- Using a 10 mm hexagon socket wrench, install the rear traction motor filler plug and a new gasket to the rear traction motor with transaxle assembly.
Torque: 39 N.m (398 kgf/cm, 29 ft.lbf)
- Using a 10 mm hexagon socket wrench, install the rear traction motor filler plug and a new gasket to the rear traction motor with transaxle assembly.
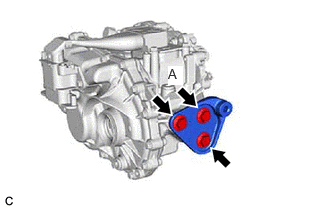
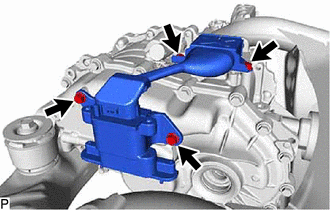
- INSTALL DIFFERENTIAL SUPPORT
- Install the differential support to the rear traction motor with transaxle assembly with the 3 bolts.
Torque: 120 N.m (1224 kgf/cm, 89 ft.lbf)
NOTE:First install the bolt (A).
- Install the differential support to the rear traction motor with transaxle assembly with the 3 bolts.
- TEMPORARILY INSTALL FRONT DIFFERENTIAL SUPPORT ASSEMBLY
- Temporarily install the front differential support assembly to the rear traction motor with transaxle assembly with 2 new bolts.
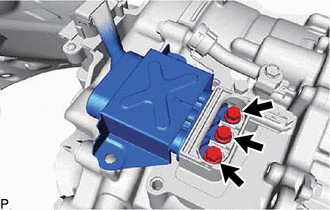
- INSTALL WIRE HARNESS CLAMP BRACKET
- Install the wire harness clamp bracket to the rear traction motor with transaxle assembly with the 2 bolts.
Torque: 8.0 N.m (82 kgf/cm, 71 in.lbf)
- Install the wire harness clamp bracket to the rear traction motor with transaxle assembly with the 2 bolts.
- INSTALL REAR TRACTION MOTOR WITH TRANSAXLE ASSEMBLY
- Using 2 straps, hold the rear traction motor with transaxle assembly.WARNING:
- Do not lift the rear traction motor with transaxle assembly more than necessary.
- When lifting the rear traction motor with transaxle assembly, make sure it is well balanced.
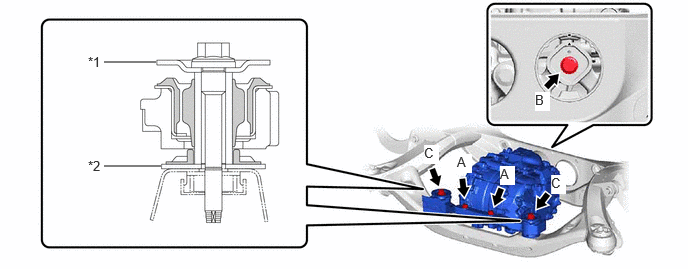
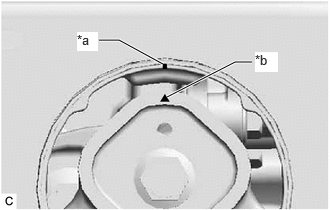
- Temporarily install the 2 upper differential mount stoppers, 2 lower differential mount stoppers and rear traction motor with transaxle assembly to the rear suspension member sub-assembly with 3 new bolts.
*1 Upper Differential Mount Stopper *2 Lower Differential Mount Stopper - Fully tighten the 2 bolts (A).
Torque: 55 N.m (561 kgf/cm, 41 ft.lbf)
- Fully tighten the bolt (B).
Torque: 130 N.m (1326 kgf/cm, 96 ft.lbf)
- Fully tighten the 2 bolts (C).
Torque: 86 N.m (877 kgf/cm, 63 ft.lbf)
- Using 2 straps, hold the rear traction motor with transaxle assembly.
- INSTALL REAR TRACTION MOTOR CABLE WARNING:
Be sure to wear insulated gloves.
NOTE:- Protect the rear traction motor cable with a plastic bag or other protective material until immediately before reconnection.
- Do not allow foreign matter or water to enter the rear traction motor cable terminal or installation area.
- Do not touch the rubber seal and terminals of the rear traction motor cable.
HINT:
Unnecessary to remove the rear traction motor cable unless inspection or replacement.
- Clean the area around the terminal of the rear traction motor cable, and then blow air on the terminal to remove dust and other foreign matter.NOTE:
- Blowing air without cleaning first may cause dust and other foreign matter to enter the terminal.
- Dust or other foreign matter entering the terminal when installing the rear traction motor cable may cause a short or electrical leakage.
- Using an insulated tool, install the rear traction motor cable to the rear traction motor with transaxle assembly with the 3 bolts.
Torque: 10 N.m (102 kgf/cm, 7 ft.lbf)
- Engage the 2 claws to install a new motor cable terminal cap to the rear traction motor with transaxle assembly.NOTE:
- Do not pinch the O-ring.
- Check that the motor cable terminal cap is securely installed.
- Slide the cover on the top side of the rear traction motor cable.

Slide cover on top side - Install the 4 bolts of the rear traction motor cable.
Torque: 22 N.m (224 kgf/cm, 16 ft.lbf)
- INSTALL REAR SUSPENSION MEMBER SUB-ASSEMBLY
Refer to INSTALLATION [12/2019 - ]
- PERFORM RESOLVER LEARNING NOTE:
If the rear traction motor with transaxle assembly has been replaced, make sure to perform resolver learning.
Refer to UTILITY [12/2019 - 11/2023] , or refer to UTILITY [11/2023 - ]