Installation [12/2019 - ]: Procedure
WARNING: This page is about a different variant/trim than selected.
- INSTALL OIL PRESSURE AND TEMPERATURE SENSOR
- Apply adhesive to the area shown in the illustration.
Adhesive
Toyota Genuine Adhesive 1344, Three Bond 1344 or equivalent
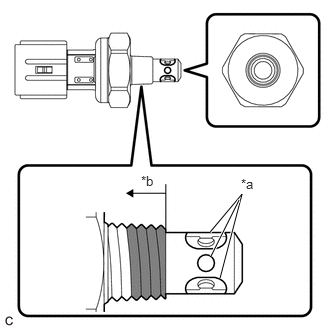
*a Oil Inlet Port *b 3 Threads or More 
Adhesive Application Area NOTE:- Do not apply adhesive to the oil inlet port of the oil pressure and temperature sensor.
- Apply the adhesive to the first 3 threads or more of the oil pressure and temperature sensor.
- Apply adhesive to the entire circumference of the thread.
- To prevent contamination by foreign matter, install immediately after applying adhesive.
- Using a 24 mm deep socket wrench, install the oil pressure and temperature sensor.
Torque: 15 N.m (153 kgf/cm, 11 ft.lbf)
NOTE:Do not start the engine within 1 hour of installation.
- Connect the oil pressure and temperature sensor connector.
- Apply adhesive to the area shown in the illustration.
- INSPECT FOR ENGINE OIL LEAK
Refer to PROCEDURE - Step 6 [12/2019 - 10/2021] , or refer to PROCEDURE - Step 6 [10/2021 - 10/2022] , or refer to PROCEDURE - Step 6 [10/2022 - 11/2023] , or refer to PROCEDURE - Step 6 [11/2023 - ]
- INSTALL NO. 2 ENGINE UNDER COVER ASSEMBLY
See step 6