Replacement [11/2023 - ]: Procedure
- REMOVE REAR DRIVE SHAFT ASSEMBLY
Refer to REMOVAL [11/2023 - ]
- REMOVE TRANSMISSION COUPLING DUST SEAL
- REMOVE TORQUE VECTORING DIFFERENTIAL CARRIER ASSEMBLY
Refer to REMOVAL [11/2023 - ]
- REMOVE CLUTCH CONTROL SOLENOID WIRE
See step 1
- REMOVE WIRE HARNESS CLAMP BRACKET
See step 2
- REMOVE DIFFERENTIAL DISCONNECT COVER
See step 3
- REMOVE ELECTRO MAGNETIC CONTROL COUPLING SUB-ASSEMBLY (for LH Side)
See step 11
- REMOVE ELECTRO MAGNETIC CONTROL COUPLING SUB-ASSEMBLY (for RH Side)
HINT:
Perform the same procedure as for the LH side.
- SECURE REAR DIFFERENTIAL CARRIER ASSEMBLY
See step 15
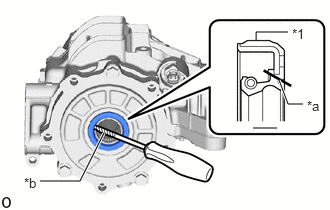
- REMOVE REAR DIFFERENTIAL CARRIER OIL SEAL (for LH Side)
- Using a knife, cut off the lip of the rear differential carrier oil seal.
*1 Rear Differential Carrier Oil Seal *a Cut Position *b Protective Tape - Using a screwdriver with its tip wrapped with protective tape, pry out the rear differential carrier oil seal.NOTE:
Do not damage the rear differential carrier assembly.
- Using a knife, cut off the lip of the rear differential carrier oil seal.
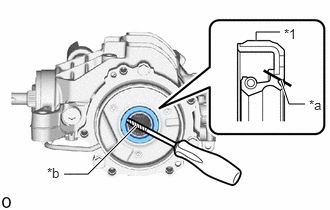
- REMOVE REAR DIFFERENTIAL CARRIER OIL SEAL (for RH Side)
- Using a knife, cut off the lip of the rear differential carrier oil seal.
*1 Rear Differential Carrier Oil Seal *a Cut Position *b Protective Tape - Using a screwdriver with its tip wrapped with protective tape, pry out the rear differential carrier oil seal.NOTE:
Do not damage the rear differential carrier assembly.
- Using a knife, cut off the lip of the rear differential carrier oil seal.
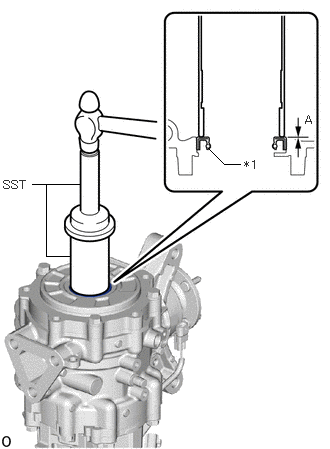
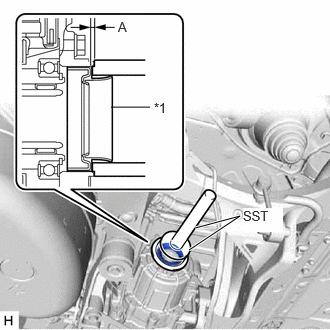
- INSTALL REAR DIFFERENTIAL CARRIER OIL SEAL (for LH Side)
- Coat the lip of a new rear differential carrier oil seal with MP grease.
- Using SST and a hammer, install the rear differential carrier oil seal.
- SST: 09223-46011
- SST: 09523-36010
Standard Distance (A)
-0.5 to 0.5 mm (-0.0197 to 0.0197 in.)
NOTE:- Install the rear differential carrier oil seal uniformly.
- Press fit the rear differential carrier oil seal straight.
- Do not damage the rear differential carrier oil seal.
- Do not excessively press in the rear differential carrier oil seal.
- Make sure to install the rear differential carrier oil seal as specified, otherwise a malfunction such as an oil leak may occur.
*1 Rear Differential Carrier Oil Seal
- INSTALL REAR DIFFERENTIAL CARRIER OIL SEAL (for RH Side)
- Coat the lip of a new rear differential carrier oil seal with MP grease.
- Using SST and a hammer, install the rear differential carrier oil seal.
- SST: 09223-46011
- SST: 09523-36010
Standard Distance (A)
-0.5 to 0.5 mm (-0.0197 to 0.0197 in.)
NOTE:- Install the rear differential carrier oil seal uniformly.
- Press fit the rear differential carrier oil seal straight.
- Do not damage the rear differential carrier oil seal.
- Do not excessively press in the rear differential carrier oil seal.
- Make sure to install the rear differential carrier oil seal as specified, otherwise a malfunction such as an oil leak may occur.
*1 Rear Differential Carrier Oil Seal
- INSTALL ELECTRO MAGNETIC CONTROL COUPLING SUB-ASSEMBLY (for LH Side)
See step 12
- INSTALL ELECTRO MAGNETIC CONTROL COUPLING SUB-ASSEMBLY (for RH Side)
HINT:
Perform the same procedure as for the LH side.
- INSTALL DIFFERENTIAL DISCONNECT COVER
See step 20
- INSTALL WIRE HARNESS CLAMP BRACKET
See step 21
- INSTALL CLUTCH CONTROL SOLENOID WIRE
See step 22
- INSTALL TORQUE VECTORING DIFFERENTIAL CARRIER ASSEMBLY
Refer to INSTALLATION [12/2019 - ]
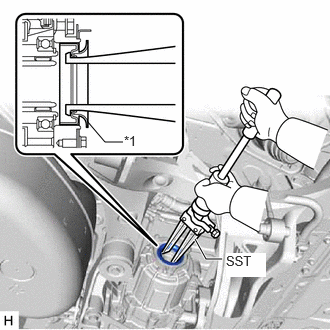
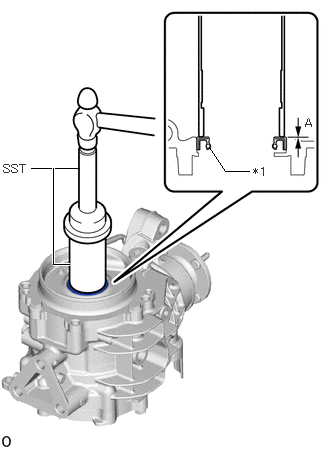
- INSTALL TRANSMISSION COUPLING DUST SEAL
- Coat the lip of a new transmission coupling dust seal with MP grease.
- Using SST and a hammer, install the transmission coupling dust seal to the electro magnetic control coupling sub-assembly.
- SST: 09316-10010
- SST: 09950-70010
- 09951-07150
Standard Distance (A)
2.0 to 2.8 mm (0.0788 to 0.1102 in.)
*1 Transmission Coupling Dust Seal NOTE:- Install the transmission coupling dust seal uniformly.
- Press fit the transmission coupling dust seal straight.
- Do not damage the transmission coupling dust seal.
- Do not damage the No. 1 rear differential dust deflector.
- Do not excessively press in the transmission coupling dust seal.
- Make sure to install the transmission coupling dust seal as specified, otherwise a malfunction such as an oil leak may occur.
- INSTALL REAR DRIVE SHAFT ASSEMBLY
Refer to INSTALLATION [10/2022 - ]