Reassembly [12/2019 - ]: Procedure
- INSTALL REAR DIFFERENTIAL CARRIER OIL SEAL (for LH Side)
See step 12 [12/2019 - 10/2022], or see step 12 [10/2022 - 11/2023], or see step 12 [11/2023 - ]
- INSTALL REAR DIFFERENTIAL CARRIER OIL SEAL (for RH Side)
See step 13 [12/2019 - 10/2022], or see step 13 [10/2022 - 11/2023], or see step 13 [11/2023 - ]
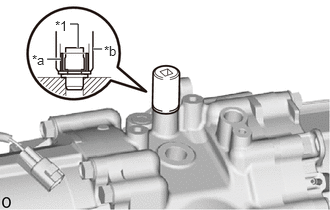
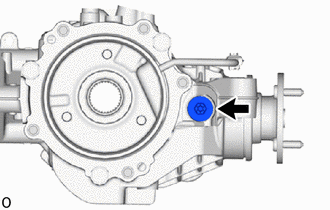
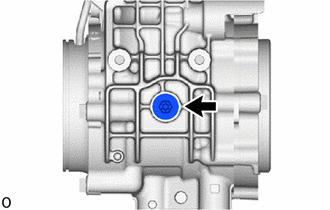
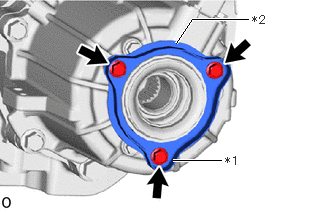
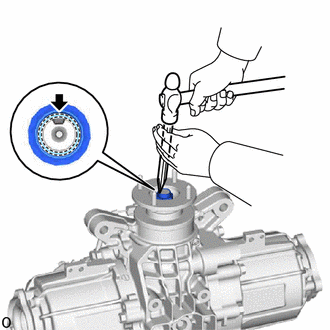
- INSTALL REAR DIFFERENTIAL BREATHER PLUG
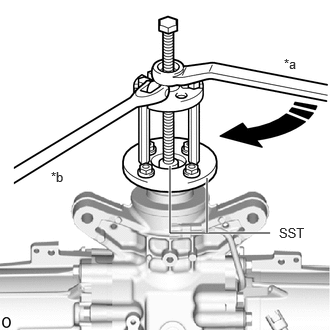
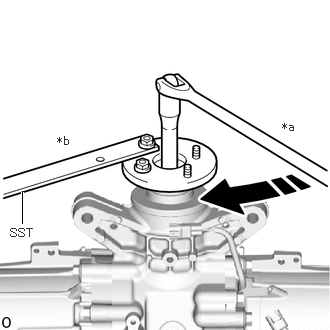
- Using a socket wrench, service nut and hammer, install a new rear differential breather plug to the rear differential carrier assembly.
HINT:
- Use a service nut with an inner diameter of 13 mm (0.512 in.) and a socket wrench appropriate for the service nut.
- Tap in the rear differential breather plug until it sits flush with the rear differential carrier assembly.
*1 Rear Differential Breather Plug *a Service Nut *b Socket Wrench
- Using a socket wrench, service nut and hammer, install a new rear differential breather plug to the rear differential carrier assembly.
- INSTALL TEMPERATURE SENSOR
See step 1
- INSTALL NO. 2 4 WHEEL DRIVE POSITION SWITCH
- INSTALL TRANSMISSION REVOLUTION SENSOR
- INSTALL REAR DIFFERENTIAL CARRIER COVER PLUG
- INSTALL REAR DIFFERENTIAL FILLER PLUG
- INSTALL REAR DIFFERENTIAL DRAIN PLUG
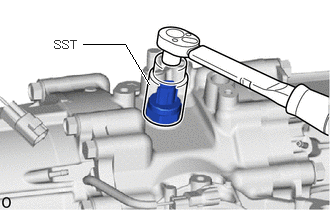
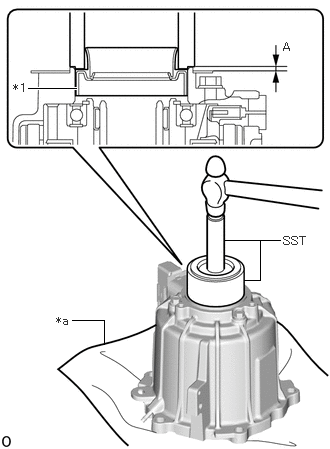
- INSTALL TRANSMISSION COUPLING DUST SEAL (for LH Side)
- Using SST and a hammer, install a new transmission coupling dust seal to the electro magnetic control coupling sub-assembly.
- SST: 09316-10010
- SST: 09950-70010
- 09951-07150
Standard Distance (A)
2.0 to 2.8 mm (0.0788 to 0.1102 in.)
NOTE:- Install the transmission coupling dust seal uniformly.
- Press fit the transmission coupling dust seal straight.
- Do not damage the transmission coupling dust seal.
- Do not excessively press in the transmission coupling dust seal.
- Make sure to install the transmission coupling dust seal as specified, otherwise a malfunction such as an oil leak may occur.
HINT:
Make sure to place the electro magnetic control coupling sub-assembly on a clean piece of cloth when performing this step.
*1 Transmission Coupling Dust Seal *a Cloth - Apply a light coat of MP grease to the lip of the transmission coupling dust seal.
- Using SST and a hammer, install a new transmission coupling dust seal to the electro magnetic control coupling sub-assembly.
- INSTALL TRANSMISSION COUPLING DUST SEAL (for RH Side)
HINT:
Perform the same procedure as for the LH side.
- INSTALL ELECTRO MAGNETIC CONTROL COUPLING SUB-ASSEMBLY (for LH Side)
- INSTALL ELECTRO MAGNETIC CONTROL COUPLING SUB-ASSEMBLY (for RH Side)
HINT:
Perform the same procedure as for the LH side.
- INSTALL NO. 1 REAR DIFFERENTIAL DUST DEFLECTOR (for LH Side)
- INSTALL NO. 1 REAR DIFFERENTIAL DUST DEFLECTOR (for RH Side)
HINT:
Perform the same procedure as for the LH side.
- INSTALL REAR DIFFERENTIAL CARRIER OIL SEAL (for Front Side)
See step 7 [12/2019 - 10/2022], or see step 7 [10/2022 - 11/2023], or see step 7 [11/2023 - ]
- INSTALL REAR DRIVE PINION COMPANION FLANGE SUB-ASSEMBLY
- Using SST, install the rear drive pinion companion flange sub-assembly.
- SST: 09950-30012
- 09951-03010
- 09953-03010
- 09954-03010
- 09955-03030
- 09956-03020
*a Turn *b Hold - SST: 09950-30012
- Using SST, temporarily install a new rear drive pinion nut.
*a Turn *b Hold - SST: 09330-00021
Torque: 140 N.m (1428 kgf/cm, 103 ft.lbf)
WARNING:The total preload may be within the standard even when the rear drive pinion companion flange sub-assembly is loose. If the rear drive pinion companion flange sub-assembly is installed in this state, the vehicle may be damaged or lead to a serious accident.
NOTE:Tighten the rear drive pinion nut until there is no more looseness in the rear drive pinion companion flange sub-assembly and it turns to the right and left with the same amount of force.
HINT:
After temporarily installing the rear drive pinion nut, be sure to adjust the preload.
- Using SST, install the rear drive pinion companion flange sub-assembly.
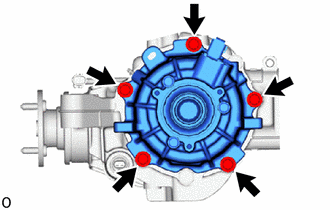
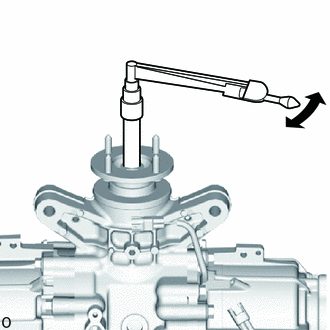
- INSPECT TOTAL PRELOAD
- Using a torque wrench, measure the total preload (starting torque) with the teeth of the differential drive pinion and differential ring gear in contact.
HINT:
- The torque wrench should be installed as shown in the illustration.
- For a more accurate measurement, rotate the bearing forward and backward several times before the measurement.
- Use the preload value measured prior to disassembling the torque vectoring differential carrier assembly as the standard value.
- Adjust within the standard value (Adjustable range within +/- 0.2 N.m of the measured preload value).
- If the preload is not as specified, perform the procedures below.
- If the measured preload is higher than the standard value:
Replace the rear drive pinion bearing and rear differential drive pinion bearing spacer, and then adjust the preload again.
- If the measured preload is lower than the standard value:
Tighten the rear drive pinion nut, and then adjust the preload again.
- If the measured preload is higher than the standard value:
- Using a torque wrench, measure the total preload (starting torque) with the teeth of the differential drive pinion and differential ring gear in contact.
- INSTALL REAR DRIVE PINION NUT
- INSTALL DIFFERENTIAL DISCONNECT COVER
- INSTALL WIRE HARNESS CLAMP BRACKET
- INSTALL CLUTCH CONTROL SOLENOID WIRE