DTC B2311: Power Window Motor Malfunction [12/2019 - ]: Procedure
- CHECK FOR DTC
- Clear the DTCs.
Body Electrical > D-Door Motor > Clear DTCs
Body Electrical > P-Door Motor > Clear DTCs
Body Electrical > RL-Door Motor > Clear DTCs
Body Electrical > RR-Door Motor > Clear DTCs
- Check for DTCs.
Body Electrical > D-Door Motor > Trouble Codes
Body Electrical > P-Door Motor > Trouble Codes
Body Electrical > RL-Door Motor > Trouble Codes
Body Electrical > RR-Door Motor > Trouble Codes
OK
DTC B2311 is not output.
Result
Proceed to OK NG
Result:
OK
USE SIMULATION METHOD TO CHECK. Refer to HOW TO PROCEED WITH TROUBLESHOOTING [12/2019 - ]
Result:
NG
See step 2
- Clear the DTCs.
- CHECK DTC OUTPUT
- Check the parts from which this DTC has been output.
Result
Result Proceed to DTC output from power window regulator motor assembly (for driver door) A DTC output from power window regulator motor assembly (for front passenger door) B DTC output from power window regulator motor assembly (for rear LH door) C DTC output from power window regulator motor assembly (for rear RH door) D
Result:
B
See step 4
Result:
C
See step 5
Result:
D
See step 6
Result:
A
See step 3
- Check the parts from which this DTC has been output.
- CHECK HARNESS AND CONNECTOR (POWER WINDOW REGULATOR MOTOR ASSEMBLY (for Driver Door) - AUXILIARY BATTERY AND BODY GROUND)
- Measure the voltage according to the value(s) in the table below.
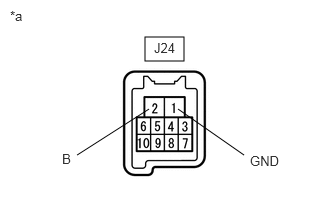
*a Component with harness connected
(Power Window Regulator Motor Assembly (for Driver Door))Standard Voltage
Tester Connection Condition Specified Condition J24-2 (B) - J24-1 (GND) Always*1 11 to 14 V Ignition switch off*2 - *1: for Gasoline Model
- *2: for HV Model
- Measure the resistance according to the value(s) in the table below.
Standard Resistance
Tester Connection Condition Specified Condition J24-1 (GND) - Body ground Always Below 1 Ω Result
Proceed to OK NG
Result:
OK
See step 7
Result:
NG
REPAIR OR REPLACE HARNESS OR CONNECTOR
- Measure the voltage according to the value(s) in the table below.
- CHECK HARNESS AND CONNECTOR (POWER WINDOW REGULATOR MOTOR ASSEMBLY (for Front Passenger Door) - AUXILIARY BATTERY AND BODY GROUND)
- Measure the voltage according to the value(s) in the table below.
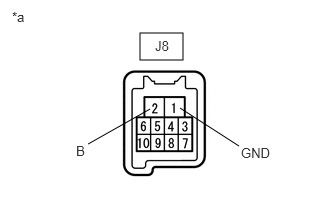
*a Component with harness connected
(Power Window Regulator Motor Assembly (for Front Passenger Door))Standard Voltage
Tester Connection Condition Specified Condition J8-2 (B) - J8-1 (GND) Always*1 11 to 14 V Ignition switch off*2 - *1: for Gasoline Model
- *2: for HV Model
- Measure the resistance according to the value(s) in the table below.
Standard Resistance
Tester Connection Condition Specified Condition J8-1 (GND) - Body ground Always Below 1 Ω Result
Proceed to OK NG
Result:
OK
See step 7
Result:
NG
REPAIR OR REPLACE HARNESS OR CONNECTOR
- Measure the voltage according to the value(s) in the table below.
- CHECK HARNESS AND CONNECTOR (POWER WINDOW REGULATOR MOTOR ASSEMBLY (for Rear LH Door) - AUXILIARY BATTERY AND BODY GROUND)
- Measure the voltage according to the value(s) in the table below.
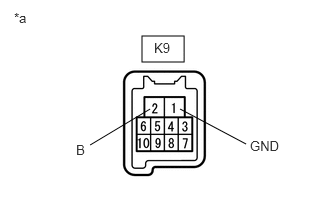
*a Component with harness connected
(Power Window Regulator Motor Assembly (for Rear LH Door))Standard Voltage
Tester Connection Condition Specified Condition K9-2 (B) - K9-1 (GND) Always*1 11 to 14 V Ignition switch off*2 - *1: for Gasoline Model
- *2: for HV Model
- Measure the resistance according to the value(s) in the table below.
Standard Resistance
Tester Connection Condition Specified Condition K9-1 (GND) - Body ground Always Below 1 Ω Result
Proceed to OK NG
Result:
OK
See step 7
Result:
NG
REPAIR OR REPLACE HARNESS OR CONNECTOR
- Measure the voltage according to the value(s) in the table below.
- CHECK HARNESS AND CONNECTOR (POWER WINDOW REGULATOR MOTOR ASSEMBLY (for Rear RH Door) - AUXILIARY BATTERY AND BODY GROUND)
- Measure the voltage according to the value(s) in the table below.
*a Component with harness connected
(Power Window Regulator Motor Assembly (for Rear RH Door))Standard Voltage
Tester Connection Condition Specified Condition K4-2 (B) - K4-1 (GND) Always*1 11 to 14 V Ignition switch off*2 - *1: for Gasoline Model
- *2: for HV Model
- Measure the resistance according to the value(s) in the table below.
Standard Resistance
Tester Connection Condition Specified Condition K4-1 (GND) - Body ground Always Below 1 Ω Result
Proceed to OK NG
Result:
NG
REPAIR OR REPLACE HARNESS OR CONNECTOR
Result:
OK
See step 7
- Measure the voltage according to the value(s) in the table below.
- PERFORM ACTIVE TEST USING GTS (APPLICABLE LOCATION)
- Perform the Active Test according to the display on the GTS.WARNING:
Be careful to avoid injuries as this test causes vehicle parts to move. During the Active Test, the jam protection function will not operate.
HINT:
Perform the Active Test for the power window regulator motor assembly that has DTC B2311 stored in its ECU.
Body Electrical > D-Door Motor > Active Test
Tester Display Measurement Item Control Range Diagnostic Note Power Window Power window OFF / DOWN / UP - Body Electrical > P-Door Motor > Active Test
Tester Display Measurement Item Control Range Diagnostic Note Power Window Power window OFF / DOWN / UP - Body Electrical > RL-Door Motor > Active Test
Tester Display Measurement Item Control Range Diagnostic Note Power Window Power window OFF / DOWN / UP - Body Electrical > RR-Door Motor > Active Test
Tester Display Measurement Item Control Range Diagnostic Note Power Window Power window OFF / DOWN / UP - Body Electrical > D-Door Motor > Active Test
Tester Display Power Window Body Electrical > P-Door Motor > Active Test
Tester Display Power Window Body Electrical > RL-Door Motor > Active Test
Tester Display Power Window Body Electrical > RR-Door Motor > Active Test
Tester Display Power Window OK
Each power window operates normally.
Result
Result Proceed to OK A NG (Driver door power window) B NG (Front passenger door power window) NG (Rear LH door power window) C NG (Rear RH door power window)
Result:
B
REPLACE POWER WINDOW REGULATOR MOTOR ASSEMBLY (for Driver Door or Front Passenger Door). Refer to REMOVAL [12/2019 - 10/2022] , or refer to REMOVAL [10/2022 - 11/2023] , or refer to REMOVAL [11/2023 - ]
Result:
C
REPLACE POWER WINDOW REGULATOR MOTOR ASSEMBLY (for Rear LH Door or Rear RH Door). Refer to REMOVAL [12/2019 - 10/2022] , or refer to REMOVAL [10/2022 - 11/2023] , or refer to REMOVAL [11/2023 - ]
Result:
A
See step 8
- Perform the Active Test according to the display on the GTS.
- PERFORM INITIALIZATION (APPLICABLE LOCATION)
- Initialize the power window regulator motor assembly.
Refer to INITIALIZATION [12/2019 - ]
HINT:
Initialize the power window regulator motor assembly that has DTC B2311 stored in its ECU.
Result
Proceed to NEXT
Result:
NEXT
See step 9
- Initialize the power window regulator motor assembly.
- CHECK POWER WINDOW CONTROL SYSTEM (APPLICABLE LOCATION)
- Check that the power window operates normally by opening and closing it.
Refer to OPERATION CHECK [12/2019 - ]
HINT:
Check the power window operation of the window where DTC B2311 has been stored.
OK
Each power window operates normally.
Result
Result Proceed to OK A NG (Driver door power window) B NG (Front passenger door power window) NG (Rear LH door power window) C NG (Rear RH door power window)
Result:
B
REPLACE POWER WINDOW REGULATOR MOTOR ASSEMBLY (for Driver Door or Front Passenger Door). Refer to REMOVAL [12/2019 - 10/2022] , or refer to REMOVAL [10/2022 - 11/2023] , or refer to REMOVAL [11/2023 - ]
Result:
C
REPLACE POWER WINDOW REGULATOR MOTOR ASSEMBLY (for Rear LH Door or Rear RH Door). Refer to REMOVAL [12/2019 - 10/2022] , or refer to REMOVAL [10/2022 - 11/2023] , or refer to REMOVAL [11/2023 - ]
Result:
A
See step 10
- Check that the power window operates normally by opening and closing it.
- CHECK WHETHER PARTS HAVE BEEN INSTALLED CORRECTLY
- Check that the power window components are installed correctly.
HINT:
Initialize the power window regulator motor assembly that has DTC B2311 stored in its ECU.
OK
Power window components are installed correctly.
Result
Proceed to OK NG
Result:
NG
INSTALL PARTS CORRECTLY
Result:
OK
See step 11
- Check that the power window components are installed correctly.
- CHECK DTC OUTPUT
- Turn the ignition switch off.
- Wait for at least 10 seconds, and then turn the ignition switch to ON.
- Check for DTCs.
Body Electrical > D-Door Motor > Trouble Codes
Body Electrical > P-Door Motor > Trouble Codes
Body Electrical > RL-Door Motor > Trouble Codes
Body Electrical > RR-Door Motor > Trouble Codes
OK
B2311 is not output.
Result
Result Proceed to OK A NG (Driver door power window) B NG (Front passenger door power window) NG (Rear LH door power window) C NG (Rear RH door power window)
Result:
A
END
Result:
B
REPLACE POWER WINDOW REGULATOR MOTOR ASSEMBLY (for Driver Door or Front Passenger Door). Refer to REMOVAL [12/2019 - 10/2022] , or refer to REMOVAL [10/2022 - 11/2023] , or refer to REMOVAL [11/2023 - ]
Result:
C
REPLACE POWER WINDOW REGULATOR MOTOR ASSEMBLY (for Rear LH Door or Rear RH Door). Refer to REMOVAL [12/2019 - 10/2022] , or refer to REMOVAL [10/2022 - 11/2023] , or refer to REMOVAL [11/2023 - ]