DTC B1793-16: Load Sensor for Occupant Detection System Circuit Voltage Below Threshold [11/2023 - ]: Procedure
- CHECK CONNECTION OF CONNECTORS
- Turn the ignition switch off.
- Disconnect the cable from the negative (-) auxiliary battery terminal, and wait for at least 60 seconds.
- Check that the connectors are properly connected to the airbag sensor assembly and separate type front seat cushion spring assembly RH.
OK
The connectors are properly connected.
Result
Proceed to OK NG
Result:
NG
CONNECT CONNECTORS PROPERLY
Result:
OK
See step 2
- CHECK CONNECTORS
- Disconnect the airbag sensor assembly connector.
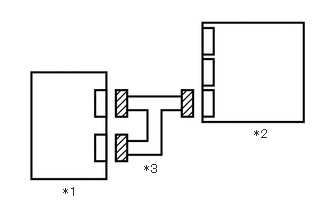
*1 Separate Type Front Seat Cushion Spring Assembly RH *2 Airbag Sensor Assembly *3 Wire Harness - Disconnect the separate type front seat cushion spring assembly RH connector.
- Check that the terminals of the connectors are not deformed or damaged.
OK
The terminals are not deformed or damaged.
Result
Proceed to OK NG
Result:
NG
REPAIR OR REPLACE HARNESS OR CONNECTOR
Result:
OK
See step 3
- Disconnect the airbag sensor assembly connector.
- CHECK HARNESS AND CONNECTOR (AIRBAG SENSOR ASSEMBLY - AUXILIARY BATTERY)
- Disconnect the airbag sensor assembly connector.
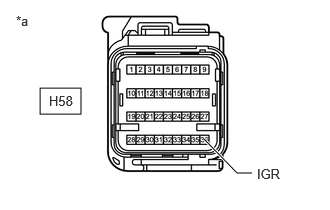
*a Front view of wire harness connector
(to Airbag Sensor Assembly) - Connect the cable to the negative (-) auxiliary battery terminal, and wait for at least 2 seconds.
- Turn the ignition switch to ON.
- Operate all components of the electrical systems (defogger, wipers, headlights, heater blower, etc.).
- Measure the voltage according to the value(s) in the table below.
Standard Voltage
Tester Connection Condition Specified Condition H58-36 (IGR) - Body ground Ignition switch ON 8 to 16 V Result
Proceed to OK NG
Result:
NG
REPAIR OR REPLACE HARNESS OR CONNECTOR
Result:
OK
See step 4
- Disconnect the airbag sensor assembly connector.
- CHECK HARNESS AND CONNECTOR (AIRBAG SENSOR ASSEMBLY - SEPARATE TYPE FRONT SEAT CUSHION SPRING ASSEMBLY RH)
- Measure the resistance according to the value(s) in the table below.
Standard Resistance
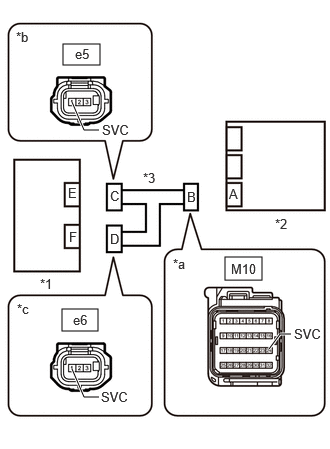
Tester Connection Condition Specified Condition M10-24 (SVC) - Other terminals and body ground Always 10 kΩ or higher e5-1 (SVC) - Other terminals and body ground Always 10 kΩ or higher e6-1 (SVC) - Other terminals and body ground Always 10 kΩ or higher *1 Separate Type Front Seat Cushion Spring Assembly RH *2 Airbag Sensor Assembly *3 Wire Harness *a Front view of wire harness connector
(to Airbag Sensor Assembly)*b Front view of wire harness connector
(to Separate Type Front Seat Cushion Spring Assembly RH (Front Occupant Classification Sensor LH))*c Front view of wire harness connector
(to Separate Type Front Seat Cushion Spring Assembly RH (Rear Occupant Classification Sensor LH))Result
Proceed to OK NG
Result:
NG
REPAIR OR REPLACE HARNESS OR CONNECTOR
Result:
OK
See step 5
- Measure the resistance according to the value(s) in the table below.
- CHECK AIRBAG SENSOR ASSEMBLY
- Turn the ignition switch off.
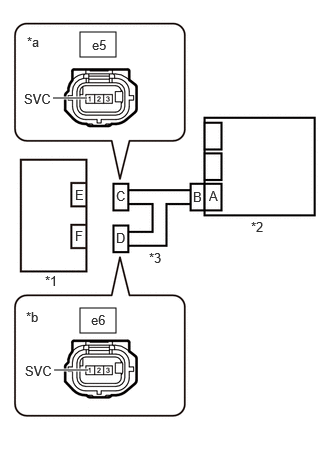
*1 Separate Type Front Seat Cushion Spring Assembly RH *2 Airbag Sensor Assembly *3 Wire Harness *a Front view of wire harness connector
(to Separate Type Front Seat Cushion Spring Assembly RH (Front Occupant Classification Sensor LH))*b Front view of wire harness connector
(to Separate Type Front Seat Cushion Spring Assembly RH (Rear Occupant Classification Sensor LH)) - Disconnect the cable from the negative (-) auxiliary battery terminal, and wait for at least 60 seconds.
- Connect the connector to the airbag sensor assembly.
- Connect the cable to the negative (-) auxiliary battery terminal, and wait for at least 2 seconds.
- Measure the voltage according to the value(s) in the table below.
Standard Voltage
Tester Connection Condition Specified Condition e5-1 (SVC) - Body ground Ignition switch ON 6.2 V or higher e6-1 (SVC) - Body ground Ignition switch ON 6.2 V or higher Result
Proceed to OK NG
Result:
OK
REPLACE SEPARATE TYPE FRONT SEAT CUSHION SPRING ASSEMBLY RH
for Manual Seat: Refer to REMOVAL [11/2023 - ]
for Power Seat: Refer to REMOVAL [11/2023 - ]
Result:
NG
REPLACE AIRBAG SENSOR ASSEMBLY. Refer to REMOVAL [11/2023 - ]
- Turn the ignition switch off.