On-Vehicle Inspection [12/2019 - ]: Procedure
- INSPECT FRONT EXHAUST PIPE ASSEMBLY (TWC: Rear Catalyst) WARNING:
To prevent burns, do not touch the engine, exhaust pipe or other high temperature components while the engine is hot.
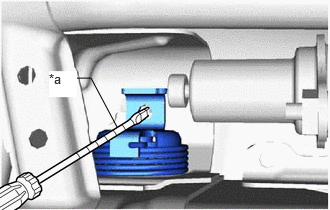
*a Protective Tape Inspect the exhaust flow control valve operation.
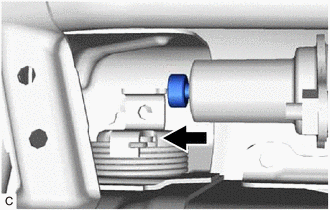
- Using a screwdriver with its tip wrapped with protective tape, move the exhaust flow control valve from the bottom of the vehicle. Check that the valve moves smoothly.
OK
Valve moves smoothly.
If the valve is stuck or does not move smoothly, replace the front exhaust pipe assembly (TWC: Rear Catalyst).
Refer to REMOVAL [12/2019 - 10/2022] , or refer to REMOVAL [10/2022 - ]
- Using a screwdriver with its tip wrapped with protective tape, move the exhaust flow control valve from the bottom of the vehicle. Check that the valve moves smoothly.
- Inspect the exhaust pipe gas control actuator sub-assembly.
- While checking the engine coolant temperature with the GTS, check the operation of the exhaust pipe gas control actuator rod when the temperature rises.
Powertrain > Engine > Data List
Tester Display Coolant Temperature Standard
Condition Rod Operation Cold (below approximately 65 °C (149 °F)) → Warmed up (approximately 80°C (176°F) or higher) Rod gradually extends smoothly as the temperature rises If the exhaust pipe gas control actuator rod does not extend smoothly, replace the exhaust pipe gas control actuator sub-assembly.
Refer to REMOVAL [12/2019 - ]
HINT:
- After the engine has warmed up (the thermostat temperature is approximately 80°C (176°F) or higher), the rod should be extended approximately 10 mm (0.394 in.) or more compared to when the engine is cold (the thermostat temperature is below approximately 65 °C (149 °F)).
- The coolant temperature shown in the Data List may slightly deviate from the thermostat temperature. This is because the Data List value indicates the temperature detected by the engine coolant temperature sensor, which is mounted on the engine, while the thermostat is positioned in the exhaust pipe gas control actuator sub-assembly.
- If it is difficult to check while the rod is operating, allow the engine to cool down until the coolant temperature matches the ambient temperature and then check the rod operation again.
- Check for any cracks or damage on the exhaust pipe gas control actuator rod.
OK
No cracks or damage is found.
If any cracks or damage is found, replace the front exhaust pipe assembly (TWC: Rear Catalyst).
Refer to REMOVAL [12/2019 - 10/2022] , or refer to REMOVAL [10/2022 - ]
- While checking the engine coolant temperature with the GTS, check the operation of the exhaust pipe gas control actuator rod when the temperature rises.
- INSPECT FOR ENGINE COOLANT LEAK FROM FRONT EXHAUST PIPE ASSEMBLY (TWC: Rear Catalyst) WARNING:
Do not remove the radiator cap sub-assembly while the engine and radiator assembly are still hot. Pressurized, hot engine coolant and steam may be released and cause serious burns.
NOTE:Before performing this inspection, turn the A/C switch off.
- Turn the ignition switch off. Check for engine coolant leaks from the front exhaust pipe assembly (TWC: Rear Catalyst) and the heater water hose around the temperature switch.
- Remove the radiator cap sub-assembly.
- Add engine coolant to the FULL line of the radiator reserve tank assembly.
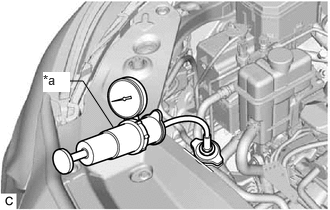
- Install a radiator cap tester.
*a Radiator Cap Tester - Put the engine in Inspection Mode (Maintenance Mode).
Powertrain > Hybrid Control > Utility
Tester Display Inspection Mode - Warm up the engine.
- Pump the radiator cap tester to 103 kPa (1.1 kgf/cm2
, 15 psi), and then check that the pressure does not drop.
If the pressure drops, check the front exhaust pipe assembly (TWC: Rear Catalyst) and the heater water hose around the temperature switch for leaks.
- Remove the radiator cap tester.
- Install the radiator cap sub-assembly.