Maintenance For HV And Auxiliary Batteries (T-SB-0040-20 REV1)
WARNING: This page is about the Highlander Hybrid LE, 2.5L Eng VIN A, which is a different variant/trim than selected.
Publication date: 2020-06-08Reference number: T-SB-0040-20 REV1
Supersedes refnos: T-SB-0040-20
MAINTENANCE FOR HV AND AUXILIARY BATTERIES
TECHNICAL SERVICE BULLETIN
Reference Number(s): T-SB-0040-20 Rev1, Date of Issue:
June 08, 2020
Superceded Bulletin(s): T-SB-0040-20, Date of Issue:
April 15, 2020
| TOYOTA: | 2021 Avalon HV, Camry HV, Corolla HV, Highlander HV, Mirai, Prius, Prius Prime, RAV4 HV, Sienna HV, Venza HV |
| SERVICE CATEGORY: | General |
| SECTION: | Pre-Delivery Service |
| MARKET: | USA |
| COPYRIGHT: | © 2020 Toyota, USA License Agreement TMS1002 |
APPLICABILITY
APPLICABILITY
| YEAR(S) | MODEL(S) | ADDITIONAL INFORMATION |
|---|---|---|
| 2021 | Avalon HV, Camry HV, Corolla HV, Highlander HV, Mirai, Prius, Prius Prime, RAV4 HV, Sienna HV, Venza HV |
REVISION NOTICE
June 08, 2020 Rev1:
- The Applicability and To Store for 30 Days or More sections have been updated.
Any previous printed versions of this bulletin should be discarded.
INTRODUCTION
Hybrid vehicles are equipped with two types of batteries:
- Hybrid Vehicle (HV) battery
- Auxiliary (12V) battery
If the hybrid vehicle is put into storage, the State-Of-Charge (SOC) of its HV battery and auxiliary battery will gradually decrease. To prevent the auxiliary battery from becoming discharged during storage, proper maintenance is necessary.
Perform the following maintenance service for the HV battery and auxiliary battery.
NOTE:
- BEFORE disconnecting the auxiliary battery, confirm the shift lever is in the "P" position. The shift lever CANNOT be shifted from the "P" position with the auxiliary battery disconnected.
- Do NOT apply the parking brake. Ensure vehicles with electronic parking brakes do NOT engage and the Auto function has been DISABLED (Refer to Owner's Manual for details).
- If the negative (-) terminal of the auxiliary battery is reconnected, even if the vehicle is powered ON (Ready ON), the hybrid system may NOT start. In this case, depress the brake pedal and press the Power button to start the hybrid system (the Ready light is ON). If the hybrid system still does NOT start (the Ready light is OFF), refer to the applicable model and model year Repair Manual.
MAINTENANCE ITEMS
MAINTENANCE ITEMS
| CONDITION(1) | MAINTENANCE OPERATION | ||||||
|---|---|---|---|---|---|---|---|
| Before Delivery | Fully charge the auxiliary battery. Fast charge is NOT recommended on the 12V battery in order to prevent battery damage. Deliver the vehicle to the customer AFTER it has fully charged to 12.6V or more. | ||||||
| To Store for 30 Days or More (Except Mirai) | Disconnect the negative (-) terminal of the auxiliary battery to prevent the SOC from decreasing during storage due to parasitic current. | ||||||
| Periodical Battery Charging: | Keep the hybrid system ON for 30 minutes with the transmission in the "P" position (in order to charge the HV battery and the auxiliary battery). | ||||||
|
|||||||
WARRANTY INFORMATION
WARRANTY INFORMATION
| OP CODE | DESCRIPTION | TIME | OFP | T1 | T2 |
|---|---|---|---|---|---|
| N/A | Not Applicable to Warranty | - | - | - | - |
REQUIRED TOOLS & EQUIPMENT
REQUIRED TOOLS & EQUIPMENT
| SPECIAL SERVICE TOOLS (SST) | PART NUMBER | QTY | ||
|---|---|---|---|---|
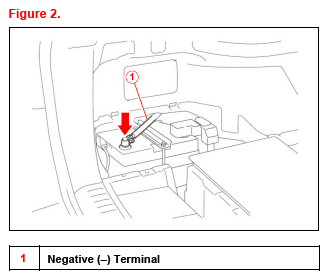
| Battery Diagnostic Tool(1) | DCA-8000P T | 1 | ||
|
||||
NOTE:
- The DCA-8000 battery diagnostic tool (P/N DCA-8000P T) supersedes the GR8 battery diagnostic station (P/N 00002-MCGR8).
- Additional SSTs may be ordered by calling 1-800-933-8335.
BEFORE DELIVERY
- BEFORE charging the auxiliary battery, turn OFF ALL lights, accessories, and the hybrid system.
- Check the battery SOC.
- If the battery voltage is LESS THAN 12.6V, continue to step 3.
- If the battery voltage is 12.6V or MORE, replace the positive (+) terminal cover, install the battery cover (if applicable), and close the luggage compartment/hood.
NOTE:- If measuring the voltage with the negative (-) terminal connected, turn OFF the Power button and turn ON the high beams for 20 - 30 seconds. This will remove the surface charge from the battery.
- If the engine has been running before measuring the voltage, wait 20 minutes or more after the engine stops. This removes the surface charge.
- For details on how to use the battery diagnostic station, refer to the DCA-8000 Instruction Manual located at TIS - Diagnostics - Tools & Equipment - Battery Diagnostics.
- Test the auxiliary battery using the DCA-8000 battery diagnostic tool Advanced Battery Test mode.
If charging is required, the DCA-8000 battery diagnostic tool will automatically start to charge.
- Connect the red charger clamp to the positive (+) terminal and the black charger clamp to the negative (-) terminal.
- Plug the charger into a grounded 110V outlet and press the power button.
- Once the DCA-8000 battery diagnostic tool is properly turned ON, perform an Advanced Battery Test. The DCA-8000 battery diagnostic tool will indicate results when complete. If the battery tests bad "Replace Battery", replace the auxiliary battery.
CAUTION:- Charge in a well-ventilated area.
- Do NOT allow sparks OR fire near the auxiliary battery.
NOTE: If the auxiliary battery was stored at 32°F (0°C) or below, charge the auxiliary battery in a room above 32°F (0°C). - If the DCA-8000 battery diagnostic tool is NOT available, you may charge the auxiliary battery by cycling the vehicle to Ready ON.
- Run time will vary depending on the battery SOC.
- If this method is used, you MUST confirm that the battery is charged to 12.8V using a DVOM.
TO STORE FOR 30 DAYS OR MORE (EXCEPT MIRAI)
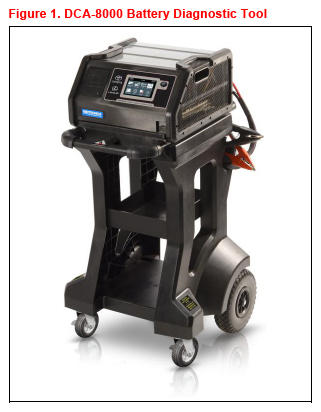
Disconnect the Negative (-) Terminal
- Turn OFF ALL lights, accessories, and the hybrid system.
- Disconnect the negative (-) terminal.NOTE: When it is necessary to move the vehicle, reconnect the negative (-) terminal.
- When removing the vehicle from storage, connect the negative (-) terminal.
Please refer to applicable Rpair Manual for torque specifications.
NOTE: AFTER recharging the auxiliary battery, the hybrid system may NOT start. Follow the procedure below to initialize the system.- Put the shift lever in the "P" position.
- Open and close ANY of the doors.
- Restart the hybrid system.
PERIODICAL BATTERY CHARGING
Cycle Vehicle to Ready ON
NOTE:
- When the remaining capacity of the HV battery is low, the gasoline engine automatically starts and the HV battery is charged. The auxiliary battery is also charged by the HV battery regardless of the gasoline engine operation.
- Be sure to reconnect the negative (-) terminal of the auxiliary battery BEFORE performing this procedure.
- Park the vehicle in open air or connect theexhaust extraction hose to tue exhaust pipe.
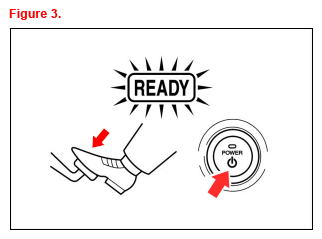
- Apply the parking brake.
- With the brake pedal depressed, push the Power button and check that the Ready light in the meter illuminates when the hybrid system starts (the Ready light is ON).
- Turn OFF ALL lights and accessories.
- Check that the shift lever is in the "P" position.
- Keep the Ready light ON and charge the HV battery for 30 minutes.NOTE:
- If the amount of charging energy is small, the display may NOT indicate the energy flow.
- Ensure there is a sufficient amount of fuel for the vehicle to run for 30 minutes.