Safety Recall 23TA15 (Remedy Notice) - Multiple Models And Model Years - Passenger Airbag May Not Deploy (23TA15)
Reference number: 23TA15
SAFETY RECALL 23TA15 (REMEDY NOTICE) - MULTIPLE MODELS AND MODEL YEARS - PASSENGER AIRBAG MAY NOT DEPLOY
SERVICE CAMPAIGN BULLETIN
| TOYOTA: | See Chart Below |
| COPYRIGHT: | © 2018 Toyota, USA License Agreement TMS1002 |
SERVICE INFORMATION
IMPORTANT UPDATE
The attached Dealer Letter has been updated. Refer to the details below.
| DATE | TOPIC |
|---|---|
| 12/09/2024 | Updated Phase Table in Dealer Letter and FAQ |
The most recent update in the attached Dealer Letter will be highlighted with a red box.
Please review this notification with your staff to assure that all relevant personnel have been briefed regarding this subject.
Thank you for your cooperation.
Toyota Motor Sales, USA, Inc.
6565 Headquarters Drive
Plano, TX 75024
(469) 292-4000
Original Publication Date: September 26, 2024
To: All Toyota Dealer Principals, General Managers, Service Managers, and Parts Managers
| Model/Years | Production Period | Approximate Total Vehicles | Approximate Stop Sale Dealer Inventory |
|---|---|---|---|
| 2020-2021 Avalon | Early July 2020 - Late April 2021 | 9,100 | 0 |
| 2020-2021Avalon HV | Early July 2020 - Early May 2021 | 5,800 | 0 |
| 2020-2022 Camry | Early July 2020 - Early November 2023 | 202,500 | 0 |
| 2020-2022 Camry HV | Early July 2020 - Late September 2021 | 27,100 | 0 |
| 2020-2021 Corolla | Late May 2020 - early March 2021 | 92,700 | 0 |
| 2020-2021 Highlander | Late May 2020 - Late September 2021 | 134,900 | 0 |
| 2020-2021 Highlander HV | Early June 2020 - Late September 2021 | 58,100 | 0 |
| 2020-2021 RAV4 | Early June 2020 - Late May 2021 | 249,800 | 0 |
| 2020-2021 RAV4 HV | Early June 2020 - Mid-November 2021 | 76,800 | 0 |
| 2021 Sienna HV | Mid-October 2020 - Late March 2021 | 35,300 | 0 |
| STOP! DO NOT SELL NEW VEHICLES IN DEALER INVENTORY. Refer to Dealer Inventory Procedures section for more details. |


On December 20, 2023 Toyota filed a Defect Information Report (DIR) with the National Highway Traffic Safety Administration (NHTSA) informing the agency of our intent to conduct a voluntary Safety Recall on the models described in the table above.
CONDITION
The subject vehicles have Occupant Classification System (OCS) sensors in the front passenger seat that could have been improperly manufactured, causing a short circuit. This would not allow the airbag system to properly classify the occupant's weight, and certain front passenger airbags may not deploy as designed in certain crashes, increasing the risk of injury.
REMEDY
Toyota dealers will inspect the OCS sensors and, if necessary, replace them FREE OF CHARGE. Please note that as part of the remedy repair, technicians will be required to use a mobile inspection application.
In order to make the best use of available parts while mitigating risk to Toyota's customers, Toyota is employing a phased remedy implementation, starting with the most humid states first, based on the vehicle's state of registration at time of phase one launch . This is because, while OCS sensor failure is rare, it is more likely to occur in more humid areas first.
Important Note: The dates specified in this table are estimates and are subject to change.
| Phase | Model Years | Models | Location | Approximate Total Vehicles | Estimated Remedy Launch Timing |
|---|---|---|---|---|---|
| 1 | All involved Model Years | All involved Models | Rental Agencies, U.S. Terr., Ak, FL, LA, MS, HI, IA, MI, IN, ME, VT, AL | 183,700 | Remedy Available Now |
| 2 | All involved Model Years | All involved Models | WI, OH, RI, WA, GA, MA, AR, DE | 125,100 | |
| 3 | All involved Model Years | All involved Models | IL, ND, NY, NC, MN | 110,900 | Fbruary 2025 |
| 4 | All involved Model Years | All involved Models | NH, KY, WV, PA, TN, CT | 76,400 | April 2025 |
| 5 | All involved Model Years | All involved Models | MO, SC, MD, D.C., VA, OR, NJ | 109,900 | June 2025 |
| 6 | All involved Model Years | All involved Models | SD, NE, KS | 10,100 | August 2025 |
| 7 | All involved Model Years | All involved Models | TX, OK, ID | 98,700 | September 2025 |
| 8 | All involved Model Years | All involved Models | CA, MT, WY, CO, UT, NM, AZ, NV | 177,100 | January 2026 |
CAMPAIGN PHASE INTERPRETATION
Campaigns may be launched in phases due to many factors, such as: the nature of the repair, parts availability, etc. It is important that each VIN is confirmed using TIS to determine if the vehicle is in the remedy or interim phase. Only perform the repair that is available for the specific VIN. If a remedy repair is performed on an interim phase vehicle, the claim will be subject to debit.

STATUS IDENTIFICATION
- Campaign Description: 23TA15 Remedy
- Campaign Status: Remedy Available
- This vehicle is eligible to have the remedy performed.

STATUS IDENTIFICATION
- Campaign Description: 23TB15 Interim
- Campaign Status: Remedy Not Available
- This vehicle is in the interim phase; the remedy CANNOT be performed at this time.
COVERED VEHICLES
There are approximately 892,000 vehicles covered by this Safety Recall. Approximately 2,100 vehicles involved in this Safety Recall were distributed to Puerto Rico.
OWNER LETTER MAILING DATE
| Phase 1 Customer Mailing | October 2024 |
| Phase 2 Customer Mailing | January 2025 |
Toyota makes significant effort to obtain current customer name and address information from each state through industry resources when mailing owner letters. In the event your dealership receives a notice for a vehicle that was sold prior to the Safety Recall announcement, it is the dealership's responsibility to forward the owner letter to the customer who purchased the vehicle.
Please note that only owners of the covered vehicles will be notified. If you are contacted by an owner who has not yet received a notification, please verify eligibility by confirming through TIS prior to performing repairs . Dealers should perform the repair as outlined in the Technical Instructions found on TIS.
DEALER INVENTORY PROCEDURES
NEW VEHICLES IN DEALERSHIP INVENTORY - REMINDER
Toyota has not identified any new vehicles in dealership inventory that are covered by this Safety Recall. However, below is a reminder of the dealer's obligations pertaining to Safety Recalls if there are new vehicles in dealership inventory:
Under Title 49, Section 30112 of the United States Code, a dealer cannot sell, offer for sale, or introduce or deliver for introduction in interstate commerce a new motor vehicle when it is aware that the vehicle does not comply with an applicable Federal Motor Vehicle Safety Standard or contains a defect related to motor vehicle safety. Further, 49 Code of Federal Regulations 577.13 requires us to provide the following advisory: It is a violation of Federal law for a dealer to deliver a new motor vehicle or any new or used item of motor vehicle equipment (including a tire) covered by this notification under a sale or lease until the defect or noncompliance is remedied.
Vehicle Safety Recall completion should always be verified through TIS. We request your assistance to ensure involved vehicles are identified and not delivered prior to performing the remedy.
PRE-OWNED VEHICLES IN DEALER INVENTORY
To ensure customer satisfaction, Toyota requests that dealers complete this Safety Recall on any used vehicles currently in dealer inventory that are in the remedy phase of this Safety Recall prior to customer delivery. However, if the campaign cannot be completed (for example, due to remedy parts availability), delivery of a covered vehicle is acceptable if disclosed to the customer that the vehicle is involved in a Safety Recall.
Toyota expects dealers to visit https://toyota-recall-disclosure.imagespm.info/ and complete a Customer Contact and Vehicle Disclosure Form. Dealers are expected to provide a copy of the completed form, along with the most current FAQ, to the vehicle buyer. Toyota and the dealer may use this information to contact the customer when the remedy becomes available. Keep the completed form on file at the dealership.
TOYOTA CERTIFIED USED VEHICLE (TCUV)
The TCUV policy prohibits the certification of any vehicle with an outstanding Safety Recall, Special Service Campaign, or Limited Service Campaign. Thus, no affected units are to be designated, sold, or delivered as a TCUV until all applicable Safety Recalls, Special Service Campaigns, and Limited Service Campaigns have been completed on that vehicle. Vehicles in the interim phase that are TCUV stock cannot be remedied until the applicable phase is launched.
RENT A TOYOTA & SERVICE LOANERS
Toyota requests that dealers remove all Rent a Toyota and Service Loaner vehicles from service that are covered by a Safety Recall unless the defect has been remedied.
CUSTOMER HANDLING, PARTS ORDERING, AND REMEDY PROCEDURES
CUSTOMER CONTACTS
Customers who receive the owner letter may contact your dealership with questions regarding the letter and/or the Safety Recall. Please welcome them to your dealership and answer any questions that they may have. A Q&A is provided to assure a consistent message is communicated.
Customers with additional questions or concerns are asked to please contact the Toyota Brand Engagement Center (1-888-270-9371) - Monday through Friday, 8:00 am to 8:00 pm, Saturday 9:00 am to 7:00 pm Eastern Time.
SALVAGE TITLE VEHICLES
Every attempt should be made to complete an open Safety Recall when circumstances permit, unless noted otherwise in the Safety Recall dealer letter.
For complete details on this policy, refer to Toyota Warranty Policy 4.17 , "What Is Not Covered by The Toyota New Vehicle Limited Warranty".
MEDIA CONTACTS
It is imperative that all media contacts (local and national) receive a consistent message. In this regard, all media contacts must be directed to the Toyota Newsroom https://pressroom.toyota.com/
PARTS ORDERING PROCESS - NON SET AND GST PARTS ORDERING PROCESS
It is possible that parts for this campaign are either required to be ordered in Campaign Part Order Request (CPOR) on Service Lane or have been placed on Manual Allocation Control (MAC) due to potential limited part availability. Please check the CPOR/MAC report on Dealer Daily for the most up-to-date parts ordering information. Dealers can identify which parts ordering method to use by reviewing the parts information section of Dealer Daily and checking for a MAC code on the part numbers below. For MAC code C, order through CPOR. For MAC code D, refer to the MAC report for further instructions.
| Part Number | Part Description | Quantity |
|---|---|---|
| 04003-60106 | SENSOR SUB-ASSY, WEIGHT DETECTOR, FR | 1 |
| 04003-60206 | SENSOR SUB-ASSY, WEIGHT DETECTOR, RR | 1 |
TECHNICIAN TRAINING REQUIREMENTS
The repair quality of covered vehicles is extremely important to Toyota. All dealership technicians performing this repair are required to complete the most current version of the E-Learning course "Safety Recall and Service Campaign Essentials". To ensure that all vehicles have the repair performed correctly, technicians performing this recall repair are required to have completed all of the following courses currently:
- TIC206A - Electrical Repair
Always check which technicians can perform the repair by logging on to https://www.uotdealerreports.com . The dealership is responsible for selecting technicians who have completed the above courses to perform this repair. Carefully review your resources, the technician's skill level, and ability before assigning technicians to this repair. It is important to consider technician days off and vacation schedules to ensure properly trained technicians are available to perform this repair at all times.
REMEDY PROCEDURES
Refer to TIS for Technical Instructions on repair. Conduct all non-completed Safety Recalls and Service Campaigns on the vehicle during the time of appointment.
REPAIR QUALITY CONFIRMATION
The repair quality of covered vehicles is extremely important to Toyota. To help ensure that all vehicles have the repair performed correctly, please designate at least one associate (someone other than the individual who performed the repair) to verify the repair quality of every vehicle prior to customer delivery.
PARTS RECOVERY PROCEDURES
All parts replaced as part of this Safety Recall must be turned over to the parts department until appropriate disposition is determined. The parts department must retain these parts until notification via the Parts Recovery System (PRS) is received indicating whether to ship or scrap the parts. These parts are utilized by various departments for defect analysis, quality control analysis, product evaluation, as well as other purposes.
To help minimize dealer storage challenges, Toyota recommends that dealers:
- File the campaign claim accurately and promptly. The time a dealer is required to hold parts is based on when the campaign claim is paid by Toyota.
- Monitor the Warranty Parts Recovery Notifications and Part Scrap Report regularly.
Refer to Warranty Policies 9.3 and 9.6 for additional details.
WARRANTY REIMBURSEMENT PROCEDURES
Warranty Reimbursement Procedure
| Op Code | Description | Flat Rate Hours |
|---|---|---|
| 23TA15R1 | OCS Inspection Only | 0.4 |
| 23TA15R2 | OCS Inspection + OCS Replacement For 1 or Both Sensors - RAV4, Sienna, Highlander |
1.5 |
| 23TA15R3 | OCS Inspection + OCS Replacement For 1 or Both Sensors - Corolla |
1.6 |
| 23TA15R4 | OCS Inspection + OCS Replacement For 1 or Both Sensors - Camry, Avalon |
1.4 |
- The flat rate times include 0.1 hours for administrative cost per unit for the dealership.
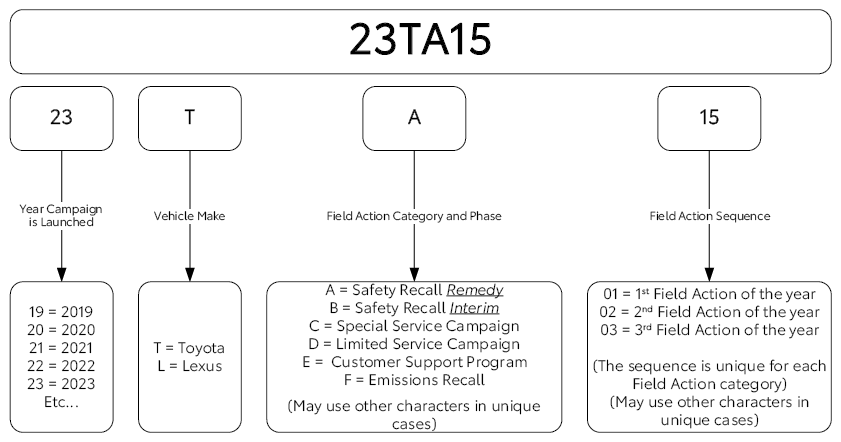
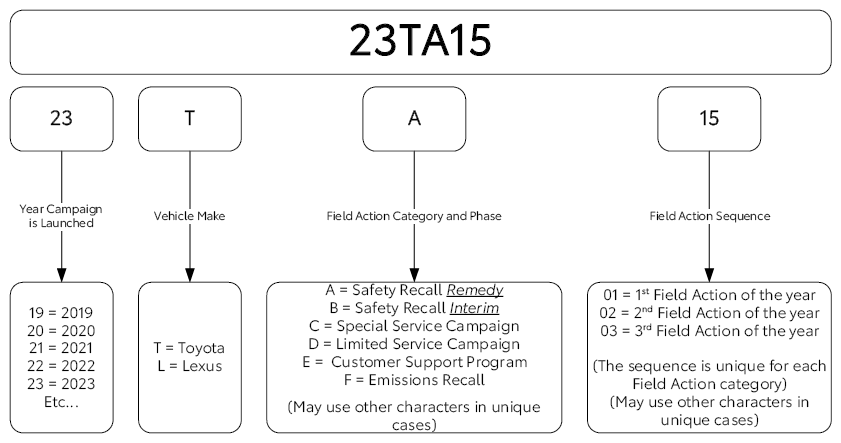
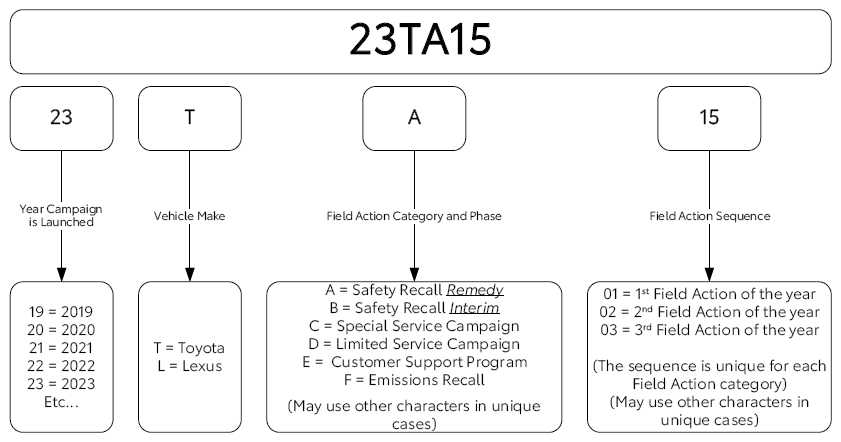
CAMPAIGN DESIGNATION/PHASE DECODER
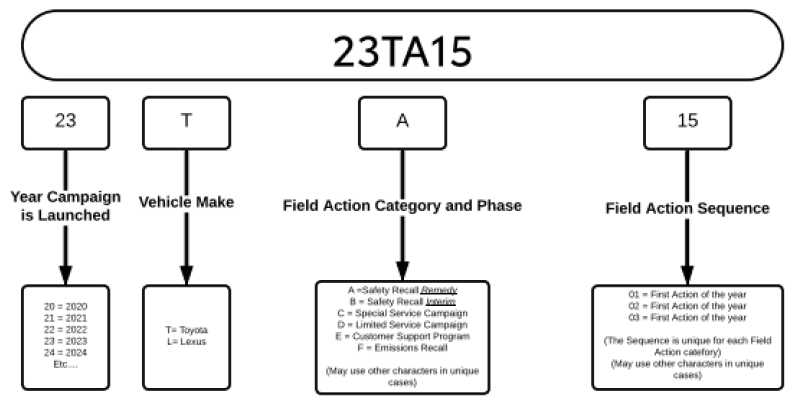
Examples:
19TA01 = Launched in 2019, Toyota, Safety Recall Remedy Phase, 1st Safety Recall Launched in 2019
20TC02 = Launched in 2020, Special Service Campaign, 2nd Special Service Campaign Launched in 2020
21TE05 = Launched in 2021, Customer Support Program, 5th Customer Support Program Launched in 2021
Please review this entire package with your Service and Parts staff to familiarize them with the proper step-by-step procedures required to implement this Safety Recall.
Thank you for your cooperation.
TOYOTA MOTOR SALES, U.S.A., INC.
SAFETY RECALL 23TA15
SAFETY RECALL 23TA15 (Remedy Notice)
Multiple Models and Model Years
Passenger Airbag May Not Deploy
Frequently Asked Questions
Original Publication Date: September 26, 2024
Q1: What is the condition?
A1: The subject vehicles have Occupant Classification System (OCS) sensors in the front passenger seat that could have been improperly manufactured, causing a short circuit. This would not allow the airbag system to properly classify the occupant's weight, and certain front passenger airbags may not deploy as designed in certain crashes, increasing the risk of injury.
Q2: Are there any warnings that this condition exists?
A2: Yes, the SRS warning light and the "Passenger Airbag OFF" light will be illuminated, and a multi-information display message will be displayed.
Q3: What is Toyota going to do?
A3: Toyota will inspect the OCS sensors and, if necessary, replace them FREE OF CHARGE .
Q4: When will the remedy become available?
A4: In order to make the best use of available parts while mitigating risk to Toyota's customers, Toyota is employing a phased remedy implementation, starting with the most humid states first, based on the vehicle's state of registration at time of phase one launch . This is because, while OCS sensor failure is rare, it is more likely to occur in more humid areas first.
| Phase | Model Years | Model | Location | Approximate Total Vehicles | Estimated Remedy Launch Timing |
|---|---|---|---|---|---|
| 1 | All involved Model Years | All involved Models | Rental Agencies, U.S. Terr., Ak, FL, LA, MS, HI, IA, MI, IN, ME, VT, AL | 183,700 | Remedy Available Now |
| 2 | All involved Model Years | All involved Models | WI, OH, RI, WA, GA, MA, AR, DE | 125,100 | |
| 3 | All involved Model Years | All involved Models | IL, ND, NY, NC, MN | 110,900 | February 2025 |
| 4 | All Involved Model Years | All Involved Models | NH, KY, WV, PA, TN, CT | 76,400 | April 2025 |
| 5 | All Involved Model Years | All Involved Models | MO, SC, MD, D.C., VA, OR, NJ | 109,900 | June 2025 |
| 6 | All Involved Model Years | All Involved Models | SD, NE, KS | 10,100 | August 2025 |
| 7 | All Involved Model Years | All Involved Models | TX, OK, ID | 98,700 | September 2025 |
| 8 | All Involved Model Years | All Involved Models | CA, MT, WY, CO, UT, NM, AZ, NV | 177,100 | January 2026 |
Q4a: How did Toyota decide which states should go first in the phase launch schedule?
A4a: Based on available data, Toyota has determined there is a correlation between higher OCS sensor failure rates and higher humidity areas. The best way to minimize the number of customers who may experience an actual OCS sensor failure is to prioritize vehicles with the highest likelihood of failing by making the remedy available to vehicles in states with the highest average annual humidity first.
Q4b: What if I move to a different state before the remedy becomes available for my vehicle?
A4b: Your vehicle's phase will be determined prior to Phase 1 launch, based on the state of the vehicle's registration. Once a vehicle is assigned a phase, that phase will not be changed due to vehicle movement between states.
Q5: Which and how many vehicles are covered by this Safety Recall?
A5: There are approximately 892,000 vehicles covered by this Safety Recall.
| Model Years | Model | Production Period | Approximate Total Vehicles |
|---|---|---|---|
| 2020-2021 | Avalon | Early July 2020 - Late April 2021 | 9,100 |
| 2020-2021 | Avalon HV | Early July 2020 - Early May 2021 | 5,800 |
| 2020-2022 | Camry | Early July 2020 - Early November 2023 | 202,500 |
| 2020-2022 | Camry HV | Early July 2020 - Late September 2021 | 27,100 |
| 2020-2021 | Corolla | Late May 2020 - early March 2021 | 92,700 |
| 2020-2021 | Highlander | Late May 2020 - Late September 2021 | 134,900 |
| 2020-2021 | Highlander HV | Early June 2020 - Late September 2021 | 58,100 |
| 2020-2021 | RAV4 | Early June 2020 - Late May 2021 | 249,800 |
| 2020-2021 | RAV4 HV | Early June 2020 - Mid November 2021 | 76,800 |
| 2021 | Sienna HV | Mid October 2020 - Late March 2021 | 35,300 |
Q5a: Are there any other Toyota/Lexus vehicles covered by this Safety Recall in the U.S.?
A5a: Yes, there are certain Lexus 2021 ES250, 2020-2022 ES300H, 2020-2021 ES350, 2020-2021 RX450H, 2020-2021 RX350 vehicles covered by this Safety Recall.
Q6: How does Toyota obtain my mailing information?
A6: Toyota uses an industry provider who works with each state's Department of Motor Vehicles (DMV) to receive registration or title information, based upon the DMV records. Please make sure your registration or title information is correct.
Q7: What if I have additional questions or concerns?
A7: If you have additional questions or concerns, please contact the Toyota Brand Engagement Center at 1-888-270-9371 Monday through Friday, 8:00 am to 8:00 pm, Saturday 9:00 am to 7:00 pm Eastern Time.
TECHNICAL INSTRUCTIONS
FOR
SAFETY RECALL 23TA15
PASSENGER AIRBAG MAY NOT DEPLOY
CERTAIN 2020-2022 AVALON, AVALON HV, CAMRY, CAMRY HV VEHICLES
Updated 12/09/2024 - Updated inspection app download
The repair quality of covered vehicles is extremely important to Toyota. All dealership technicians performing this repair are required to complete the most current version of the E-Learning course "Safety Recall and Service Campaign Essentials". To ensure that all vehicles have the repair performed correctly, technicians performing this recall repair are required to have completed all of the following courses currently:
- TIC206A - Electrical Repair
Always check which technicians can perform the repair by logging on to https://www.uotdealerreports.com. The dealership is responsible for selecting technicians who have completed the above courses to perform this repair. Carefully review your resources, the technician's skill level, and ability before assigning technicians to this repair. It is important to consider technician days off and vacation schedules to ensure properly trained technicians are available to perform this repair at all times.
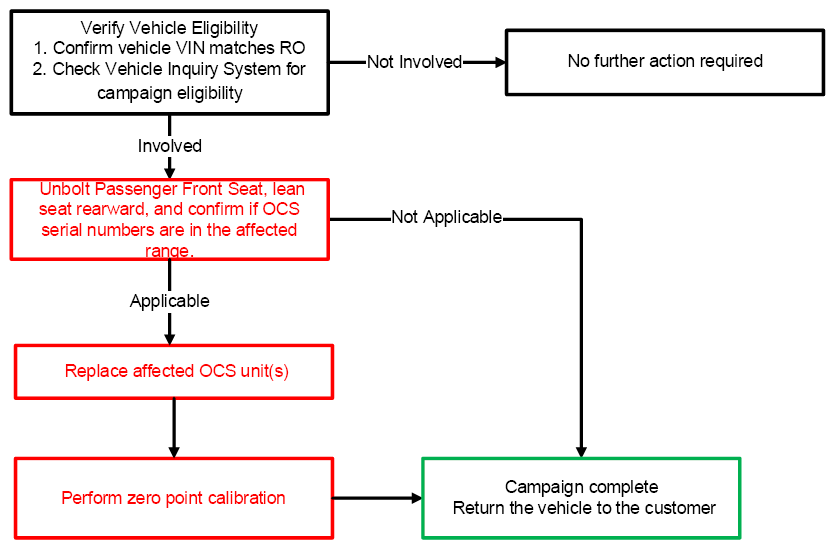
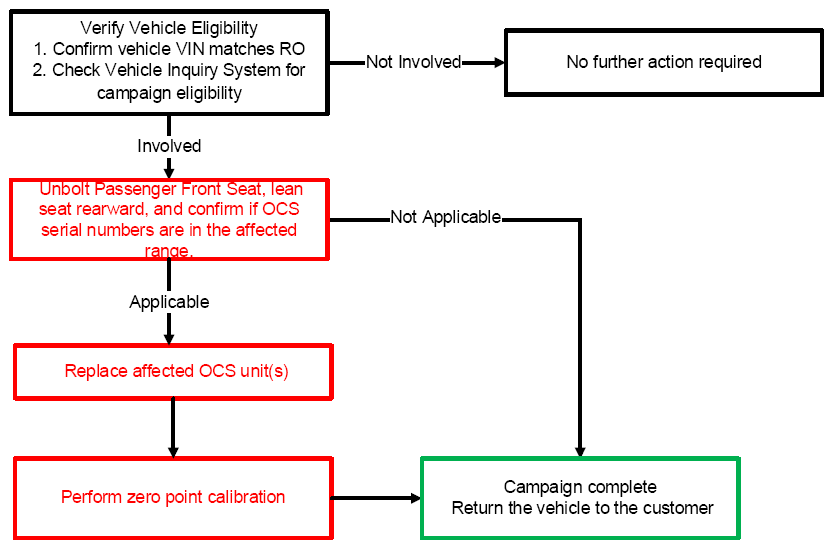
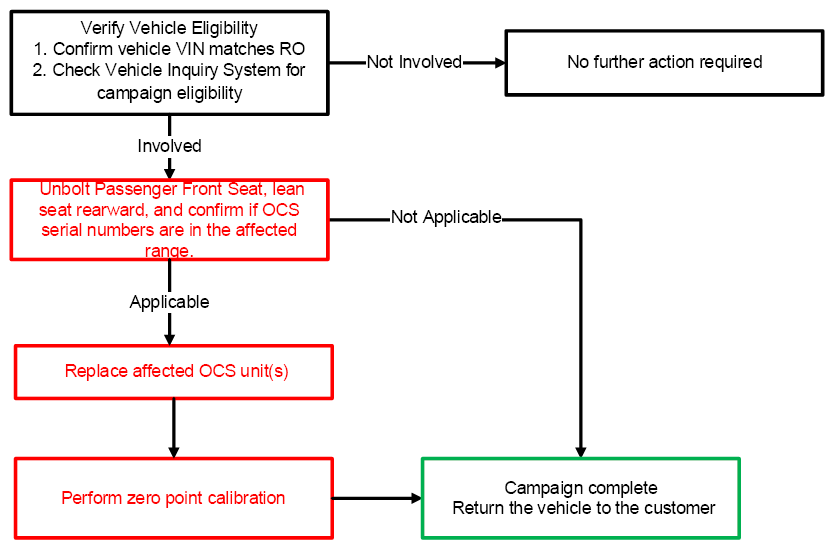
II. IDENTIFICATION OF AFFECTED VEHICLES
- CHECK VEHICLE FOR CAMPAIGN ELIGIBILITY
- Compare the vehicle's VIN to the VIN listed on the Repair Order to ensure they match.
- Check the TIS Vehicle Inquiry System to confirm the VIN is involved in this Campaign and that it has not already been completed.
III. PREPARATION
A. TOOLS AND EQUIPMENT
| Standard Hand Tools | Techstream/GTS+ | T50 "TORX" Socket |
| Torque Wrench | Flashlight | Masking Tape |
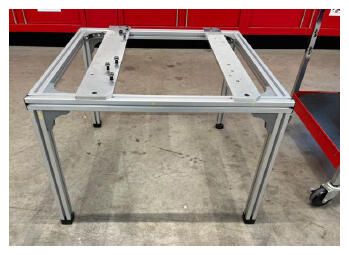
| Inspection Application | Protective Cover | Seat Jig Assembly |
| 3.5-4.5" Spacer (foam block, wood block or equivalent) |
OCS Inspection App. (Apple Only) |
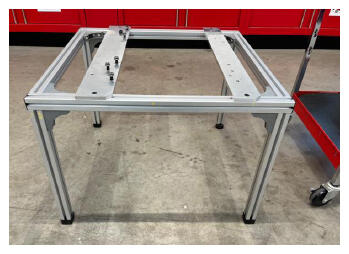
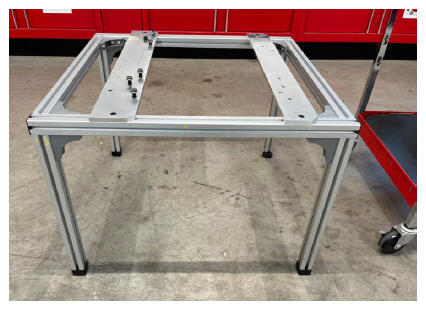
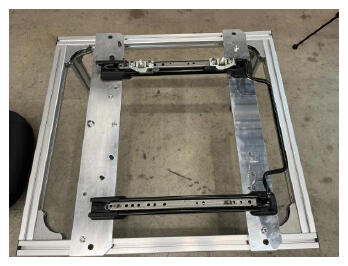
- Recall SST: Seat Jig Assembly (This was shipped to your dealer at Phase 1 Remedy Launch).
- It is critical that the seat jig assembly is used during sensor replacement, so the seat tracks remain square and do not become misaligned. Seat track out of alignment will impact the occupant detection weight readings by the ECU.

IV. WORK PROCEDURE TABLE OF CONTENTS
-
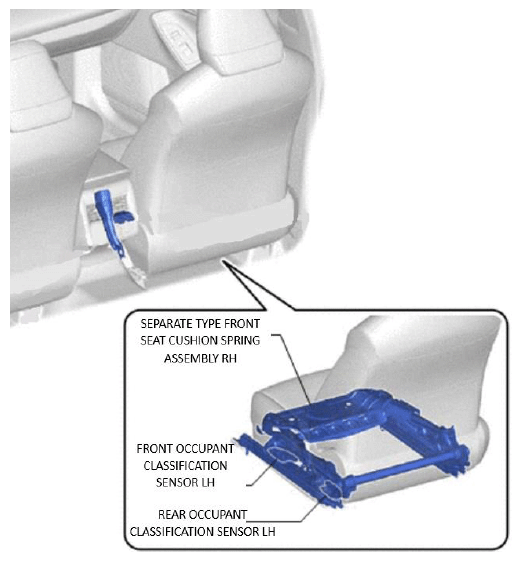
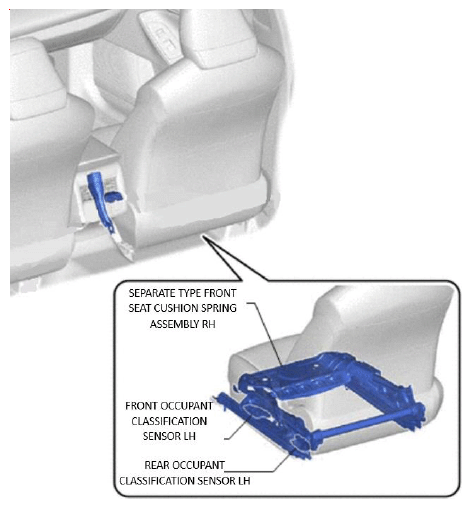
VI. INSPECT FRONT AND REAR OCS SERIAL NUMBERS
- UNBOLT THE PASSENGER FRONT SEAT AND CONFIRM OCS SERIAL NUMBERS
- Install the mobile inspection app on your device using the QR code or by clicking on the links below:
Apple: Click Here
Android: Here
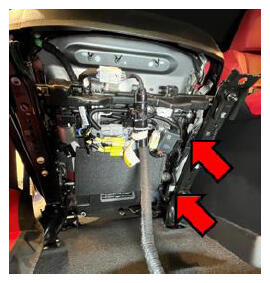
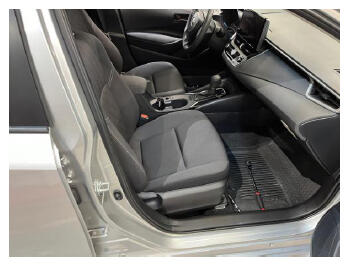
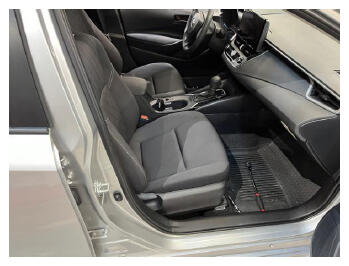
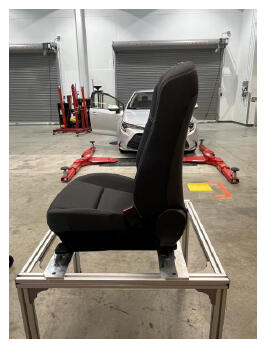
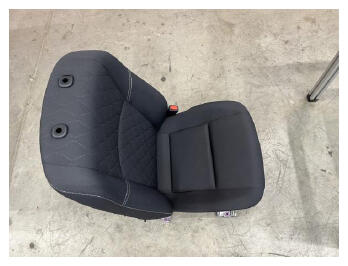
DO NOT disconnect any seat harness connectors at this time. - Take note of the passenger seat position, so seat can be returned to this position later.
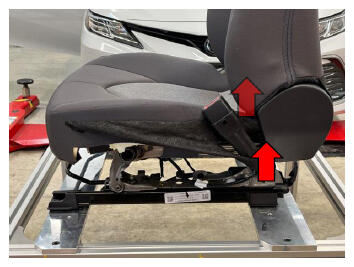
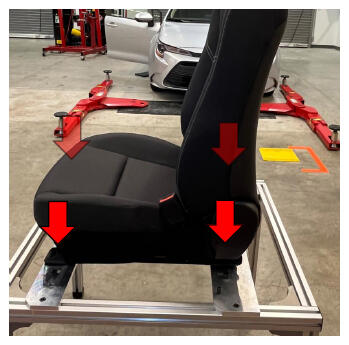
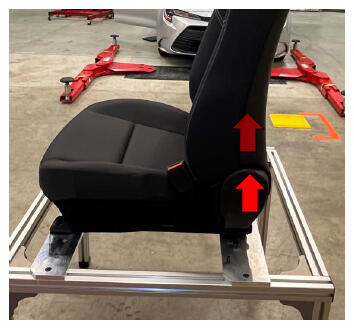
- Place the passenger front seat in the following positions before unbolting:
- Recline Angle - Upright Position
- Front Tilt Height - Highest Position
- Seat Lifter Height - Highest Position
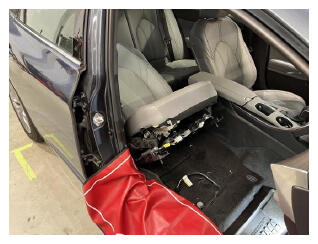
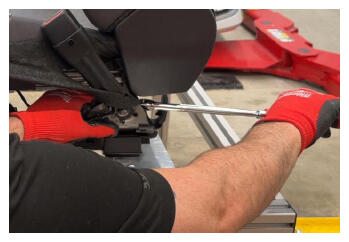
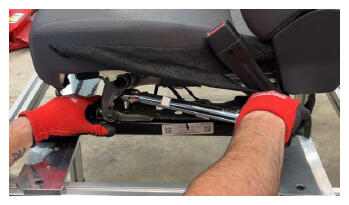
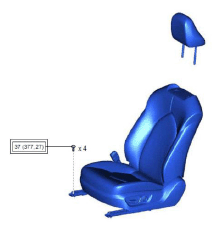
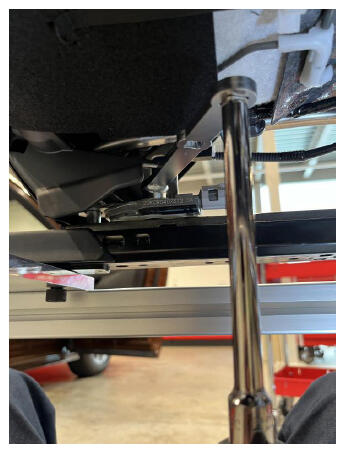
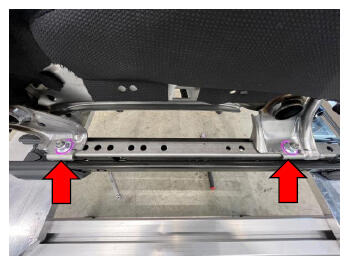
- Using a T50 "TORX" socket, unbolt the 4 passenger seat bolts.
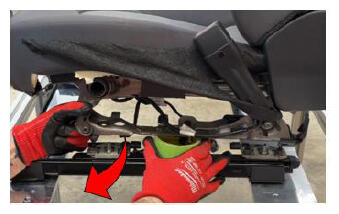
Lean the passenger front seat back to view the underside of the seat.
- Install the mobile inspection app on your device using the QR code or by clicking on the links below:
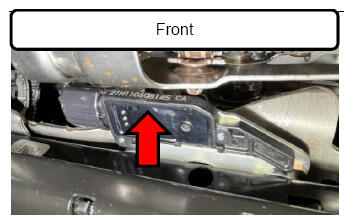
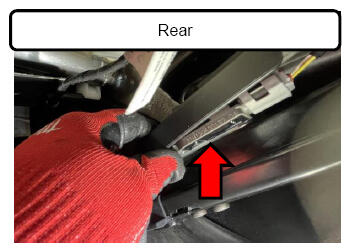
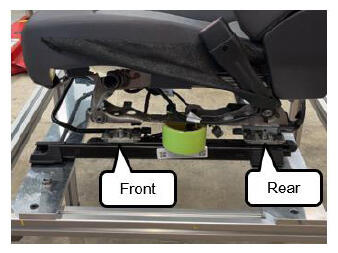
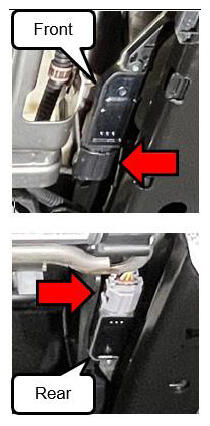
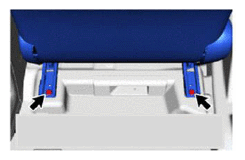
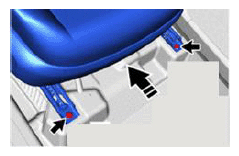
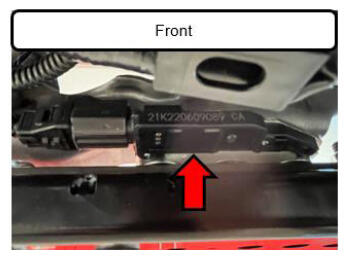
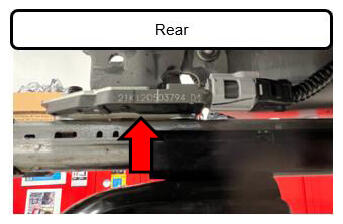
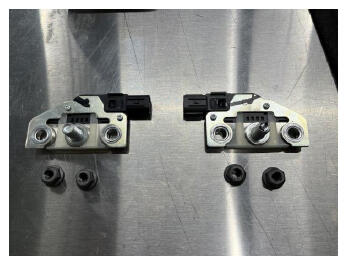
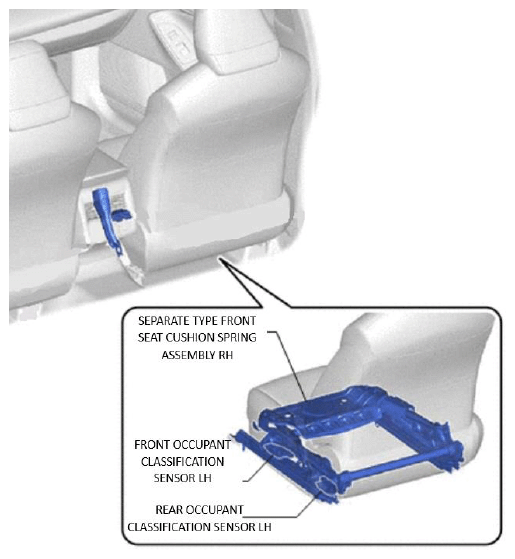
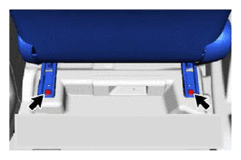
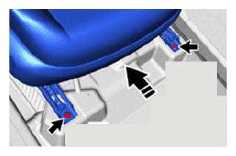
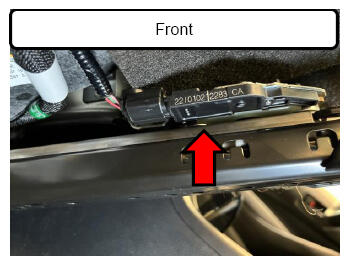
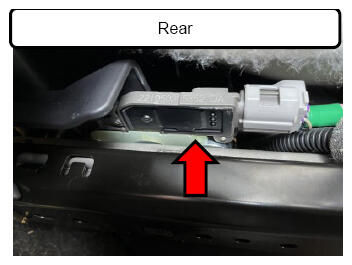
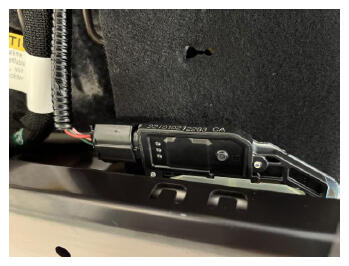
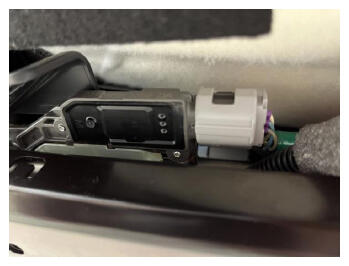
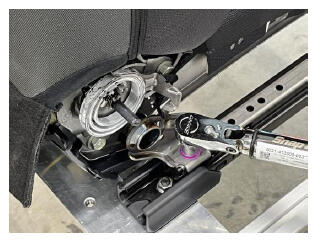
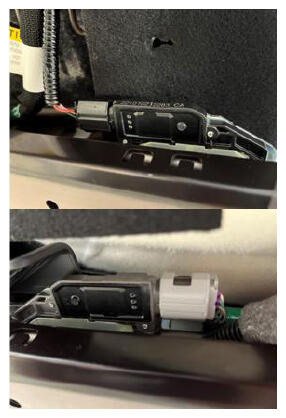
- IDENTIFY THE FRONT AND REAR OCS SERIAL NUMBERS
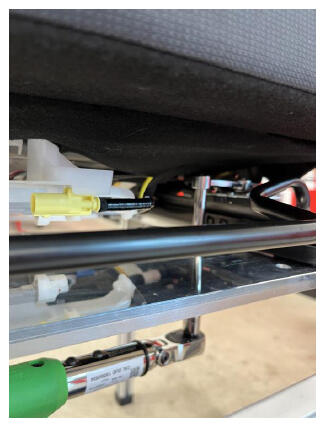
- Viewing from underneath the seat, locate and identify the front and rear OCSs.
- Log into the QA - Dealer Inspection Application.
- Select the appropriate campaign: "23TA15/23LA03".
- Follow the instructions in the application to scan the front and rear OCS serial numbers.
Do the front and/or rear OCS units require replacement?
YES : Front and/or rear OCS require replacement; proceed to Section VII .
NO : Proceed to step 3 .
If the first 5 digits of the OCS serial number are illegible, the sensor must be replaced. NOTE: In the event that the application cannot successfully scan the vinyl VIN certification label due to its compromised condition or if it is missing, please reach out to the Quality Compliance team at quality_compliance@toyota.com . Include a photograph of the damaged VIN label, if applicable, as well as the VIN label located beneath the windshield in your correspondence. - Viewing from underneath the seat, locate and identify the front and rear OCSs.
- REINSTALL PASSENGER FRONT SEAT
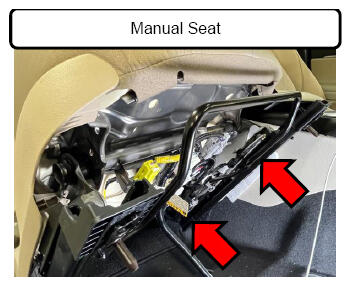
- Install the passenger front seat following the repair manual steps:
- Camry (Manual Seat)
- Camry (Power Seat)
- Avalon
NOTE: Be sure to tighten the bolts in the order shown in the repair manual. - Install the passenger front seat following the repair manual steps:
- RESTORE FRONT PASSENGER SEAT TO ORIGINAL POSITION
- CAMPAIGN COMPLETE


VII. REPLACE FRONT AND/OR REAR OCS ASSEMBLIES
HINT:
Perform this procedure only when OCS replacement has been determined in the previous section.
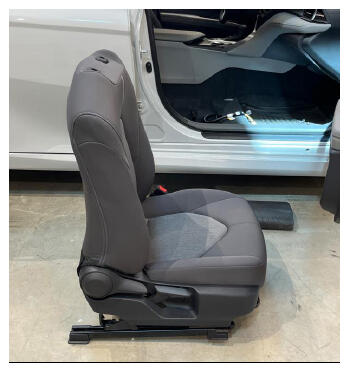
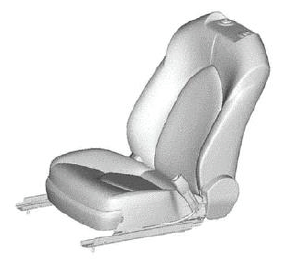
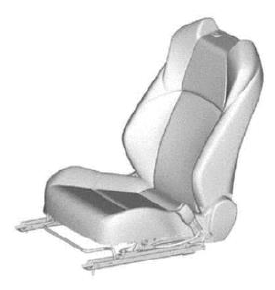
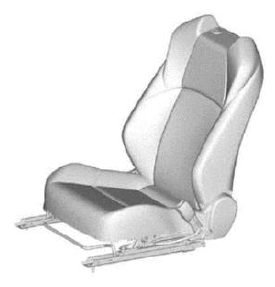
- REMOVE PASSENGER FRONT SEAT ASSEMBLY
Before removing the seat assembly, ensure that the rear seat track bolt holes are accessible for mounting to the jig assembly in step 3 . - PREPARE THE JIG ASSEMBLY
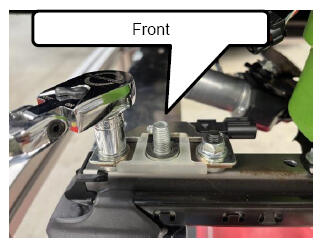
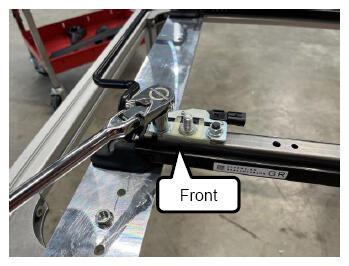
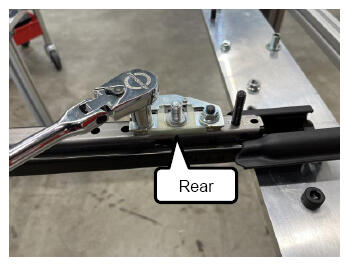
- Identify the correct rear bolt and front alignment pinhole combination to match the seat frame type being mounted to the jig.
HINT:
Be sure to position the jig safely and clear of any moving vehicles or machinery.
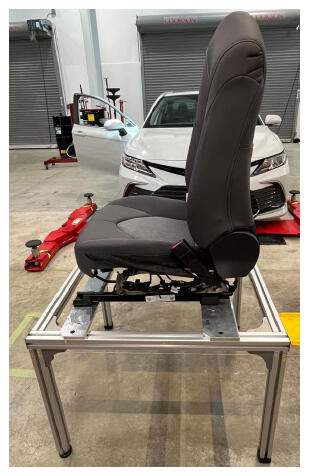
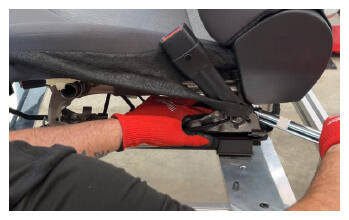
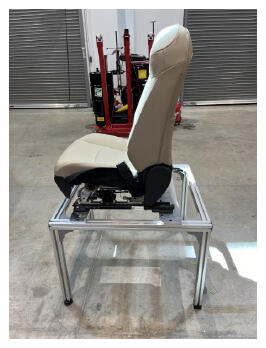
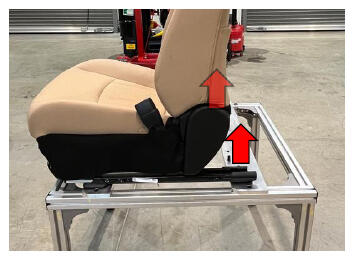
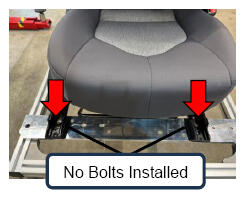
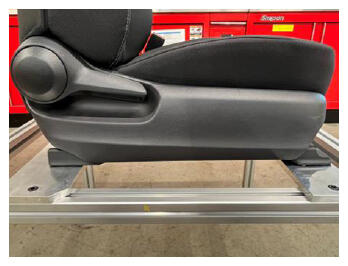
- INSTALL SEAT ASSEMBLY TO THE JIG
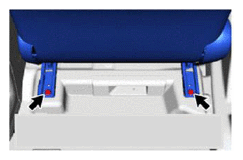
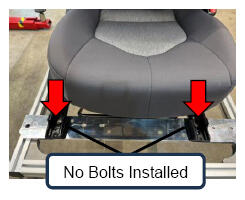
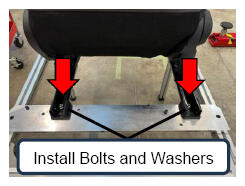
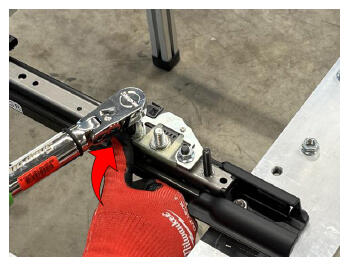
- Place the passenger front seat assembly onto the jig and secure it using the 2 provided bolts, nuts, and washers through the rear seat track mounting holes.
Torque: 27 N*m (20 ft.*lbf)
NOTE: Wear protective gloves. Sharp areas on the seat track parts may injure your hands. - Ensure seat is properly secured to the jig.
- Place the passenger front seat assembly onto the jig and secure it using the 2 provided bolts, nuts, and washers through the rear seat track mounting holes.
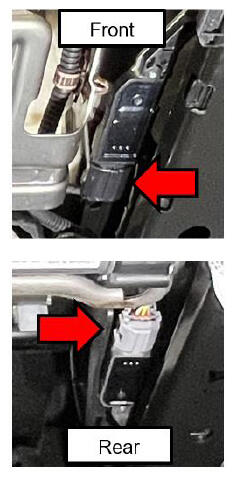
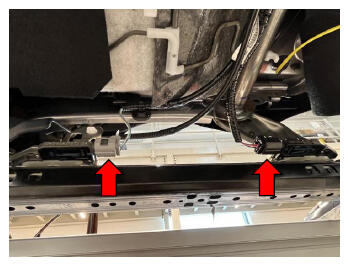
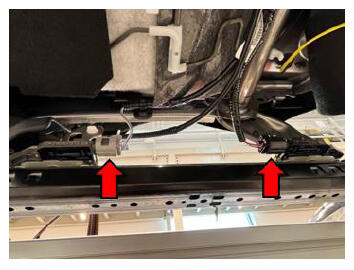
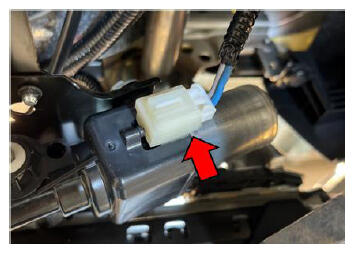
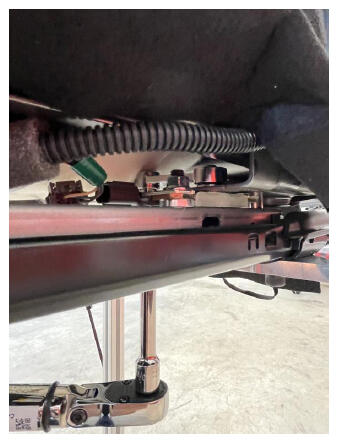
- DISCONNECT THE OCS CONNECTORS
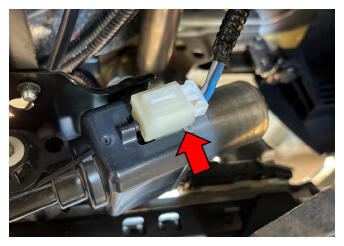
- Disconnect the front and rear OCS connectors.NOTE: Be sure to disconnect both front and rear OCS connectors before lifting up the seat track in the following step.
- Disconnect the front and rear OCS connectors.
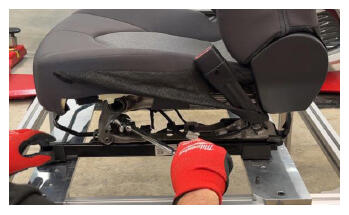
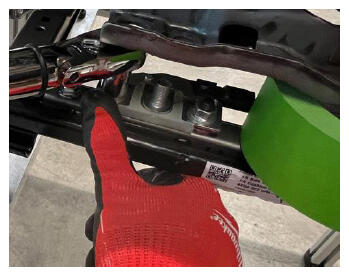
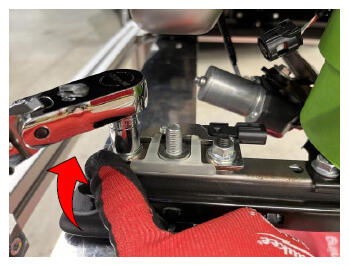
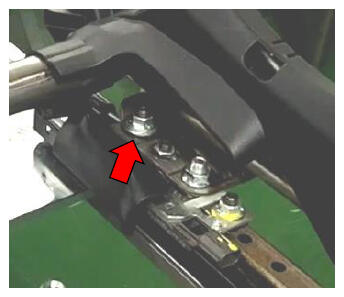
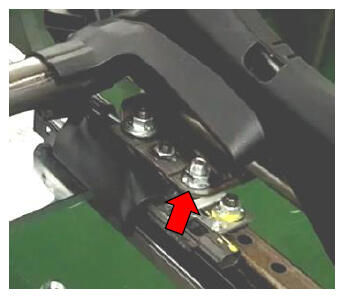
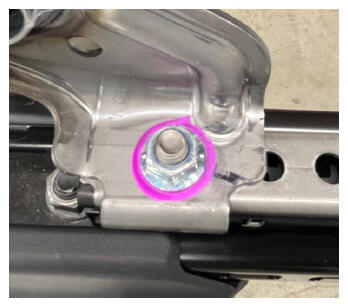
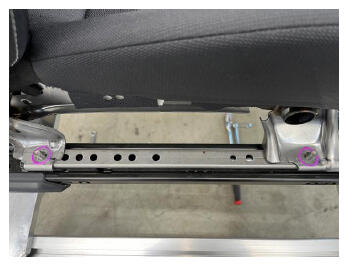
- REMOVE LEFT SIDE SEAT TRACK NUTS
DO NOT loosen any nuts other than the ones instructed. - Loosen and remove the front and rear seat track nuts using a 14mm socket and ratcheting wrench.
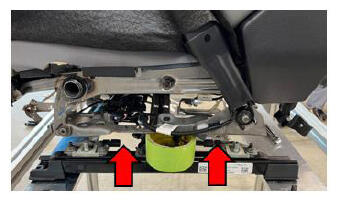
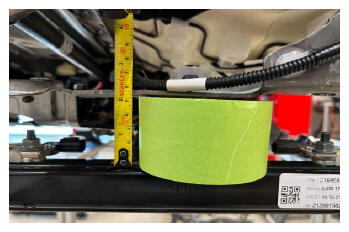
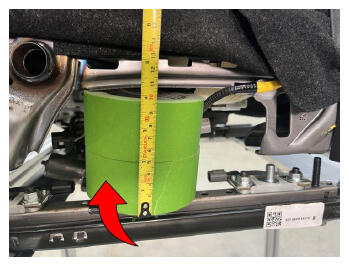
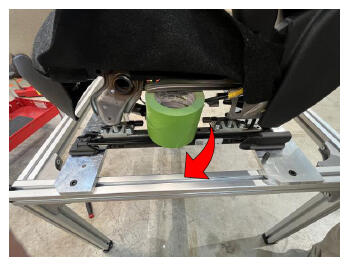
- INSTALL A 3.5-4.5" SPACER BETWEEN THE LOWER SEAT TRACK RAIL AND THE UPPER TRACK ASSEMBLY
HINT:
Be sure to use a foam block, tape roll, wood block, or similar, to provide enough space to access the front and rear OCS nuts.
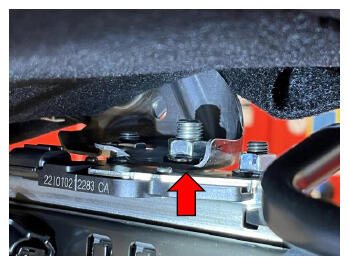
DO NOT exceed 4.5" of space when inserting tape roll. Damage may occur if this is not followed. - REMOVE OCS(S)
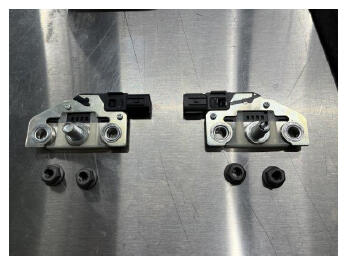
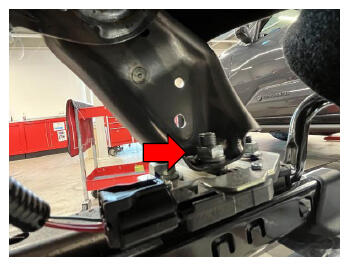
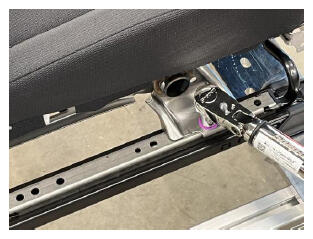
DO NOT loosen any nuts other than the ones instructed. - Using a 13mm box wrench or socket wrench, remove the front and/or rear OCS as instructed by the mobile inspection app.
- INSTALL NEW OCS(s)TO THE SEAT TRACK ASSEMBLY NOTE: Wear protective gloves. Sharp areas on the seat track parts may injure your hands.
- b) If necessary, install the NEW
rear OCS to the seat track assembly.NOTE: When installing, be sure to use your thumb to gently push on the left corner of each sensor to seat the NEW OCS properly.
Torque: 30 N*m (22.5 ft.*lbf)
- c) If necessary, install the NEW front OCS assembly to the seat track assembly.
NOTE: When installing, be sure to use your thumb to gently push on the left corner of each sensor to seat the NEW OCS properly.Torque: 30 N*m (22.5 ft.*lbf)
- Remove the spacer and place the upper seat assembly back onto the seat track assembly.
- Re-install the rear seat track nut.
Torque: 47 N*m (35 ft.*lbf)
- Re-install the front seat track nut.
Torque: 47 N*m (35 ft.*lbf)
- Reconnect both front and rear OCS connectors.
- Remove the 2 mounting nuts securing the seat assembly to the jig and remove the seat assembly from the jig.
- b) If necessary, install the NEW
rear OCS to the seat track assembly.
- REINSTALL PASSENGER FRONT SEAT
- Install the passenger front seat following the repair manual steps:
- Camry (Manual Seat)
- Camry (Power Seat)
- Avalon
- Continue to Zero Point Calibration section VIII .
- Install the passenger front seat following the repair manual steps:


VIM. CALIBRATION AND CONFIRMATION
- PERFORM ZERO POINT CALIBRATION
Refer to the Repair Manual for instructions on Vehicle Interior/SUPPLEMENTAL RESTRAINT SYSTEMS/OCCUPANT CLASSIFICATION SYSTEM/INITIALIZATION.
- Camry
- Camry HV
- Avalon
- Avalon HV
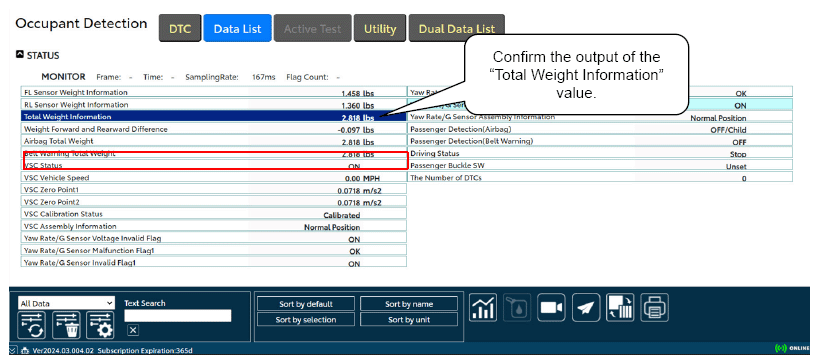
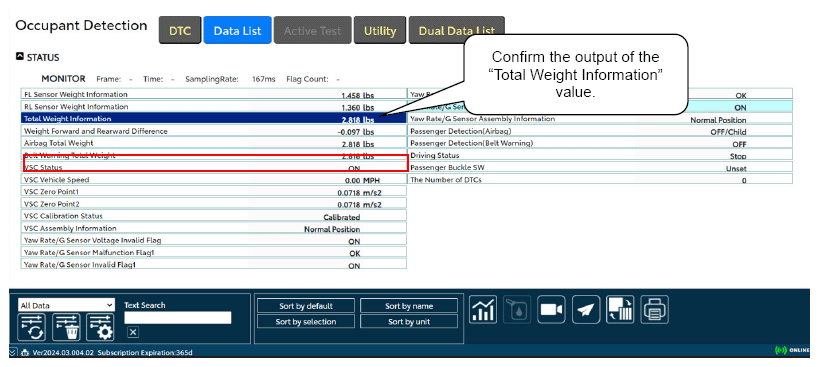
- PERFORM OCCUPANT CLASSIFICATION SYSTEM - DATA LIST/ACTIVE TEST
- Refer to the Repair Manual for instructions on Vehicle Interior/SUPPLEMENTAL RESTRAINT SYSTEMS: OCCUPANT CLASSIFICATION SYSTEM: DATA LIST/ACTIVE TEST.
- Camry
- Camry HV
- Avalon
- Avalon HV
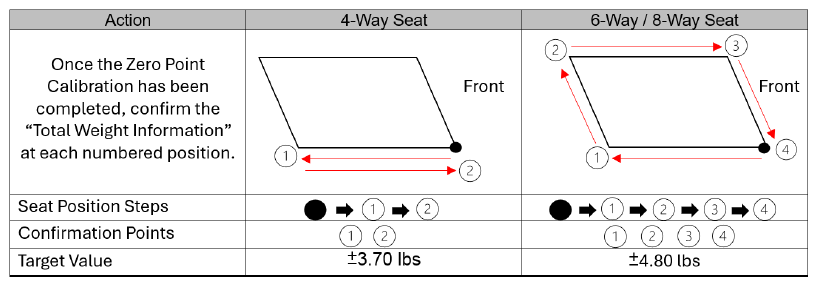
- For 4-way seat
:
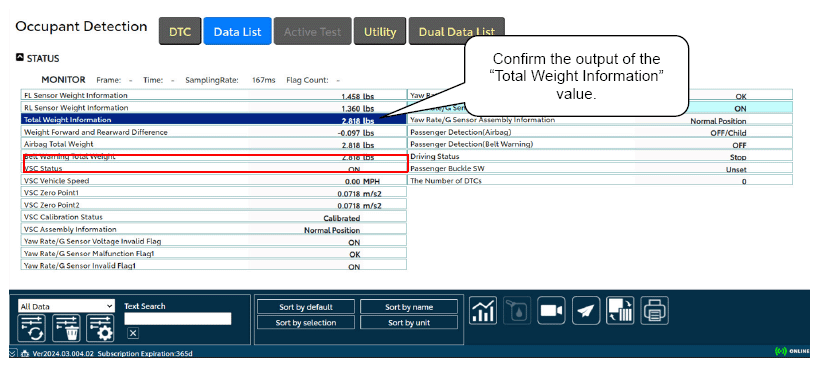
Confirm that the Total Weight Information value is within ±3.70 lbs at each confirmation point.
HINT: Refer to the chart above for reference.
- With the seat in the lowest and forward most position, move the seat to the rear most position and confirm the "Total Weight Information" value in the data list.
- Move the seat to the forward most position and confirm the "Total Weight Information" value in the data list.
Do all the confirmation point values fall within the target range value?
YES - Proceed to Step 3 .
NO - STOP and contact FTS to report findings.
- For 6-way and 8-way seats
:
Confirm that the Total Weight Information value is within ±4.80 lbs at each confirmation point.
HINT: Refer to the chart above for reference.
- With the seat in the lowest and forward most position, move the seat to the rear most position and confirm the "Total Weight Information" value in the data list.
- Move the seat to the rear upper position and confirm the "Total Weight Information" value in the data list.
- Move the seat to the front upper position and confirm the "Total Weight Information" value in the data list.
- Move the seat to the front lower position and confirm the "Total Weight Information" value in the data list.
Do all the confirmation point values fall within the target range value?
YES - Proceed to Step 3 .
NO - STOP and contact FTS to report findings.
- Refer to the Repair Manual for instructions on Vehicle Interior/SUPPLEMENTAL RESTRAINT SYSTEMS: OCCUPANT CLASSIFICATION SYSTEM: DATA LIST/ACTIVE TEST.
- PERFORM FINAL CONFIRMATION CHECK
Sit on the passenger front seat and confirm if the airbag light changes from "OFF" to "ON" .
Does the passenger airbag indicator light switch to ON?
YES - Campaign complete.
NO - Perform zero point calibration again and recheck.
VERIFY REPAIR QUALITY
- Confirm all bolts are properly torqued.
- Confirm all seat track bolts and wire harness connectors are installed correctly.
- Confirm no DTCs present after repair.
IX. APPENDIX
A. PARTS DISPOSAL
In accordance with Federal law, please make sure all recalled parts (original parts) removed from the vehicle are disposed of in a manner in which they will not be reused, unless requested for parts recovery return.
B. CAMPAIGN DESIGNATION DECODER
Examples:
19TA01 = Launched in 2019, Toyota, Safety Recall Remedy Phase, 1st Safety Recall Launched in 2019
20TC02 = Launched in 2020, Special Service Campaign, 2nd Special Service Campaign Launched in 2020
21TE05 = Launched in 2021, Customer Support Program, 5th Customer Support Program Launched in 2021
TECHNICAL INSTRUCTIONS
FOR
SAFETY RECALL 23TA15
PASSENGER AIRBAG MAY NOT DEPLOY
CERTAIN 2020-2022 HIGHLANDER, HIGHLANDER HV, RAV4, RAV4 HV, SIENNA HV VEHICLES
Updated 12/09/2024 - Updated inspection app download information
The repair quality of covered vehicles is extremely important to Toyota. All dealership technicians performing this repair are required to complete the most current version of the E-Learning course "Safety Recall and Service Campaign Essentials". To ensure that all vehicles have the repair performed correctly, technicians performing this recall repair are required to have completed all of the following courses currently:
- TIC206A - Electrical Repair
Always check which technicians can perform the repair by logging on to https://www.uotdealerreports.com. The dealership is responsible for selecting technicians who have completed the above courses to perform this repair. Carefully review your resources, the technician's skill level, and ability before assigning technicians to this repair. It is important to consider technician days off and vacation schedules to ensure properly trained technicians are available to perform this repair at all times.
II. IDENTIFICATION OF AFFECTED VEHICLES
- CHECK VEHICLE FOR CAMPAIGN ELIGIBILITY
- Compare the vehicle's VIN to the VIN listed on the Repair Order to ensure they match.
- Check the TIS Vehicle Inquiry System to confirm the VIN is involved in this Campaign and that it has not already been completed.
III. PREPARATION
A. TOOLS AND EQUIPMENT
| Standard Hand Tools | Techstream/GTS+ | T50 "TORX" Socket |
| Torque Wrench | Flashlight | Masking Tape |
| Inspection Application | Protective Cover | |
| 3.5-4.5 Spacer (foam block, wood block or equivalent) |
SST 14mm Torque Adapter (100mm/150mm) | SST 12mm Torque Adapter (100mm/150mm) |
| 6" 3/8 Extension |
- Recall SST: Seat Jig Assembly (This was shipped to your dealer at Phase 1 Remedy Launch).
- It is critical that the seat jig assembly is used during sensor replacement, so the seat tracks remain square and do not become misaligned. Seat track out of alignment will impact the occupant detection weight readings by the ECU.

IV. WORK PROCEDURE TABLE OF CONTENTS
-
VI. INSPECT FRONT AND REAR OCS SERIAL NUMBERS
- UNBOLT THE PASSENGER FRONT SEAT AND CONFIRM OCS SERIAL NUMBERS
- Install the mobile inspection app on your device using the QR code or by clicking on the links below:
Apple: Click Here
Android: Click Here
DO NOT disconnect any seat harness connectors at this time - Take note of the passenger seat position, so seat can be returned to this position later.
- Place the passenger front seat in the following positions before unbolting:
- Recline Angle - Upright Position
- Front Tilt Height - Highest Position
- Seat Lifter Height - Highest Position
- Using a T50 "TORX" socket, unbolt the 4 passenger seat bolts.
Lean the passenger front seat back to view the underside of the seat.
- Install the mobile inspection app on your device using the QR code or by clicking on the links below:
- IDENTIFY THE FRONT AND REAR OCS ASSEMBLY SERIAL NUMBERS
- Viewing from underneath the seat, locate and identify the front and rear OCSs.
- Log into the QA - Dealer Inspection Application.
- Select the appropriate campaign: "23TA15/23LA03".
- Follow the instructions in the application to scan the front and rear OCS serial numbers.
Do the front and/or rear OCS units require replacement?
YES : Front and/or rear OCS require replacement; proceed to Section VII .
NO : Proceed to step 3 .
If the first 5 digits of the OCS serial number are illegible, the sensor must be replaced. NOTE: In the event that the application cannot successfully scan the vinyl VIN certification label due to its compromised condition or if it is missing, please reach out to the Quality Compliance team at quality_compliance@toyota.com . Include a photograph of the damaged VIN label, if applicable, as well as the VIN label located beneath the windshield in your correspondence. - Viewing from underneath the seat, locate and identify the front and rear OCSs.
- REINSTALL PASSENGER FRONT SEAT
- Install the passenger front seat following the repair manual steps:
- Highlander
- RAV4 (Manual)
- RAV4 (Power)
- Sienna HV
NOTE: Be sure to tighten the bolts in the order shown in the repair manual. - Install the passenger front seat following the repair manual steps:
- RESTORE FRONT PASSENGER SEAT TO ORIGINAL POSITION
- CAMPAIGN COMPLETE


VII. REPLACE FRONT AND/OR REAR OCS ASSEMBLIES
HINT:
Perform this procedure only when OCS replacement has been determined in the previous section.
- REMOVE PASSENGER FRONT SEAT ASSEMBLY
For powered seats, set the seat position forward to allow rear seat track bolts to be accessible for mounting to jig assembly in the following steps. - PREPARE THE JIG ASSEMBLY
- Identify the correct rear bolt and front alignment pinhole combination to match the seat frame type being mounted to the jig.
HINT:
Be sure to position the jig in a safe location clear of any moving vehicles or machinery.
- INSTALL SEAT ASSEMBLY TO THE JIG
- Place the passenger front seat assembly onto the jig and secure it using the 2 provided bolts, nuts, and washers through the rear seat track mounting holes.
Torque: 27 N*m (20 ft.*lbf)
NOTE: Wear protective gloves. Sharp areas on the seat track parts may injure your hands. - Ensure seat is properly secured to the jig.
- Place the passenger front seat assembly onto the jig and secure it using the 2 provided bolts, nuts, and washers through the rear seat track mounting holes.
- DISCONNECT THE OCS CONNECTORS
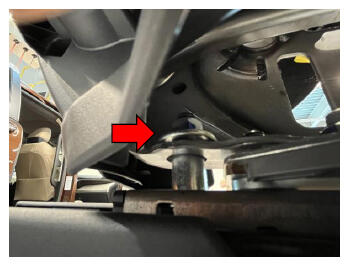
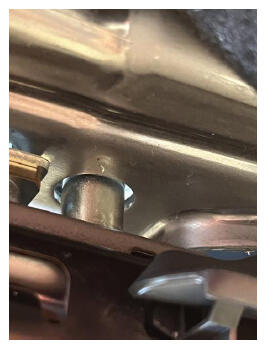
- REMOVE LEFT REAR SEAT TRACK INTERFERENCE NUT
DO NOT loosen any nuts other than the ones instructed. - REMOVE LEFT REAR SEAT TRACK NUT
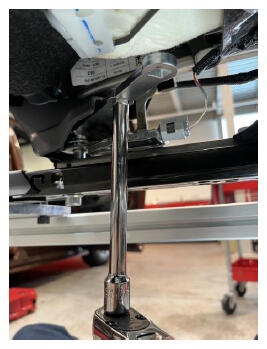
DO NOT loosen any nuts other than the ones instructed. - Loosen and remove the rear seat track nut using the SST 14mm Torque Adapter in either the 100mm or 150mm setting, with a 6" extension and ratcheting wrench.
NOTE: Be sure to confirm that the rear seat track nut is being removed, not the rear OCS nut. - REMOVE LEFT FRONT SEAT TRACK NUT
DO NOT loosen any nuts other than the ones instructed. - Loosen and remove the front seat track nut using the SST 14mm Torque Adapter in either the 100mm or 150mm setting, with a 6" extension and ratcheting wrench.
HINT:
For powered seats only , disconnect the front power seat motor connector to allow the removal and installation of the front seat track bolt.
- INSTALL A 3.5-4.5" SPACER BETWEEN THE LOWER SEAT TRACK RAIL AND THE UPPER TRACK ASSEMBLY
HINT:
Be sure to use a foam block, tape roll, wood block, or similar to provide enough space to access the front and rear OCS assembly nuts.
DO NOT exceed 4.5" of space when inserting tape roll. Damage may occur if this is not followed - REMOVE OCS(s)
DO NOT loosen any nuts other than the ones instructed. - Using a ratcheting or box wrench, remove the front and/or rear OCS, as instructed by the mobile inspection app.
- INSTALL NEW OCS(s) TO THE SEAT TRACK ASSEMBLY NOTE: Wear protective gloves. Sharp areas on the seat track parts may injure your hands.
- If necessary, install the NEW
rear OCS to the seat track assembly.NOTE: When installing, be sure to use your thumb to gently push on the left corner of each sensor to seat the NEW OCS properly.
Torque: 25 N*m (18.5 ft.*lbf)
- If necessary, install the NEW
front OCS assembly to the seat track assembly.NOTE: When installing, be sure to use your thumb to gently push on the left corner of each sensor to seat the NEW OCS properly.
Torque: 25 N*m (18.5 ft.*lbf)
- Remove the spacer and place the upper seat assembly back onto the seat track assembly.
- If necessary, install the NEW
rear OCS to the seat track assembly.
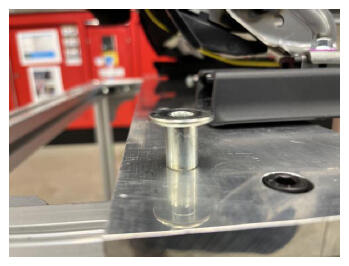
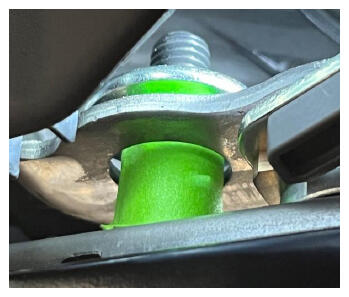
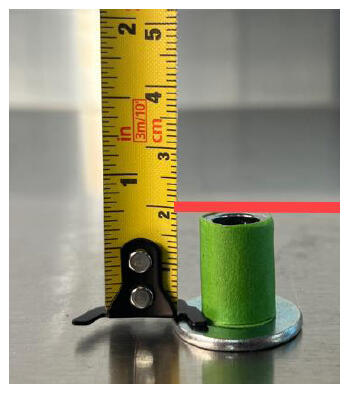
- PREPARE INTERFERENCE SLEEVE
- Prepare the interference sleeve for installation by using masking tape. Cut approximately 20mm (3/4") of tape and wrap the interference sleeve 2 times
, ensuring no wrinkles or creases exist.
HINT:
This will ensure that no contact between the sleeve and seat track assembly exists during the installation of the left side seat track nuts.
- Temporarily insert the interference sleeve onto the stud.
- Prepare the interference sleeve for installation by using masking tape. Cut approximately 20mm (3/4") of tape and wrap the interference sleeve 2 times
, ensuring no wrinkles or creases exist.
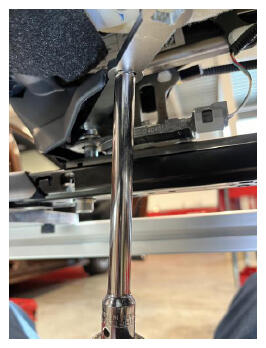
- CALCULATE TORQUE SPECIFICATION FOR SEAT TRACK NUTS
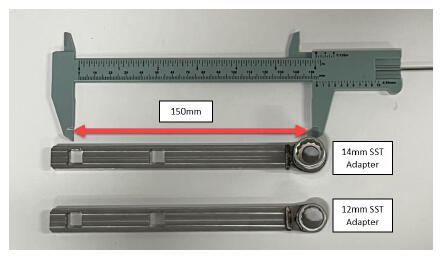
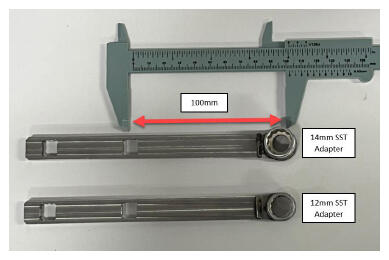
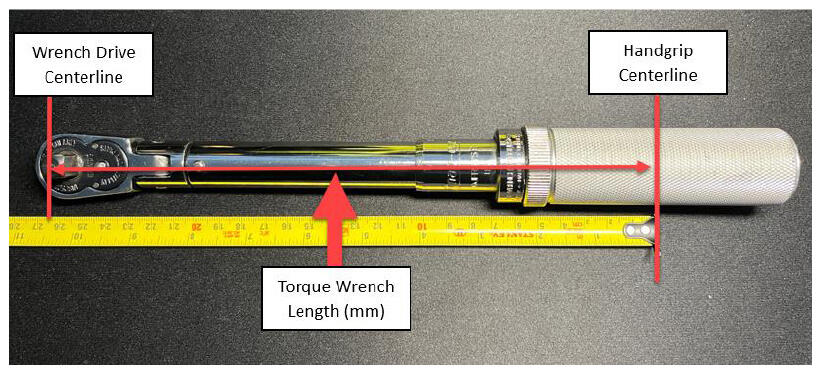
- Use the following formula to calculate the torque specification:NOTE: The applied torque changes when using the SST adapter. The calculation below will determine the new applied torque specification required for installing the seat track nuts.
HINT:
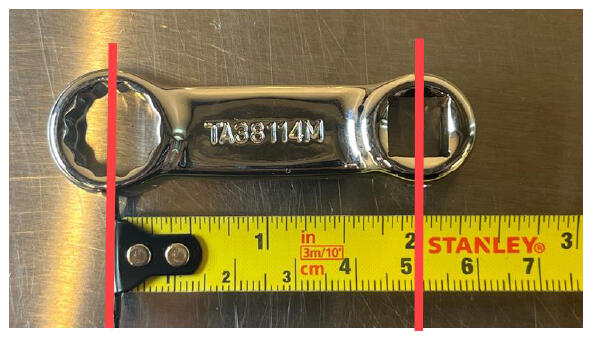
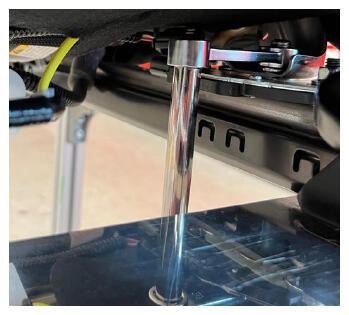
- The measurement that needs to be performed manually is the Torque Wrench Length in millimeters (See illustration above). This is due to the varying sizes of torque wrenches available for use.
- The SST adapter is set to allow for 100mm or 150mm in length (choose either length based on need and enter it into the calculation).
- An extension can be used along with the SST adapter. The extension does not affect the calculated torque specification.
- Calculation
:
- New Torque Value = (A/(A+B)) * Original Torque Value
A = Torque wrench length (mm) (wrench drive centerline to handgrip centerline)
B = SST adapter length being used (100mm or 150mm)
Original Torque Value = 37 N*m
HINT: Example :
If :
A = *270mm *(variable based on your torque wrench size)
B = *100mm *(fixed value for this SST)
Original Torque Value = 37 N*m
Then :
New Torque Value = (270/(270+100)) * 37 =
(270/370) * 37 =
0.730 * 37 = 27
(Example) New Torque Value = 27 N*m (20 ft.*lbf)
- New Torque Value = (A/(A+B)) * Original Torque Value
- Use the following formula to calculate the torque specification:
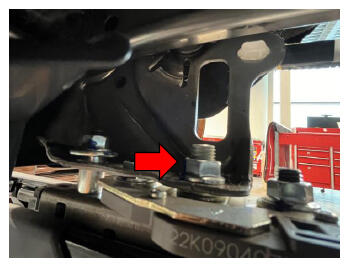
- INSTALL THE LEFT SIDE SEAT TRACK BOLTS
- The interference sleeve MUST NOT touch the seat frame on any side during the following steps.
- Confirm that the interference sleeve is free to spin after the torquing of each nut.
- If at any point the interference sleeve is no longer free to spin, the left side seat track nuts need to be removed, the seat track adjusted, and the nuts reinstalled.
- Re-install the rear seat track nut and check to ensure interference sleeve is still free to spin. If interference sleeve is not free to spin (making contact with the seat frame), loosen the rear seat track nut, adjust the seat assembly, and repeat this step.
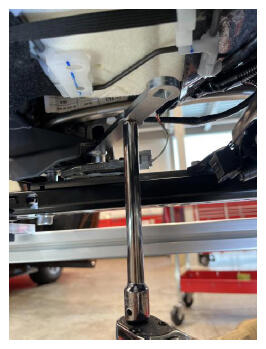
Original Torque Value: 37 N*m (27.5 ft.*lbf)
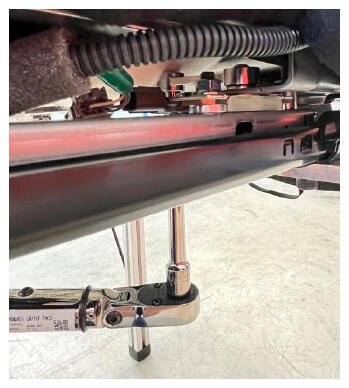
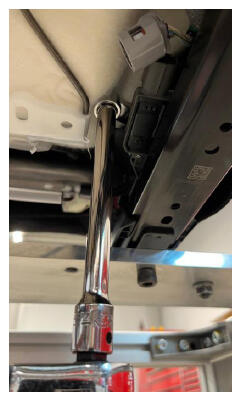
NOTE: The torque adapter MUST remain inline (parallel) with the torque wrench handle while torquing nuts. If torque wrench adapter is not parallel with the torque wrench handle while torquing, the effective length of the tool will be altered, causing torque calculations to be inaccurate. - Re-install the front seat track nut following the same process as the previous step.
Original Torque Value: 37 N*m (27.5 ft.*lbf)
- Remove the tape from the interference sleeve and reinstall it to the stud.
- Re-install the interference sleeve nut.
Original Torque Value: 25 N*m (18 ft.*lbf)
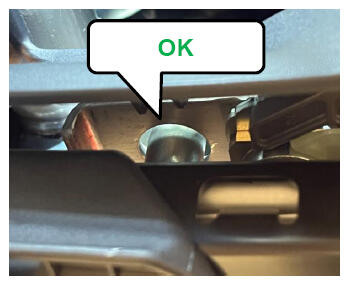
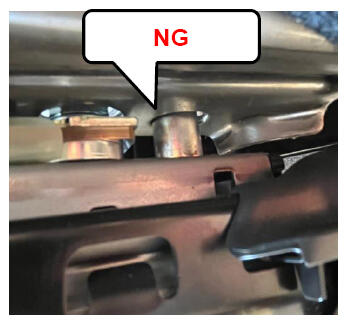
- Confirm the status of the interference sleeve using a flashlight to shine light in the top side of the interference sleeve.
HINT:
If no interference exists between the lower seat frame and the spacer, the light can be seen all around. If there is interference, the light cannot be seen.
Does the interference sleeve touch the seat track on any side?
NG : Remove the left side seat track bolts and repeat the installation steps.
OK : Proceed to step 14 .
- RECONNECT BOTH FRONT AND REAR OCS CONNECTORS. NOTE: (Power Seat Only) Reinstall the power seat motor connector removed in the previous step.
- REMOVE THE SEAT ASSEMBLY FROM THE JIG
- Remove the 2 nuts and then remove the seat assembly from the jig.
- REINSTALL PASSENGER FRONT SEAT
- Install the passenger front seat following the repair manual steps:
- Highlander
- RAV4 (Manual)
- RAV4 (Power)
- Sienna HV
- Continue to Zero Point Calibration section VIII.
- Install the passenger front seat following the repair manual steps:


VIII. CALIBRATION AND CONFIRMATION
- PERFORM ZERO POINT CALIBRATION
Refer to the Repair Manual for instructions on Vehicle Interior/SUPPLEMENTAL RESTRAINT SYSTEMS/OCCUPANT CLASSIFICATION SYSTEM/INITIALIZATION.
- Highlander
- RAV4
- Sienna HV
- PERFORM OCCUPANT CLASSIFICATION SYSTEM - DATA LIST/ACTIVE TEST
- Refer to the Repair Manual for instructions on Vehicle Interior/SUPPLEMENTAL RESTRAINT SYSTEMS: OCCUPANT CLASSIFICATION SYSTEM: DATA LIST/ACTIVE TEST.
- Highlander
- RAV4
- Sienna HV
- For 4-way seat
:
Confirm that the Total Weight Information value is within ±3.70 lbs at each confirmation point.
HINT: Refer to the chart above for reference.
- With the seat in the lowest and forward most position, move the seat to the rear most position and confirm the "Total Weight Information" value in the data list.
- Move the seat to the forward most position and confirm the "Total Weight Information" value in the data list.
Do all the confirmation point values fall within the target range value?
YES - Proceed to Step 3 .
NO - STOP and contact FTS to report findings.
- For 6-way and 8-way seats
:
Confirm that the Total Weight Information value is within ±4.80 lbs at each confirmation point.
HINT: Refer to the chart above for reference.
- With the seat in the lowest and forward most position, move the seat to the rear most position and confirm the "Total Weight Information" value in the data list.
- Move the seat to the rear upper position and confirm the "Total Weight Information" value in the data list.
- Move the seat to the front upper position and confirm the "Total Weight Information" value in the data list.
- Move the seat to the front lower position and confirm the "Total Weight Information" value in the data list.
Do all the confirmation point values fall within the target range value?
YES - Proceed to Step 3 .
NO - STOP and contact FTS to report findings.
- Refer to the Repair Manual for instructions on Vehicle Interior/SUPPLEMENTAL RESTRAINT SYSTEMS: OCCUPANT CLASSIFICATION SYSTEM: DATA LIST/ACTIVE TEST.
- PERFORM FINAL CONFIRMATION CHECK
Sit on the passenger front seat and confirm if the airbag light changes from "OFF" to "ON" .
Does the passenger airbag indicator light switch to ON?
YES - Campaign complete.
NO - Perform zero point calibration again and recheck.
VERIFY REPAIR QUALITY
- Confirm all bolts are properly torqued.
- Confirm all seat track bolts and wire harness connectors are installed correctly.
- Confirm no DTCs present after repair.

IX. APPENDIX
A. PARTS DISPOSAL
In accordance with Federal law, please make sure all recalled parts (original parts) removed from the vehicle are disposed of in a manner in which they will not be reused, unless requested for parts recovery return.
B. CAMPAIGN DESIGNATION DECODER
Examples:
19TA01 = Launched in 2019, Toyota, Safety Recall Remedy Phase, 1st Safety Recall Launched in 2019
20TC02 = Launched in 2020, Special Service Campaign, 2nd Special Service Campaign Launched in 2020
21TE05 = Launched in 2021, Customer Support Program, 5th Customer Support Program Launched in 2021
TECHNICAL INSTRUCTIONS
FOR
SAFETY RECALL 23TA15
PASSENGER AIRBAG MAY NOT DEPLOY
CERTAIN 2020-2021 COROLLA VEHICLES
Updated 12/09/2024 - Updated inspection app download information
The repair quality of covered vehicles is extremely important to Toyota. All dealership technicians performing this repair are required to complete the most current version of the E-Learning course "Safety Recall and Service Campaign Essentials". To ensure that all vehicles have the repair performed correctly, technicians performing this recall repair are required to have completed all of the following courses currently:
- TIC206A - Electrical Repair
Always check which technicians can perform the repair by logging on to https://www.uotdealerreports.com.
The dealership is responsible for selecting technicians who have completed the above courses to perform this repair. Carefully review your resources, the technician's skill level, and ability before assigning technicians to this repair. It is important to consider technician days off and vacation schedules to ensure properly trained technicians are available to perform this repair at all times.

II. IDENTIFICATION OF AFFECTED VEHICLES
- CHECK VEHICLE FOR CAMPAIGN ELIGIBILITY
- Compare the vehicle's VIN to the VIN listed on the Repair Order to ensure they match.
- Check the TIS Vehicle Inquiry System to confirm the VIN is involved in this Campaign and that it has not already been completed.
III. PREPARATION
A. TOOLS AND EQUIPMENT
| Standard Hand Tools | Techstream/GTS+ | T50 "TORX" Socket |
| Torque Wrench | Flashlight | Masking Tape |
| Inspection Application | Protective Cover | Seat Jig Assembly |
| 3.5-4.5" Spacer (foam block, wood block or equivalent) |
SST 12mm Torque Adapter (50mm Long) | Paint Marker |
| 6" 3/8 Extension | SST 14mm Torque Adapter (50mm Long) |
- Recall SST: Seat Jig Assembly (This was shipped to your dealer at Phase 1 Remedy Launch).
- It is critical that the seat jig assembly is used during sensor replacement, so the seat tracks remain square and do not become misaligned. Seat track out of alignment will impact the occupant detection weight readings by the ECU.
IV. WORK PROCEDURE TABLE OF CONTENTS
-
VI. INSPECT FRONT AND REAR OCS SERIAL NUMBERS
- UNBOLT THE PASSANGER FRONT SEAT AND CONFIRM OCS SERIAL NUMBERS
- Install the mobile inspection app on your device using the QR code or by clicking on the links below:
Apple: Click Here
Android: Click Here
DO NOT disconnect any seat harness connectors at this time. - Take note of the passenger seat position, so seat can be returned to this position later.
- Place the passenger front seat in the following positions before unbolting:
- Recline Angle - Upright Position
- Front Tilt Height - Highest Position
- Seat Lifter Height - Highest Position
- Using a T50 "TORX" socket, unbolt the 4 passenger seat bolts.
Lean the passenger front seat back to view the underside of the seat
- Install the mobile inspection app on your device using the QR code or by clicking on the links below:
- IDENTIFY THE FRONT AND REAR OCS ASSEMBLY SERIAL NUMBERS
- Viewing from underneath the seat, locate and identify the front and rear OCSs.
- Log into the QA - Dealer Inspection Application.
- Select the appropriate campaign: "23TA15/23LA03".
- Follow the instructions in the application to scan the front and rear OCS serial numbers.
Do the front and/or rear OCS units require replacement?
YES : Front and/or rear OCS require replacement; proceed to Section VII .
NO : Proceed to step 3 .
If the first 5 digits of the OCS serial number are illegible, the sensor must be replaced. NOTE: In the event that the application cannot successfully scan the vinyl VIN certification label due to its compromised condition or if it is missing, please reach out to the Quality Compliance team at quality_compliance@toyota.com . Include a photograph of the damaged VIN label, if applicable, as well as the VIN label located beneath the windshield in your correspondence. - Viewing from underneath the seat, locate and identify the front and rear OCSs.
- REINSTALL PASSENGER FRONT SEAT
- Install the passenger front seat following the repair manual steps:
- Corolla
NOTE: Be sure to tighten the bolts in the order shown in the repair manual. - Install the passenger front seat following the repair manual steps:
- RESTORE FRONT PASSENGER SEAT TO ORIGINAL POSITION
- CAMPAIGN COMPLETE


VII. REPLACE FRONT AND/OR REAR OCS ASSEMBLIES
HINT:
Perform this procedure only when OCS replacement has been determined in the previous section.
- REMOVE PASSENGER FRONT SEAT ASSEMBLY
- PREPARE THE JIG ASSEMBLY
- Identify the correct rear bolt and front alignment pinhole combination to match the seat frame type being mounted to the jig.
HINT:
Be sure to position the jig in a safe location clear of any moving vehicles or machinery.
- INSTALL SEAT ASSEMBLY TO THE JIG
- Place the passenger front seat assembly onto the jig and secure it using the 2 provided bolts and washers through the rear seat track mounting holes.
Torque: 27 N*m (20 ft.*lbf)
NOTE: Wear protective gloves. Sharp areas on the seat track parts may injure your hands. - Ensure seat is properly secured to the jig.
- Place the passenger front seat assembly onto the jig and secure it using the 2 provided bolts and washers through the rear seat track mounting holes.
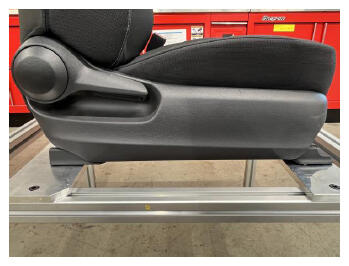
- REMOVE THE PASSENGER SIDE FRONT SEAT CUSHION SHIELD
- Remove the passenger side front seat cushion shield following the repair manual instructions:
- Corolla (Step 12 (a-d) only)
- Remove the passenger side front seat cushion shield following the repair manual instructions:
- DISCONNECT THE OCS CONNECTORS
- Disconnect the front and rear OCS connectors.
NOTE: Be sure to disconnect both front and rear OCS connectors before lifting up the seat track in the following steps. - REMOVE LEFT REAR SEAT TRACK INTERFERENCE NUT
DO NOT loosen any nuts other than the ones instructed. - REMOVE LEFT REAR SEAT TRACK BOLT
DO NOT loosen any nuts other than the ones instructed. - REMOVE LEFT FRONT SEAT TRACK NUT
DO NOT loosen any nuts other than the ones instructed. - Loosen and remove the front seat track nut using a 14mm 2" (50mm) Torque Adapter with a 6" extension and ratcheting wrench.
- REMOVE THE RIGHT SIDE SEAT TRACK NUTS
- LIFT UP AND REMOVE UPPER SEAT FRAME ASSEMBLY
Make sure both OCS connectors are disconnected before removing the seat assembly. - REMOVE OCS ASSEMBLIES
DO NOT loosen any nuts other than the ones instructed. - INSTALL NEW OCS ASSEMBLIES TO THE SEAT TRACK ASSEMBLY NOTE: Wear protective gloves. Sharp areas on the seat track parts may injure your hands.
- If necessary, install the NEW
rear OCS assembly to the seat track assembly.NOTE: When installing, be sure to use your thumb to gently push on the left corner of each sensor to seat the NEW OCS properly.
Torque: 25 N*m (18.5 ft.*lbf)
- If necessary, install the NEW
front OCS assembly to the seat track assembly.NOTE: When installing, be sure to use your thumb to gently push on the left corner of each sensor to seat the NEW OCS properly.
Torque: 25 N*m (18.5 ft.*lbf)
- Place the upper seat assembly back onto the seat track assembly.
- If necessary, install the NEW
rear OCS assembly to the seat track assembly.
- REINSTALL RIGHT SIDE SEAT TRACK ASSEMBLY
- PREPARE INTERFERENCE SLEEVE
- Prepare the interference sleeve for installation by using masking tape. Cut approximately 20mm (3/4") of tape and wrap the interference sleeve 2 times
, ensuring no wrinkles or creases exist.
HINT:
This will ensure that no contact between the sleeve and seat track assembly exists during the installation of the left side seat track nuts.
- Temporarily insert the interference sleeve onto the stud.
- Prepare the interference sleeve for installation by using masking tape. Cut approximately 20mm (3/4") of tape and wrap the interference sleeve 2 times
, ensuring no wrinkles or creases exist.
- CALCULATE TORQUE SPECIFICATION FOR SEAT TRACK NUTS
- Use the following formula to calculate the torque specification:NOTE: The applied torque changes when using the SST adapter. The calculation below will determine the new applied torque specification required for installing the seat track nuts.
HINT:
- The measurement that needs to be performed manually is the Torque Wrench Length in millimeters (See illustration above). This is due to the varying sizes of torque wrenches available for use.
- The SST adapter is set to allow for 50mm in length.
- An extension can be used along with the SST adapter. The extension does not affect the calculated torque specification.
- Calculation
:
- New Torque Value = (A/(A+B)) * Original Torque Value
A = Torque wrench length (mm) (wrench drive centerline to handgrip centerline)
B = SST adapter length being used (50mm)
Original Torque Value = 37 N*m
HINT: Example :
If :
A = 270mm *(variable based on your torque wrench size)
B = 50mm *(fixed value for this SST)
Original Torque Value = 37 N*m
Then :
New Torque Value = (270/(270+50)) * 37 =
(270/320) * 37 =
0.843 * 37 = 31
New Torque Value = 31 N*m (23 ft.*lbf)
- New Torque Value = (A/(A+B)) * Original Torque Value
- Use the following formula to calculate the torque specification:
- INSTALL THE LEFT SIDE SEAT TRACK BOLTS
- The interference sleeve MUST not touch the seat frame on any side during the following steps.
- Confirm that the interference sleeve is free to spin after the torquing of each nut.
- If at any point the interference sleeve is no longer free to spin, the left side seat track nuts need to be removed, the seat track adjusted, and the nuts reinstalled.
- Re-install the left side rear seat track nut and check to ensure interference sleeve is still free to spin. If interference sleeve is not free to spin (making contact with the seat frame), loosen the rear seat track nut, adjust the seat assembly, and repeat this step
Original Torque Value: 37 N*m (27.5 ft.*lbf)
NOTE: The torque adapter MUST remain inline (parallel) with the torque wrench handle while torquing nuts. If torque wrench adapter is not parallel with the torque wrench handle while torquing, the effective length of the tool will be altered, causing torque calculations to be inaccurate. - Re-install the left side front seat track nut following the same process as the previous step.
Original Torque Value: 37 N*m (27.5 ft.*lbf)
- Remove the tape from the interference sleeve and reinstall it to the stud.
- Re-install the interference sleeve nut.
Original Torque Value: 25 N*m (18 ft.*lbf)
- Confirm the status of the interference sleeve using a flashlight to shine light in the top side of the interference sleeve.
HINT:
If no interference exists between the lower seat frame and the spacer, the light can be seen all around. If there is interference, the light cannot be seen.
Does the interference sleeve touch the seat track on any side?
NG : Remove the left side seat track bolts and repeat the installation steps.
OK : Proceed to step 17 .
- RECONNECT BOTH FRONT AND REAR OCS CONNECTORS.
- INSTALL THE PASSENGER SIDE FRONT SEAT CUSHION SHIELD
- Install the passenger side front seat cushion shield following the repair manual instructions:
- Corolla (Step 37(b) - 39(b) only)
- Install the passenger side front seat cushion shield following the repair manual instructions:
- REMOVE THE SEAT ASSEMBLY FROM THE JIG
- Remove the 2 nuts and then remove the seat assembly from the jig.
- REINSTALL PASSENGER FRONT SEAT
- Install the passenger front seat following the repair manual steps:
- Corolla
- Continue to Zero Point Calibration section VIII.
- Install the passenger front seat following the repair manual steps:


VIII. CALIBRATION AND CONFIRMATION
- PERFORM ZERO POINT CALIBRATION
- Refer to the Repair Manual for instructions on Vehicle Interior/SUPPLEMENTAL RESTRAINT SYSTEMS/OCCUPANT CLASSIFICATION SYSTEM/INITIALIZATION.
- Corolla
- Refer to the Repair Manual for instructions on Vehicle Interior/SUPPLEMENTAL RESTRAINT SYSTEMS/OCCUPANT CLASSIFICATION SYSTEM/INITIALIZATION.
- PERFORM OCCUPANT CLASSIFICATION SYSTEM - DATA LIST/ACTIVE TEST
- Refer to the Repair Manual for instructions on Vehicle Interior/SUPPLEMENTAL RESTRAINT SYSTEMS: OCCUPANT CLASSIFICATION SYSTEM: DATA LIST/ACTIVE TEST.
- Corolla
- Corolla HV
- For 4-way seat
:
Confirm that the Total Weight Information value is within ±3.70 lbs at each confirmation point.
HINT: Refer to the chart above for reference.
- With the seat in the lowest and forward most position, move the seat to the rear most position and confirm the "Total Weight Information" value in the data list.
- Move the seat to the forward most position and confirm the "Total Weight Information" value in the data list.
Do all the confirmation point values fall within the target range value?
YES - Proceed to Step 3 .
NO - STOP and contact FTS to report findings.
- Refer to the Repair Manual for instructions on Vehicle Interior/SUPPLEMENTAL RESTRAINT SYSTEMS: OCCUPANT CLASSIFICATION SYSTEM: DATA LIST/ACTIVE TEST.
- CONFIRM PASSENGER AIRBAG INDICATOR LIGHT OPERATION
- Sit on the passenger front seat and confirm if the airbag light changes from "OFF" to "ON".
Does the passenger airbag indicator light switch to ON?
YES - Campaign complete.
NO - Perform zero point calibration again and recheck.
- Sit on the passenger front seat and confirm if the airbag light changes from "OFF" to "ON".

VERIFY REPAIR QUALITY
- Confirm all bolts are properly torqued.
- Confirm all seat track bolts and wire harness connectors are installed correctly.
- Confirm no DTCs present after repair.
IX. APPENDIX
A. PARTS DISPOSAL
In accordance with Federal law, please make sure all recalled parts (original parts) removed from the vehicle are disposed of in a manner in which they will not be reused, unless requested for parts recovery return.
B. CAMPAIGN DESIGNATION DECODER
Examples:
19TA01 = Launched in 2019, Toyota, Safety Recall Remedy Phase, 1st Safety Recall Launched in 2019
20TC02 = Launched in 2020, Special Service Campaign, 2nd Special Service Campaign Launched in 2020
21TE05 = Launched in 2021, Customer Support Program, 5th Customer Support Program Launched in 2021