Inspection [12/2019 - ]: Procedure
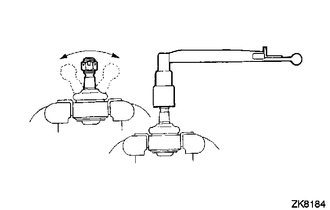
- INSPECT TIE ROD ASSEMBLY LH
- Secure the tie rod assembly LH in a vise between aluminum plates.NOTE:
Do not overtighten the vise.
- Install the nut to the stud bolt.
- Flip the ball joint back and forth 5 times.
- Using a torque wrench and the nut, turn the stud bolt continuously at a rate of 2 to 4 seconds per turn, and check the turning torque on the 5th turn.
Standard Turning Torque
0.49 to 3.43 N.m (5 to 34 kgf/cm, 5 to 30 in.lbf)
HINT:
If the turning torque is not within the specified range, replace the tie rod assembly LH with a new one.
- Check that the dust cover is not cracked and that there is no grease on it.
HINT:
If the dust cover is cracked or there is grease on it, replace the tie rod assembly LH with a new one.
- Secure the tie rod assembly LH in a vise between aluminum plates.
- INSPECT TIE ROD ASSEMBLY RH
HINT:
Perform the same procedure as for the LH side.
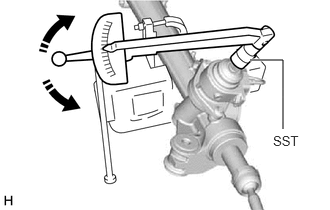
- INSPECT TOTAL PRELOAD NOTE:
Inspect the total preload in a no-load condition by removing the tie rod assemblies RH and LH, and steering rack boots.
- Install SST to the pinion shaft and turn it left and right 5 times or more.
- SST: 09616-00011
- Using SST and a torque wrench, turn the pinion shaft continuously at a rate of 4 to 6 seconds per turn to inspect the total preload of the rack and pinion power steering gear assembly.
Standard Preload
1.61 to 3.3 N.m (17 to 33 kgf/cm, 15 to 29 in.lbf)
NOTE:Inspect the total preload around the steering rack center position.
HINT:
If the total preload is not within the specified range, replace the rack and pinion power steering gear assembly with a new one.
- Install SST to the pinion shaft and turn it left and right 5 times or more.