Removal [12/2019 - 10/2022]: Procedure
- REMOVE ROOF DRIP SIDE FINISH MOULDING JOINT COVER (w/o Roof Rack)
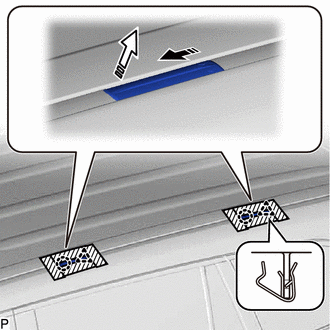
- Apply protective tape around the roof drip side finish moulding joint cover as shown in the illustration.

Remove in this Direction (1) 
Remove in this Direction (2) 
Protective Tape - Disengage the 2 clips and 2 claws, and remove the 2 roof drip side finish moulding joint covers as indicated by the arrows, in the order shown in the illustration.
- Apply protective tape around the roof drip side finish moulding joint cover as shown in the illustration.
- REMOVE FRONT ROOF DRIP SIDE FINISH MOULDING (w/o Roof Rack)
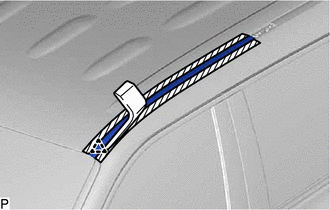
- Apply protective tape around the front roof drip side finish moulding.
Protective Tape - Using a moulding remover, disengage the clip and remove the front roof drip side finish moulding.NOTE:
- Do not remove the roof drip side finish moulding clip.
- If a roof drip side finish moulding clip is damaged or falls off, replace it with a new one.
- Apply protective tape around the front roof drip side finish moulding.
- REMOVE CENTER ROOF DRIP SIDE FINISH MOULDING (w/o Roof Rack)
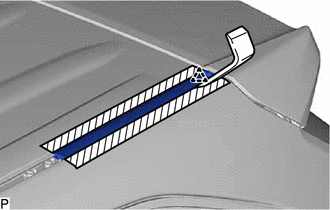
- Apply protective tape around the center roof drip side finish moulding.
*a Matchmark Protective Tape - Place a matchmark on the vehicle body at the location indicated in the illustration.
- Using a moulding remover, disengage the clip and remove the center roof drip side finish moulding.NOTE:
- Do not remove the roof drip side finish moulding clip.
- If the roof drip side finish moulding clip is damaged or falls out, replace it with a new one.
- Apply protective tape around the center roof drip side finish moulding.
- REMOVE REAR ROOF DRIP SIDE FINISH MOULDING (w/o Roof Rack)
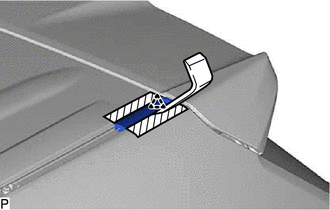
- Apply protective tape around the rear roof drip side finish moulding.
Protective Tape - Using a moulding remover, disengage the clip and remove the rear roof drip side finish moulding.NOTE:
- Do not remove the roof drip side finish moulding clip.
- If the roof drip side finish moulding clip is damaged or falls out, replace it with a new one.
- Apply protective tape around the rear roof drip side finish moulding.
- REMOVE ROOF RACK ASSEMBLY (w/ Roof Rack)
Refer to REMOVAL [12/2019 - 10/2022]
- REMOVE REAR ROOF DRIP SIDE FINISH MOULDING (w/ Roof Rack)
- Apply protective tape around the rear roof drip side finish moulding.
Protective Tape - Using a moulding remover, disengage and remove the rear roof drip side finish moulding.NOTE:
- Do not remove the roof drip side finish moulding clip.
- If the roof drip side finish moulding clip is damaged or falls out, replace it with a new one.
- Apply protective tape around the rear roof drip side finish moulding.