Installation [12/2019 - ]: Procedure
- INSTALL BACK DOOR GLASS SPACER
- Using a brush or sponge, coat the installation area of a new back door glass spacer with glass primer.NOTE:
- Do not apply too much glass primer.
- Allow the glass primer to dry for 3 minutes or more.
- Throw away any leftover glass primer.
HINT:
If an area other than specified is coated by accident, wipe off the glass primer with a clean piece of cloth before it dries.
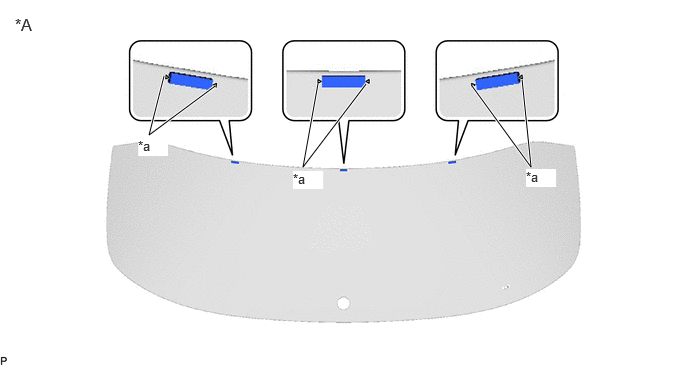
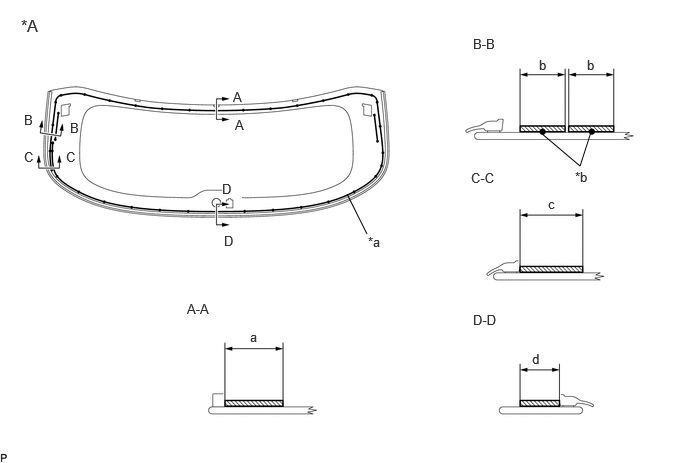
- Install the 3 back door glass spacers to the back door glass as shown in the illustration.
*A Back Side - - *a Marking for Spacer Pasting - -
- Using a brush or sponge, coat the installation area of a new back door glass spacer with glass primer.
- INSTALL BACK WINDOW GLASS CLIP
- Using a brush or sponge, coat the installation area of a new back window glass clip with glass primer.NOTE:
- Do not apply too much glass primer.
- Allow the glass primer to dry for 3 minutes or more.
- Throw away any leftover glass primer.
HINT:
If an area other than specified is coated by accident, wipe off the glass primer with a clean piece of cloth before it dries.
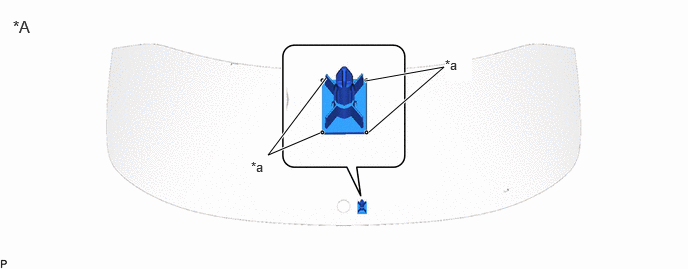
- Install the back window glass clip to the back door glass as shown in the illustration.
*A Back Side - - *a Marking for Clip Installation - -
- Using a brush or sponge, coat the installation area of a new back window glass clip with glass primer.
- INSTALL BACK WINDOW OUTSIDE MOULDING CLIP LH
- Using a brush or sponge, coat the installation area of a new back window outside moulding clip LH with glass primer.NOTE:
- Do not apply too much glass primer.
- Allow the glass primer to dry for 3 minutes or more.
- Throw away any leftover glass primer.
HINT:
If an area other than specified is coated by accident, wipe off the glass primer with a clean piece of cloth before it dries.
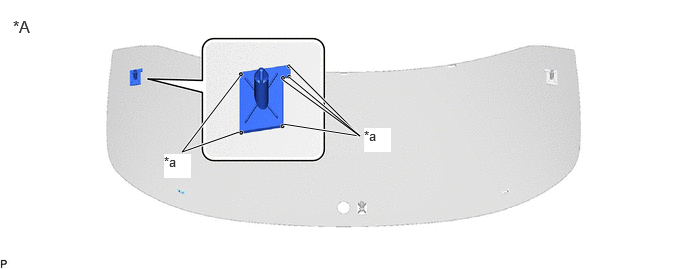
- Install the back window outside moulding clip LH to the back door glass as shown in the illustration.
*A Back Side - - *a Marking for Clip Installation - -
- Using a brush or sponge, coat the installation area of a new back window outside moulding clip LH with glass primer.
- INSTALL BACK WINDOW OUTSIDE MOULDING CLIP RH
HINT:
Use the same procedure as for the LH side.
- INSTALL BACK WINDOW OUTSIDE MOULDING
- Using a brush or sponge, coat the installation area of a new back window outside moulding with glass primer.NOTE:
- Do not apply too much glass primer.
- Allow the glass primer to dry for 3 minutes or more.
- Throw away any leftover glass primer.
HINT:
If an area other than specified is coated by accident, wipe off the glass primer with a clean piece of cloth before it dries.
- Install the back window outside moulding to the back door glass as shown in the illustration.
*A Back Side - - *a Alignment Position (Edge Of Curved Surface) - - Standard Dimension
Area Dimension Area Dimension a 3.0 mm (0.118 in.) b 11.6 mm (0.457 in.) c 15.4 mm (0.606 in.) - -
- Using a brush or sponge, coat the installation area of a new back window outside moulding with glass primer.
- INSTALL BACK DOOR GLASS NOTE:
- After cutting off the old adhesive remaining on the adhesion surface, apply new adhesive within 2 hours.
- If the cut surface of the old adhesive is left exposed for a long time, the adhesion strength will be reduced, so apply the new adhesive quickly.
- Position the back door glass.
*a Matchmark - Using suction cups, place the back door glass in the correct position.
- Check that the whole contact surface of the back door glass rim is perfectly even.
- Align the matchmarks on the back door glass and back door panel.NOTE:
Check that the back window glass clips are engaged to the back door panel correctly.
- Remove the back door glass.
- Using a brush, coat the installation surfaces on the back door panel with body primer.NOTE:
- Do not coat the adhesive with body primer.
- Do not apply too much body primer.
- Allow the body primer to dry for 3 minutes or more.
- Throw away any leftover body primer.
HINT:
If an area other than specified is coated by accident, wipe off the body primer with a clean piece of cloth before it dries.
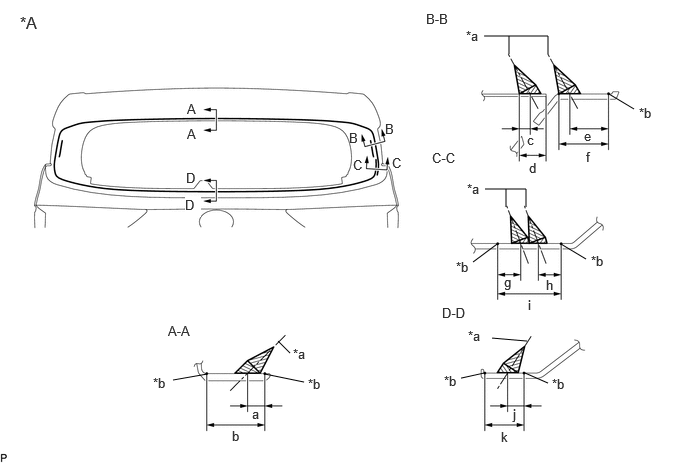
- Using a brush or sponge, coat the adhesive application area with glass primer.
*A Back Side - - *a Adhesive Positioning Center *b Ceramic Notch 
Glass Primer - - Standard Dimension
Area Dimension Area Dimension a 25.1 mm (0.988 in.) b 19.4 mm (0.764 in.) c 29.2 mm (1.15 in.) d 18.1 mm (0.713 in.) NOTE:- Do not apply too much glass primer.
- Allow the glass primer to dry for 3 minutes or more.
- Throw away any leftover glass primer.
HINT:
- Apply glass primer to the ceramic notches.
- If an area other than specified is coated by accident, wipe off the glass primer with a clean piece of cloth before it dries.
- Apply adhesive to the back door.
Adhesive
Toyota Genuine Windshield Glass Adhesive (High modulus type) or equivalent
- Cut off the tip of the cartridge nozzle as shown in the illustration.
*a Nozzle Standard Dimension
Area Dimension a 12.0 to 15.0 mm (0.472 to 0.591 in.) b 8.0 to 11.0 mm (0.315 to 0.433 in.) - Load the sealer gun with the cartridge.
- Apply adhesive to the back door as shown in the illustration.
*A Back Side - - *a Adhesive Positioning Center *b Scribed Line Adhesive - - Standard Dimension
Area Dimension Area Dimension a 7.5 mm (0.295 in.) b 25.1 mm (0.988 in.) c 4.5 mm (0.177 in.) d 11.4 mm (0.449 in.) e 16.6 mm (0.654 in.) f 20.6 mm (0.811 in.) g 10.6 mm (0.417 in.) h 10.6 mm (0.417 in.) i 29.2 mm (1.15 in.) j 7.5 mm (0.295 in.) k 18.1 mm (0.713 in.) - -
- Cut off the tip of the cartridge nozzle as shown in the illustration.
- Install the back door glass.
- Using suction cups, position the back door glass so that the matchmarks are aligned, and press it in gently along the rim.NOTE:
- Check that the 3 back window glass spacers are engaged to the back door panel correctly.
- Check the clearance between the back door panel and back door glass.
*a Matchmark - Lightly press the front surface of the back door glass to ensure a close fit.
HINT:
Press the glass with force of 98 N (10 kgf, 22.0 lbf) or more.
- Using a scraper, remove any excess or protruding adhesive.
- Hold the back door glass using protective tape until the applied adhesive becomes hard.
HINT:
Follow the instructions supplied by the adhesive manufacturer or in the corresponding instruction manual for the minimum amount of time necessary to wait before driving the vehicle.
- Using suction cups, position the back door glass so that the matchmarks are aligned, and press it in gently along the rim.
- Connect each connector.
- INSPECT FOR LEAK
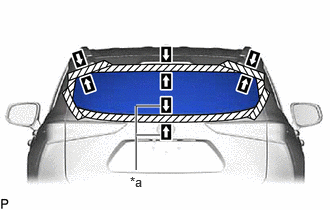
- After the adhesive has hardened, apply water from the outside of the vehicle. Check that no water leaks into the cabin.
- If water leaks into the cabin, allow the water to dry and add adhesive.
- Remove the protective tape.
- INSTALL REAR WIPER MOTOR ASSEMBLY
Refer to INSTALLATION [12/2019 - ]