Installation [11/2023 - ]: Procedure
- INSTALL FRONT SEAT ASSEMBLY
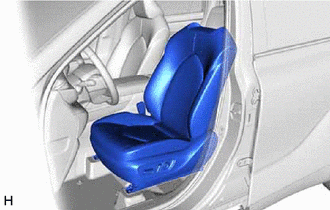
- Place the front seat assembly in the cabin.NOTE:
Be careful not to damage the vehicle body.
- for Front Passenger Side:
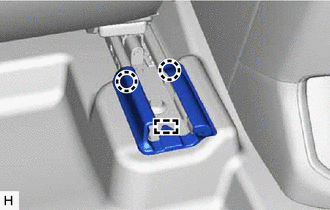
- Connect the front seat cushion airbag assembly RH connector under the front seat assembly.NOTE:
- When connecting any airbag connector, take care not to damage the airbag wire harness.
- When connecting the connector, make sure to push it straight in.
- Connect the front seat cushion airbag assembly RH connector under the front seat assembly.
- Connect the front seat airbag assembly connector under the front seat assembly.
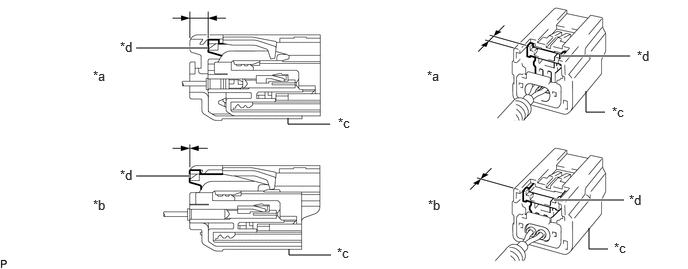
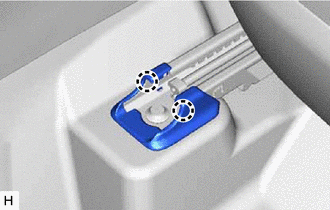
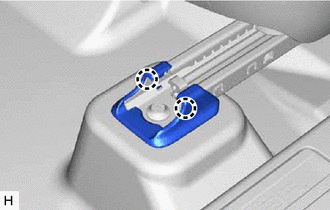
- Before connecting the connector, check that the position of the white housing lock is correct as shown in the illustration.
*a Correct *b Incorrect *c Yellow CPA *d White Housing Lock - Be sure to engage the connectors until they are locked (when locking, make sure that a click sound can be heard).NOTE:
- When connecting any airbag connector, take care not to damage the airbag wire harness.
- When engaged, the white housing lock will slide. Be sure not to hold the white housing lock and upper part of the yellow CPA, as it may result in an insecure fit.
- Before connecting the connector, check that the position of the white housing lock is correct as shown in the illustration.
- Connect each connector and engage each clamp under the front seat assembly.
- Connect the cable to the negative (-) auxiliary battery terminal.
for A25A-FXS: Refer to PROCEDURE - Step 2
for T24A-FTS: Refer to PROCEDURE - Step 4
- Temporarily install the front seat assembly with the 4 bolts.
- Operate the slide and vertical power seat switch knob and move the front seat assembly to the rearmost position.
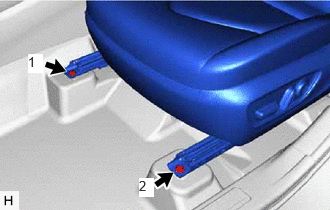
- Using a T50 "TORX" socket wrench, tighten the 2 bolts on the front side of the front seat assembly.
Torque: 37 N.m (377 kgf/cm, 27 ft.lbf)
NOTE:Tighten the bolts in the order shown in the illustration.
- Operate the slide and vertical power seat switch knob and move the front seat assembly to the foremost position.
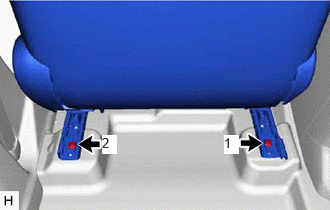
- Using a T50 "TORX" socket wrench, tighten the 2 bolts on the rear side of the front seat assembly.
Torque: 37 N.m (377 kgf/cm, 27 ft.lbf)
NOTE:Tighten the bolts in the order shown in the illustration.
- Place the front seat assembly in the cabin.
- INSTALL INNER SEAT TRACK BRACKET COVER
- INSTALL REAR OUTER SEAT TRACK BRACKET COVER
- INSTALL FRONT INNER SEAT TRACK BRACKET COVER
- INSTALL FRONT OUTER SEAT TRACK BRACKET COVER
- INSTALL FRONT SEAT HEADREST ASSEMBLY
- Install the front seat headrest assembly to the front seat assembly.
- INSTALL BATTERY SERVICE HOLE COVER (for HV Model)
Refer to PROCEDURE - Step 3
- INITIALIZATION AFTER RECONNECTING AUXILIARY BATTERY TERMINAL
HINT:
When disconnecting and reconnecting the auxiliary battery, there is an automatic learning function that completes learning when the respective system is used.
- INSPECT FRONT SEAT ASSEMBLY
- w/o Seat Position Memory System:
Refer to OPERATION CHECK [10/2021 - ]
- w/ Seat Position Memory System:
Refer to OPERATION CHECK [12/2019 - ]
- w/o Seat Position Memory System:
- CHECK SEAT HEATER (w/ Seat Heater System)
Refer to OPERATION CHECK [12/2019 - ]
- INITIALIZATION OF SEAT ECU (w/ Seat Position Memory System)
Refer to REGISTRATION [11/2023 - ]
- PERFORM ZERO POINT CALIBRATION AND SENSITIVITY CHECK (for Front Passenger Side)
Refer to INITIALIZATION [11/2023 - ]
- INSPECT SRS WARNING LIGHT
Refer to OPERATION CHECK [11/2023 - ]