Reassembly [10/2022 - ]: Procedure
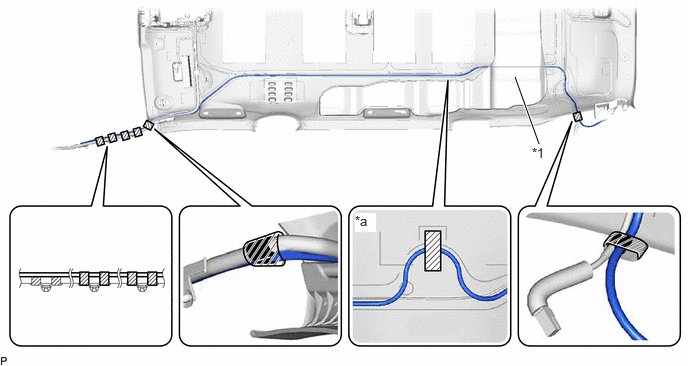
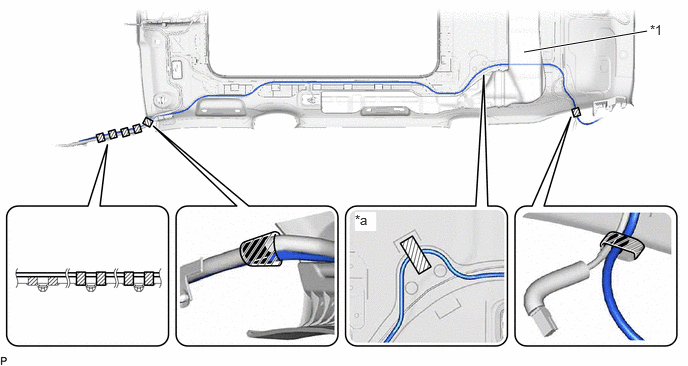
- INSTALL NO. 1 ROOF WIRE (for Normal Roof)
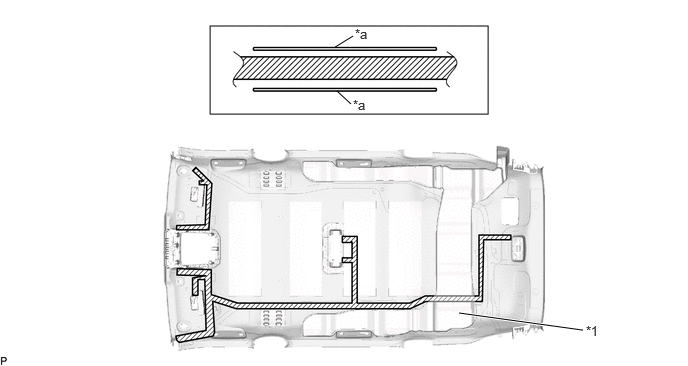
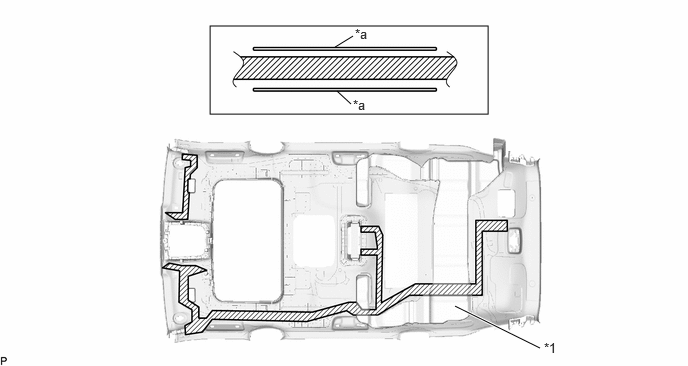
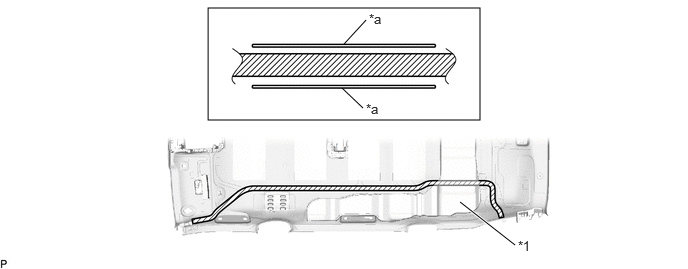
- Apply double-sided tape as shown in the illustration.
*1 Rear Roof Air Duct - - *a Marking - - 
Double-sided Tape - - NOTE:Securely attach the double-sided tape.
HINT:
Slide the double-sided tape under the rear roof air duct then press it to attach it.
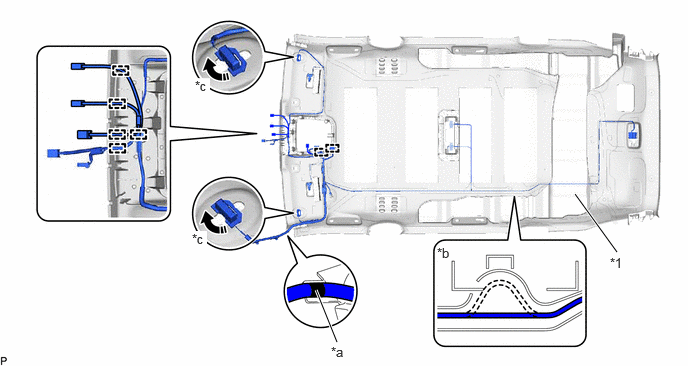
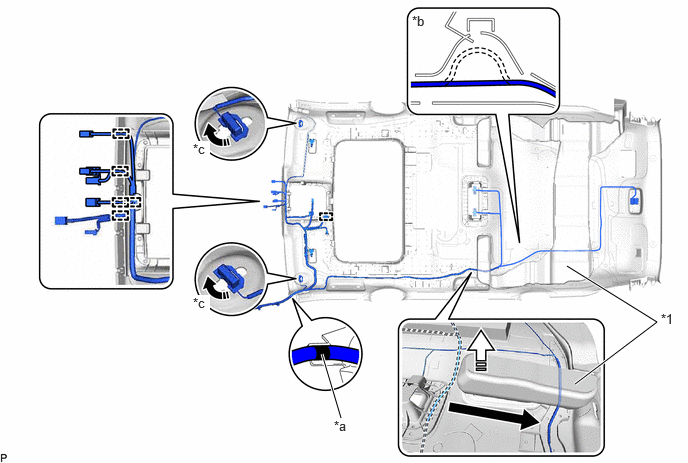
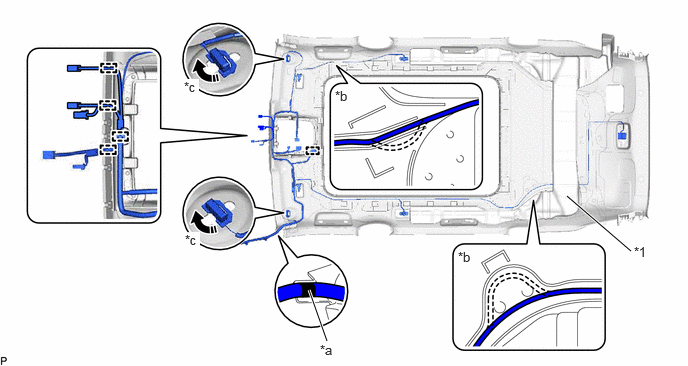
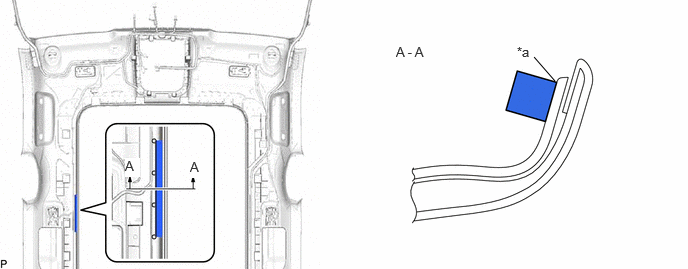
- Align the marking tape (A) on the No. 1 roof wire with the vehicle front side tab of the roof headlining assembly.
*1 Rear Roof Air Duct - - *a Marking Tape (A) *b Adjustment Area *c 45° - - 
Rotation Direction - - - Engage each clamp.
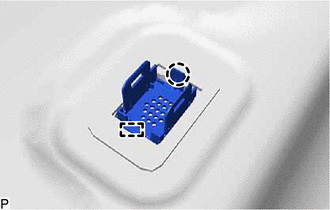
- Turn the 2 visor connectors clockwise approximately 45° to install them to the roof headlining assembly.
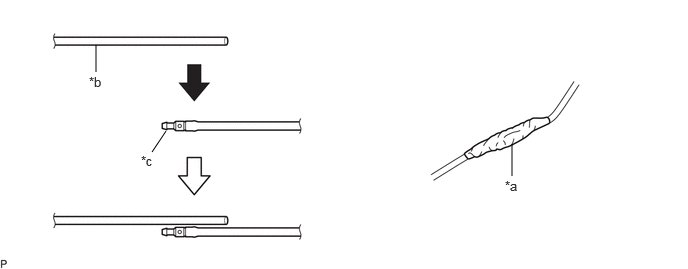
- Using wire, pass the No. 1 roof wire between the rear roof air duct and roof headlining assembly.
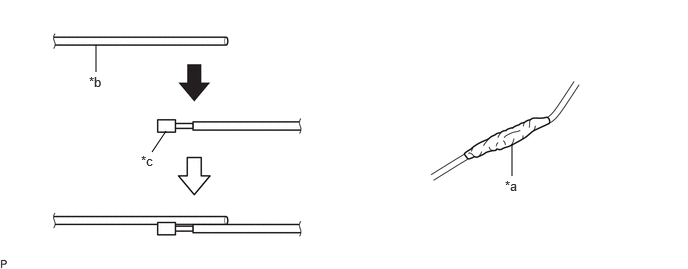
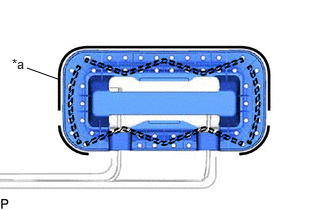
- Secure the wire with a diameter of 2.0 mm (0.0787 in.) to the No. 1 roof wire with vinyl tape as shown in the illustration.
*a Vinyl Tape *b Wire *c Connector - - NOTE:Make sure that the wire is secured with vinyl tape to prevent the wire from separating from the No. 1 roof wire when removing it.
HINT:
As the No. 1 roof wire is likely to be caught in the narrow areas inside the roof headlining assembly, make sure to align in a straight line and cover the edges of the connector with vinyl tape.
- Secure the wire with a diameter of 2.0 mm (0.0787 in.) to the No. 1 roof wire with vinyl tape as shown in the illustration.
- Attach the No. 1 roof wire with the double-sided tape.NOTE:
- Securely attach the No. 1 roof wire.
- If any of the No. 1 roof wire is left loose, it will cause an abnormal noise.
- Make sure to attach the No. 1 roof wire without leaving any of it loose.
HINT:
Secure the extra length of the No. 1 roof wire in the adjustment area.
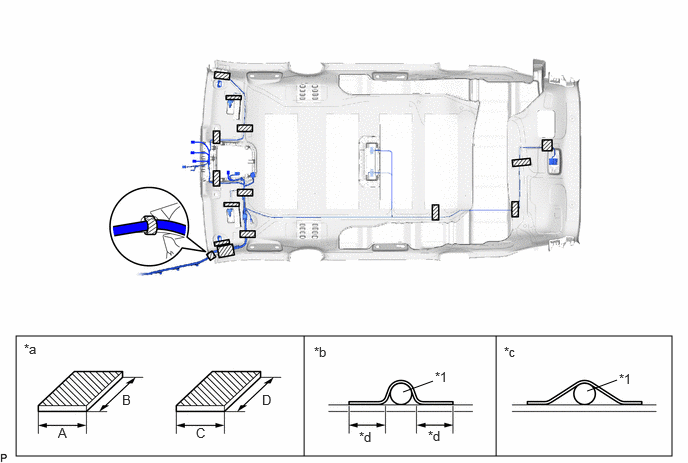
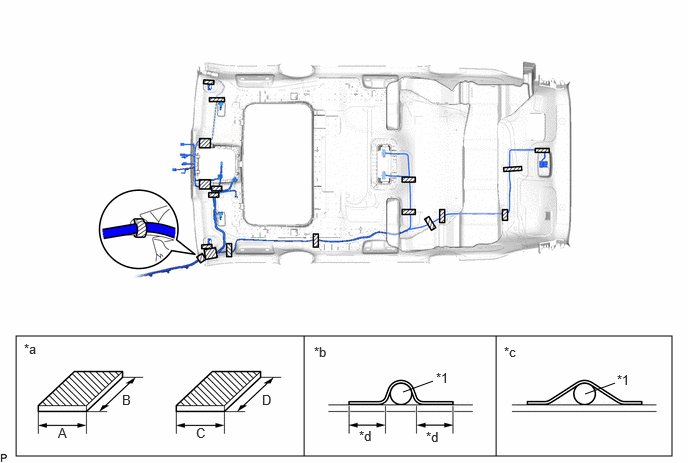
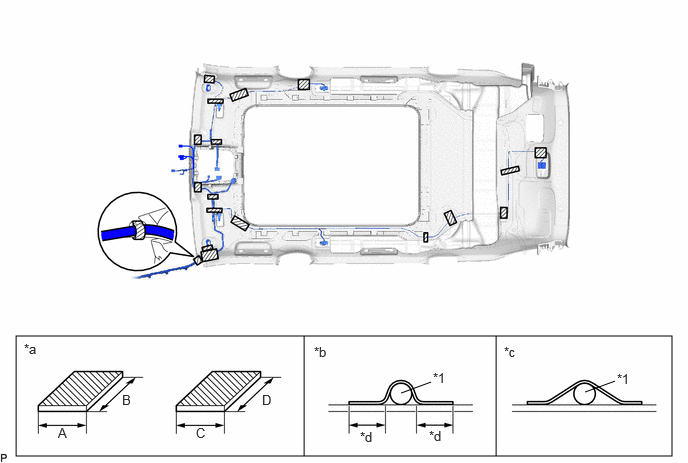
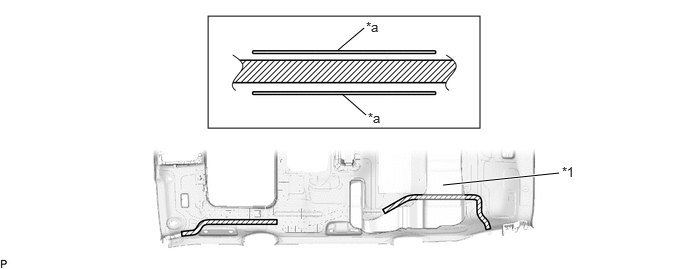
- Install the No. 1 roof wire to the roof headlining assembly with adhesive tape.
*1 No. 1 Roof Wire - - *a Adhesive Tape Size *b Correct *c Incorrect *d 15 mm (0.591 in.) or more Adhesive Tape - - ADHESIVE TAPE SIZEArea Dimension A 20 mm (0.787 in.) B 80 mm (3.15 in.) C 80 mm (3.15 in.) D 80 mm (3.15 in.) NOTE:- Apply the tape securely in place.
- Do not touch the adhesive surface when applying the tape to prevent adhesion failure.
- Apply double-sided tape as shown in the illustration.
- INSTALL NO. 1 ROOF WIRE (for Moon Roof)
- Apply double-sided tape as shown in the illustration.
*1 Rear Roof Air Duct - - *a Marking - - Double-sided Tape - - NOTE:Securely attach the double-sided tape.
HINT:
Slide the double-sided tape under the rear roof air duct then press it to attach it.
- Align the marking tape (A) on the No. 1 roof wire with the vehicle front side tab of the roof headlining assembly.
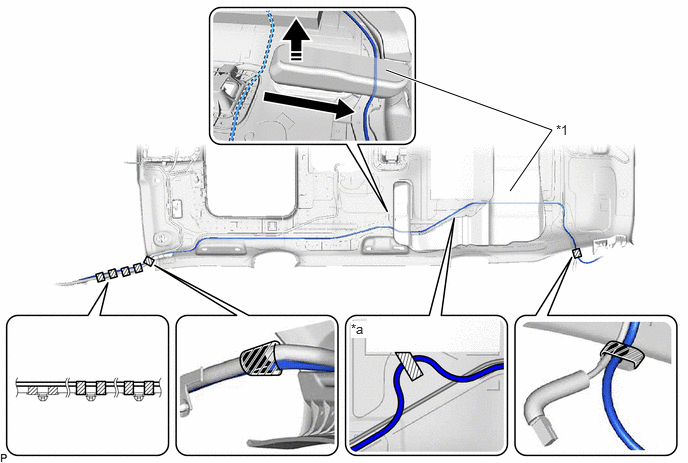
*1 Rear Roof Air Duct - - *a Marking Tape (A) *b Adjustment Area *c 45° - - Rotation Direction 
Lift up in this Direction - Engage each clamp.
- Turn the 2 visor connectors clockwise approximately 45° to install them to the roof headlining assembly.
- While lifting the rear roof air duct as shown in the illustration, pass the No. 1 roof wire through.
HINT:
Lift up the rear roof air duct to the extent that the No. 1 roof wire can be passed through.
- Using wire, pass the No. 1 roof wire between the rear roof air duct and roof headlining assembly.
- Secure the wire with a diameter of 2.0 mm (0.0787 in.) to the No. 1 roof wire with vinyl tape as shown in the illustration.
*a Vinyl Tape *b Wire *c Connector - - NOTE:Make sure that the wire is secured with vinyl tape to prevent the wire from separating from the No. 1 roof wire when removing it.
HINT:
As the No. 1 roof wire is likely to be caught in the narrow areas inside the roof headlining assembly, make sure to align in a straight line and cover the edges of the connector with vinyl tape.
- Secure the wire with a diameter of 2.0 mm (0.0787 in.) to the No. 1 roof wire with vinyl tape as shown in the illustration.
- Attach the No. 1 roof wire with the double-sided tape.NOTE:
- Securely attach the No. 1 roof wire.
- If any of the No. 1 roof wire is left loose, it will cause an abnormal noise.
- Make sure to attach the No. 1 roof wire without leaving any of it loose.
HINT:
Secure the extra length of the No. 1 roof wire in the adjustment area.
- Install the No. 1 roof wire to the roof headlining assembly with adhesive tape.
*1 No. 1 Roof Wire - - *a Adhesive Tape Size *b Correct *c Incorrect *d 15 mm (0.591 in.) or more Adhesive Tape - - ADHESIVE TAPE SIZEArea Dimension A 20 mm (0.787 in.) B 80 mm (3.15 in.) C 80 mm (3.15 in.) D 80 mm (3.15 in.) NOTE:- Apply the tape securely in place.
- Do not touch the adhesive surface when applying the tape to prevent adhesion failure.
- Apply double-sided tape as shown in the illustration.
- INSTALL NO. 1 ROOF WIRE (for Panoramic Moon Roof)
- Apply double-sided tape as shown in the illustration.
*1 Rear Roof Air Duct - - *a Marking - - Double-sided Tape - - NOTE:Securely attach the double-sided tape.
HINT:
Slide the double-sided tape under the rear roof air duct then press it to attach it.
- Align the marking tape (A) on the No. 1 roof wire with the vehicle front side tab of the roof headlining assembly.
*1 Rear Roof Air Duct - - *a Marking Tape (A) *b Adjustment Area *c 45° - - Rotation Direction - - - Engage each clamp.
- Turn the 2 visor connectors clockwise approximately 45° to install them to the roof headlining assembly.
- Using wire, pass the No. 1 roof wire between the rear roof air duct and roof headlining assembly.
- Secure the wire with a diameter of 2.0 mm (0.0787 in.) to the No. 1 roof wire with vinyl tape as shown in the illustration.
*a Vinyl Tape *b Wire *c Connector - - NOTE:Make sure that the wire is secured with vinyl tape to prevent the wire from separating from the No. 1 roof wire when removing it.
HINT:
As the No. 1 roof wire is likely to be caught in the narrow areas inside the roof headlining assembly, make sure to align in a straight line and cover the edges of the connector with vinyl tape.
- Secure the wire with a diameter of 2.0 mm (0.0787 in.) to the No. 1 roof wire with vinyl tape as shown in the illustration.
- Attach the No. 1 roof wire with the double-sided tape.NOTE:
- Securely attach the No. 1 roof wire.
- If any of the No. 1 roof wire is left loose, it will cause an abnormal noise.
- Make sure to attach the No. 1 roof wire without leaving any of it loose.
HINT:
Secure the extra length of the No. 1 roof wire in the adjustment area.
- Install the No. 1 roof wire to the roof headlining assembly with adhesive tape.
*1 No. 1 Roof Wire - - *a Adhesive Tape Size *b Correct *c Incorrect *d 15 mm (0.591 in.) or more Adhesive Tape - - ADHESIVE TAPE SIZEArea Dimension A 20 mm (0.787 in.) B 80 mm (3.15 in.) C 80 mm (3.15 in.) D 80 mm (3.15 in.) NOTE:- Apply the tape securely in place.
- Do not touch the adhesive surface when applying the tape to prevent adhesion failure.
- Apply double-sided tape as shown in the illustration.
- INSTALL NO. 3 ROOF HEADLINING SUPPORT (except Panoramic Moon Roof)
- INSTALL SPOT LIGHT ASSEMBLY LH (for Panoramic Moon Roof)
Refer to PROCEDURE - Step 4
- INSTALL SPOT LIGHT ASSEMBLY RH (for Panoramic Moon Roof)
HINT:
Use the same procedure as for the LH side.
- INSTALL REAR WASHER HOSE ASSEMBLY
- for Normal Roof:
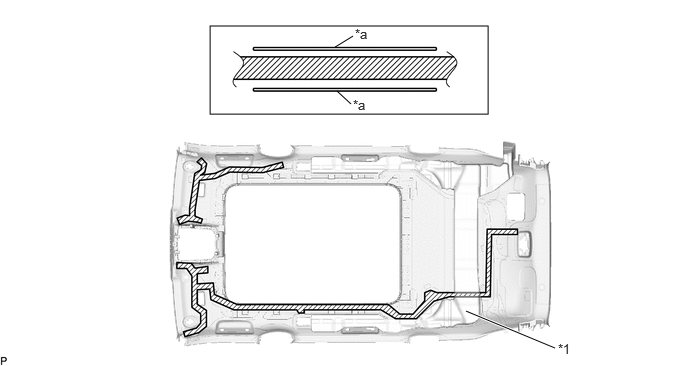
- Apply butyl tape as shown in the illustration.
*1 Rear Roof Air Duct - - *a Marking - - Butyl Tape - - NOTE:Securely attach the butyl tape.
HINT:
Slide the butyl tape under the rear roof air duct then press it to attach it.
- Align the edge of the marking tape on the rear washer hose assembly from the vehicle front side tab of the roof headlining assembly as shown in the illustration.
*1 Rear Roof Air Duct - - *a Adjustment Area - - 
Marking Tape Adhesive Tape - Using wire, pass the rear washer hose assembly between the rear roof air duct and roof headlining assembly.
- Secure the wire with a diameter of 2.0 mm (0.0787 in.) to the rear washer hose assembly with vinyl tape as shown in the illustration.
*a Vinyl Tape *b Wire *c Joint - - NOTE:Make sure that the wire is secured with vinyl tape to prevent the wire from separating from the rear washer hose assembly when removing it.
HINT:
As the rear washer hose assembly is likely to be caught in the narrow areas inside the roof headlining assembly, make sure to align in a straight line and cover the edges of the joint with vinyl tape.
- Secure the wire with a diameter of 2.0 mm (0.0787 in.) to the rear washer hose assembly with vinyl tape as shown in the illustration.
- Align the edge of the joint to the rear washer hose assembly from the vehicle rear side of the roof headlining assembly as shown in the illustration.
- Attach the rear washer hose assembly with the butyl tape.NOTE:
- Securely attach the rear washer hose assembly.
- If any of the rear washer hose assembly is left loose, it will cause an abnormal noise.
- Make sure to attach the rear washer hose assembly without leaving any of it loose.
HINT:
Secure the extra length of the rear washer hose assembly in the adjustment area using the adhesive tape as shown in the illustration.
- Install the rear washer hose assembly with adhesive tape.
- Apply butyl tape as shown in the illustration.
- for Moon Roof:
- Apply butyl tape as shown in the illustration.
*1 Rear Roof Air Duct - - *a Marking - - Butyl Tape - - NOTE:Securely attach the butyl tape.
HINT:
Slide the butyl tape under the rear roof air duct then press it to attach it.
- Align the edge of the marking tape on the rear washer hose assembly from the vehicle front side tab of the roof headlining assembly as shown in the illustration.
*1 Rear Roof Air Duct - - *a Adjustment Area - - Marking Tape Adhesive Tape Lift up in this Direction - - - While lifting the rear roof air duct as shown in the illustration, pass the rear washer hose assembly through.
HINT:
Lift up the rear roof air duct to the extent that the rear washer hose assembly can be passed through.
- Using wire, pass the rear washer hose assembly between the rear roof air duct and roof headlining assembly.
- Secure the wire with a diameter of 2.0 mm (0.0787 in.) to the rear washer hose assembly with vinyl tape as shown in the illustration.
*a Vinyl Tape *b Wire *c Joint - - NOTE:Make sure that the wire is secured with vinyl tape to prevent the wire from separating from the rear washer hose assembly when removing it.
HINT:
As the rear washer hose assembly is likely to be caught in the narrow areas inside the roof headlining assembly, make sure to align in a straight line and cover the edges of the joint with vinyl tape.
- Secure the wire with a diameter of 2.0 mm (0.0787 in.) to the rear washer hose assembly with vinyl tape as shown in the illustration.
- Align the edge of the joint to the rear washer hose assembly from the vehicle rear side of the roof headlining assembly as shown in the illustration.
- Attach the rear washer hose assembly with the butyl tape.NOTE:
- Securely attach the rear washer hose assembly.
- If any of the rear washer hose assembly is left loose, it will cause an abnormal noise.
- Make sure to attach the rear washer hose assembly without leaving any of it loose.
HINT:
Secure the extra length of the rear washer hose assembly in the adjustment area using the adhesive tape as shown in the illustration.
- Install the rear washer hose assembly with adhesive tape.
- Apply butyl tape as shown in the illustration.
- for Panoramic Moon Roof:
- Apply butyl tape as shown in the illustration.
*1 Rear Roof Air Duct - - *a Marking - - Butyl Tape - - NOTE:Securely attach the butyl tape.
HINT:
Slide the butyl tape under the rear roof air duct then press it to attach it.
- Align the edge of the marking tape on the rear washer hose assembly from the vehicle front side tab of the roof headlining assembly as shown in the illustration.
*1 Rear Roof Air Duct - - *a Adjustment Area - - Marking Tape Adhesive Tape - Using wire, pass the rear washer hose assembly between the rear roof air duct and roof headlining assembly.
- Secure the wire with a diameter of 2.0 mm (0.0787 in.) to the rear washer hose assembly with vinyl tape as shown in the illustration.
*a Vinyl Tape *b Wire *c Joint - - NOTE:Make sure that the wire is secured with vinyl tape to prevent the wire from separating from the rear washer hose assembly when removing it.
HINT:
As the rear washer hose assembly is likely to be caught in the narrow areas inside the roof headlining assembly, make sure to align in a straight line and cover the edges of the joint with vinyl tape.
- Secure the wire with a diameter of 2.0 mm (0.0787 in.) to the rear washer hose assembly with vinyl tape as shown in the illustration.
- Align the edge of the joint to the rear washer hose assembly from the vehicle rear side of the roof headlining assembly as shown in the illustration.
- Attach the rear washer hose assembly with the butyl tape.NOTE:
- Securely attach the rear washer hose assembly.
- If any of the rear washer hose assembly is left loose, it will cause an abnormal noise.
- Make sure to attach the rear washer hose assembly without leaving any of it loose.
HINT:
Secure the extra length of the rear washer hose assembly in the adjustment area using the adhesive tape as shown in the illustration.
- Install the rear washer hose assembly with adhesive tape.
- Apply butyl tape as shown in the illustration.
- for Normal Roof:
- INSTALL NO. 3 ANTENNA CORD SUB-ASSEMBLY (for Normal Roof)
Refer to PROCEDURE - Step 2 [12/2019 - 11/2024] , or refer to PROCEDURE - Step 2 [11/2024 - ]
- INSTALL NO. 3 ANTENNA CORD SUB-ASSEMBLY (for Moon Roof)
Refer to PROCEDURE - Step 3 [12/2019 - 11/2024] , or refer to PROCEDURE - Step 3 [11/2024 - ]
- INSTALL NO. 3 ANTENNA CORD SUB-ASSEMBLY (for Panoramic Moon Roof)
Refer to PROCEDURE - Step 4 [12/2019 - 11/2024] , or refer to PROCEDURE - Step 4 [11/2024 - ]
- INSTALL INNER ROOF SIDE SEAL (for Panoramic Moon Roof)
- Remove the release paper from a new inner roof side seal.
HINT:
After removing the release paper, keep the exposed adhesive free from foreign matter.
- Install the inner roof side seal to the roof headlining assembly as shown in the illustration.
*a R End - - NOTE:Make sure to firmly press the double-sided tape portion of the inner roof side seal to securely attach it.
- Remove the release paper from a new inner roof side seal.
- INSTALL FRONT DOOR VENT SEAL
- Remove the release paper from 2 new front door vent seals.
HINT:
After removing the release paper, keep the exposed adhesive free from foreign matter.
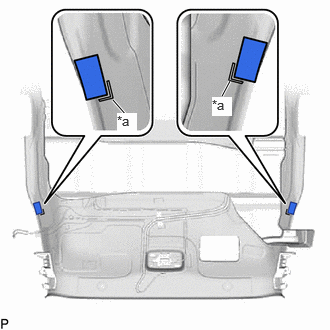
- Install the 2 front door vent seals to the roof headlining assembly as shown in the illustration.
*a Marking NOTE:Make sure to firmly press the double-sided tape portion of the front door vent seal to securely attach it.
- Remove the release paper from 2 new front door vent seals.
- INSTALL NO. 1 MICROPHONE CASE
HINT:
Use the same procedure for all No. 1 microphone cases.
- INSTALL TELEPHONE MICROPHONE ASSEMBLY
Refer to PROCEDURE - Step 1