Installation [11/2024 - ]: Procedure
- INSTALL NO. 2 FRONT DOOR NAME PLATE (for HV Model)
- Clean the front door panel surface.
- Using a heat light, heat the front door panel surface.
- Remove any remaining double-sided tape from the front door panel.
- Wipe off any tape adhesive residue with cleaner.
- Install a new No. 2 front door name plate.
- Using a heat light, heat the front door panel surface.
- Remove the release paper from the No. 2 front door name plate.
HINT:
After removing the release paper, keep the exposed adhesive free from foreign matter.
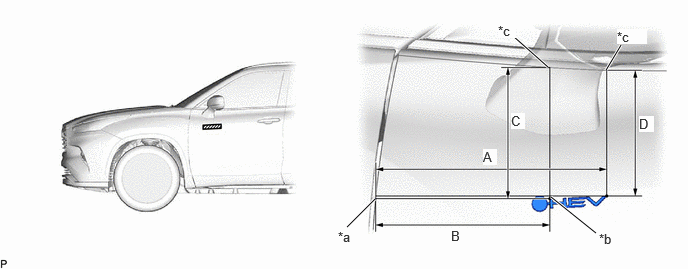
- Install the No. 2 front door name plate as shown in the illustration.
*a Profile of Front Door Panel *b R End *c R End of Front Door Panel - - Standard Measurement
Area Measurement Area Measurement A 300.0 mm (11.8 in.) B 226.0 mm (8.90 ft.) C 204.0 mm (80.3 in.) D 169.0 mm (6.65 in.) HINT:
Press the No. 2 front door name plate firmly to install it.
- Clean the front door panel surface.
- INSTALL FRONT DOOR NAME PLATE (for HV Model)
- Clean the front door panel surface.
- Using a heat light, heat the front door panel surface.
- Remove any remaining double-sided tape from the front door panel.
- Wipe off any tape adhesive residue with cleaner.
- Install a new front door name plate.
- Using a heat light, heat the front door panel surface.
- Remove the release paper from the front door name plate.
HINT:
After removing the release paper, keep the exposed adhesive free from foreign matter.
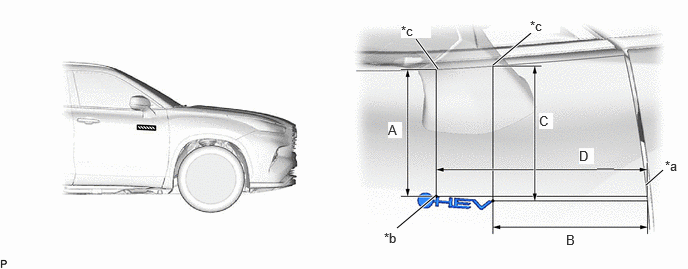
- Install the front door name plate as shown in the illustration.
*a Profile of Front Door Panel *b R End *c R End of Front Door Panel - - Standard Measurement
Area Measurement Area Measurement A 198.0 mm (7.80 in.) B 203.0 mm (7.99 ft.) C 208.8 mm (8.22 in.) D 276.23 mm (10.9 in.) HINT:
Press the front door name plate firmly to install it.
- Clean the front door panel surface.
- INSTALL NO. 1 LUGGAGE COMPARTMENT DOOR NAME PLATE (for HV Model)
- Clean the back door panel surface.
- Using a heat light, heat the back door panel surface.
- Remove any remaining double-sided tape from the back door panel.
- Wipe off any tape adhesive residue with cleaner.
- Install a new No. 1 luggage compartment door name plate.
- Using a heat light, heat the back door panel surface.
- Remove the release paper from the No. 1 luggage compartment door name plate.
HINT:
After removing the release paper, keep the exposed adhesive free from foreign matter.
- Install the No. 1 luggage compartment door name plate as shown in the illustration.
*a R End *b R End of Back Door Panel Standard Measurement
Area Measurement Area Measurement A 42.26 mm (1.66 in.) B 15.1 mm (0.594 in.) C 30.95 mm (1.22 in.) D 53.22 mm (2.1 in.) E 13.7 mm (0.539 in.) - - HINT:
Press the No. 1 luggage compartment door name plate firmly to install it.
- Clean the back door panel surface.
- INSTALL NO. 5 BACK DOOR NAME PLATE
- Clean the back door panel surface.
- Using a heat light, heat the back door panel surface.
- Remove any remaining double-sided tape from the back door panel.
- Wipe off any tape adhesive residue with cleaner.
- Install a new No. 5 back door name plate.
- Using a heat light, heat the back door panel surface.
- Remove the release paper from the No. 5 back door name plate.
HINT:
After removing the release paper, keep the exposed adhesive free from foreign matter.
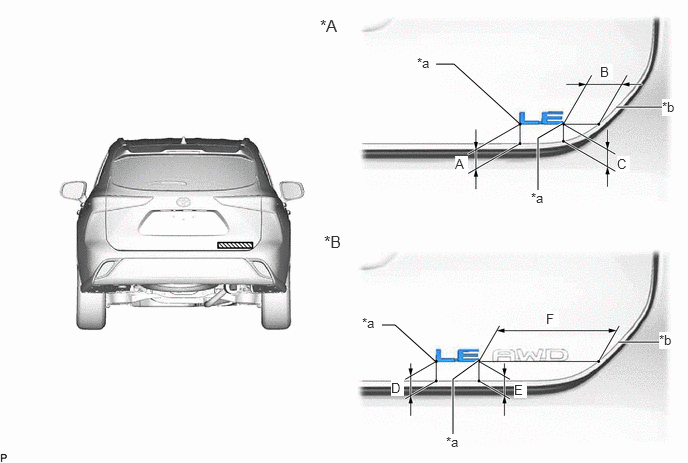
- for LE Plate:
- Install the No. 5 back door name plate as shown in the illustration.
*A for 2WD *B for AWD *a R End *b R End of Back Door Panel Standard Measurement
Area Measurement Area Measurement A 21.5 mm (0.846 in.) B 41.6 mm (1.64 in.) C 19.3 mm (0.760 in.) D 21.4 mm (0.843 in.) E 21.5 mm (0.846 in.) F 138.0 mm (5.43 in.) HINT:
Press the No. 5 back door name plate firmly to install it.
- Install the No. 5 back door name plate as shown in the illustration.
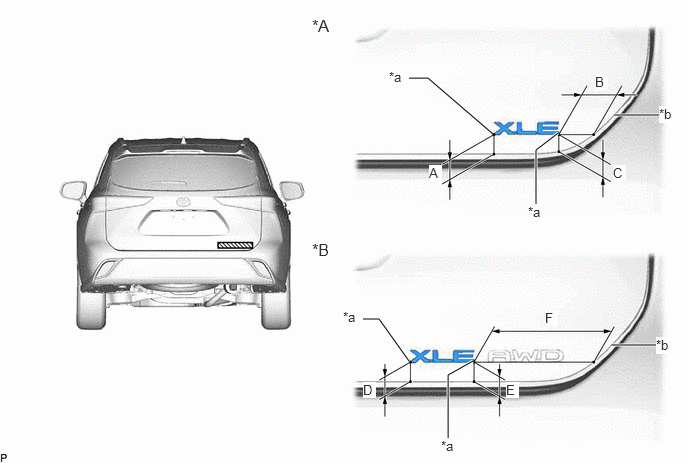
- for XLE Plate:
- Install the No. 5 back door name plate as shown in the illustration.
*A for 2WD *B for AWD *a R End *b R End of Back Door Panel Standard Measurement
Area Measurement Area Measurement A 21.5 mm (0.846 in.) B 41.4 mm (1.63 in.) C 19.3 mm (0.760 in.) D 21.3 mm (0.839 in.) E 21.5 mm (0.846 in.) F 138.0 mm (5.43 in.) HINT:
Press the No. 5 back door name plate firmly to install it.
- Install the No. 5 back door name plate as shown in the illustration.
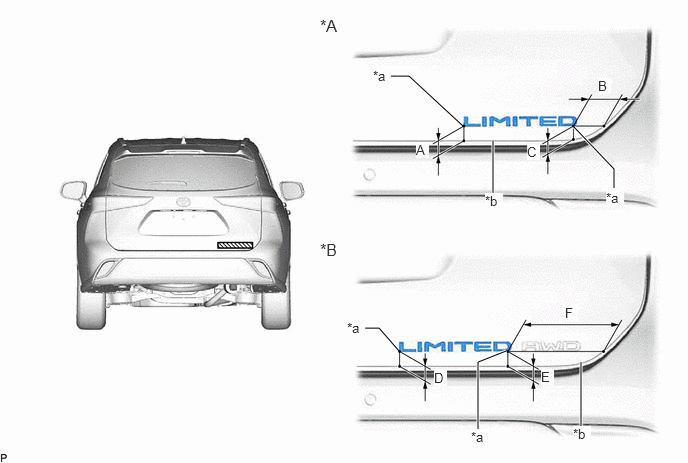
- for Limited Plate:
- Install the No. 5 back door name plate as shown in the illustration.
*A for 2WD *B for AWD *a R End *b R End of Back Door Panel Standard Measurement
Area Measurement Area Measurement A 21.3 mm (0.839 in.) B 49.4 mm (1.94 in.) C 20.3 mm (0.799 in.) D 21.1 mm (0.831 in.) E 21.5 mm (0.846 in.) F 145.8 mm (5.74 in.) HINT:
Press the No. 5 back door name plate firmly to install it.
- Install the No. 5 back door name plate as shown in the illustration.
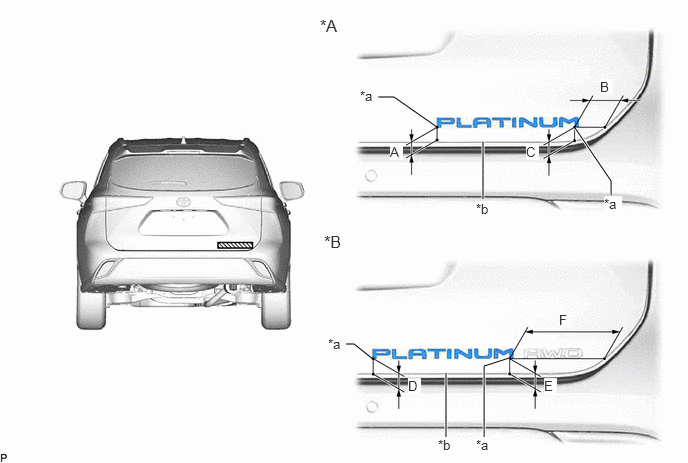
- for Platinum Plate:
- Install the No. 5 back door name plate as shown in the illustration.
*A for 2WD *B for AWD *a R End *b R End of Back Door Panel Standard Measurement
Area Measurement Area Measurement A 21.2 mm (0.835 in.) B 41.6 mm (1.64 in.) C 19.1 mm (0.752 in.) D 21.0 mm (0.827 in.) E 21.5 mm (0.846 in.) F 138.0 mm (5.43 in.) HINT:
Press the No. 5 back door name plate firmly to install it.
- Install the No. 5 back door name plate as shown in the illustration.
- for XSE Plate:
- Install the No. 5 back door name plate as shown in the illustration.
*A for 2WD *B for AWD *a R End *b R End of Back Door Panel Standard Measurement
Area Measurement Area Measurement A 21.5 mm (0.846 in.) B 41.4 mm (1.63 in.) C 19.3 mm (0.760 in.) D 21.3 mm (0.839 in.) E 21.5 mm (0.846 in.) F 138.0 mm (5.43 in.) HINT:
Press the No. 5 back door name plate firmly to install it.
- Install the No. 5 back door name plate as shown in the illustration.
- Clean the back door panel surface.
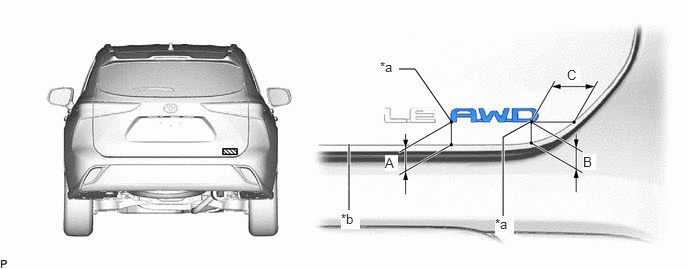
- INSTALL NO. 4 LUGGAGE COMPARTMENT DOOR NAME PLATE (for AWD)
- Clean the back door panel surface.
- Using a heat light, heat the back door panel surface.
- Remove any remaining double-sided tape from the back door panel.
- Wipe off any tape adhesive residue with cleaner.
- Install a new No. 4 luggage compartment door name plate.
- Using a heat light, heat the back door panel surface.
- Remove the release paper from the No. 4 luggage compartment door name plate.
HINT:
After removing the release paper, keep the exposed adhesive free from foreign matter.
- Install the No. 4 luggage compartment door name plate as shown in the illustration.
*a R End *b R End of Back Door Panel Standard Measurement
Area Measurement Area Measurement A 21.5 mm (0.846 in.) B 19.5 mm (0.768 in.) C 42.9 mm (1.69 in.) - - HINT:
Press the No. 4 luggage compartment door name plate firmly to install it.
- Clean the back door panel surface.
- INSTALL NO. 2 LUGGAGE COMPARTMENT DOOR NAME PLATE (w/o 25th Edition)
- Clean the back door panel surface.
- Using a heat light, heat the back door panel surface.
- Remove any remaining double-sided tape from the back door panel.
- Wipe off any tape adhesive residue with cleaner.
- Install a new No. 2 luggage compartment door name plate.
- Using a heat light, heat the back door panel surface.
- Remove the release paper from the No. 2 luggage compartment door name plate.
HINT:
After removing the release paper, keep the exposed adhesive free from foreign matter.
- Install the No. 2 luggage compartment door name plate as shown in the illustration.
*a R End *b R End of Back Door Panel Standard Measurement
Area Measurement Area Measurement A 16.1 mm (0.634 in.) B 28.4 mm (1.12 in.) C 21.1 mm (0.831 in.) - - HINT:
Press the No. 2 luggage compartment door name plate firmly to install it.
- Clean the back door panel surface.
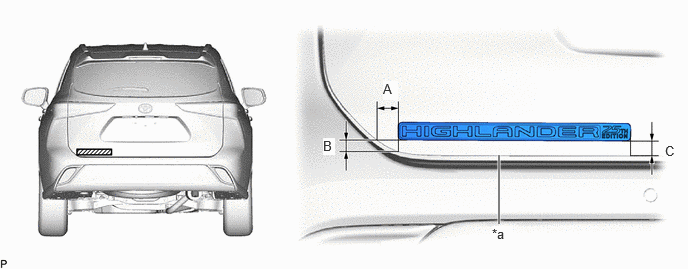
- INSTALL VEHICLE NAME SERIES EMBLEM (w/ 25th Edition)
- Clean the back door panel surface.
- Using a heat light, heat the back door panel surface.
- Remove any remaining double-sided tape from the back door panel.
- Wipe off any tape adhesive residue with cleaner.
- Install a new vehicle name series emblem.
- Using a heat light, heat the back door panel surface.
- Remove the release paper from the vehicle name series emblem.
HINT:
After removing the release paper, keep the exposed adhesive free from foreign matter.
- Install the vehicle name series emblem as shown in the illustration.
*a R End of Back Door Panel - - Standard Measurement
Area Measurement Area Measurement A 30.5 mm (1.20 in.) B 17.7 mm (0.70 in.) C 18.7 mm (0.74 in.) - - HINT:
Press the vehicle name series emblem firmly to install it.
- Clean the back door panel surface.
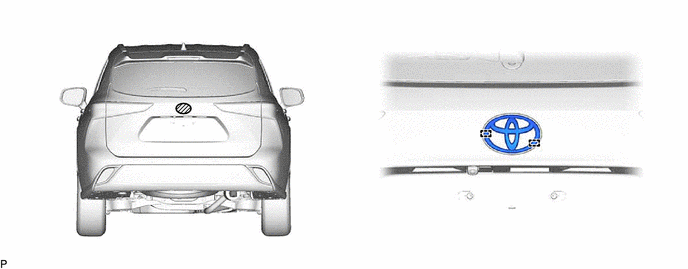
- INSTALL SYMBOL EMBLEM
- Clean the back door panel surface.
- Using a heat light, heat the back door panel surface.
- Remove any remaining double-sided tape from the back door panel.
- Wipe off any tape adhesive residue with cleaner.
- Install a new symbol emblem.
- Clean the back door panel surface.