High Voltage (HV) Battery Rescue Charge At Battery (HEV Workstation/GRX-5100) (T-SB-0110-20 REV2)
Reference number: T-SB-0110-20 REV2
Supersedes refnos: T-SB-0110-20, T-SB-0110-20 REV1
HIGH VOLTAGE (HV) BATTERY RESCUE CHARGE AT BATTERY (HEV WORKSTATION/GRX-5100)
TECHNICAL SERVICE BULLETIN
| TOYOTA: | 2019 - 2022 Avalon HV; 2018 - 2024 Camry HV; 2023 - 2025 Corolla Cross HV, Crown; 2020 - 2025 Corolla HV; 2020 - 2025 Highlander HV; 2021 - 2025 Mirai; 2016 - 2022 Prius; 2019 - 2025 RAV4 HV; 2021 - 2025 Sienna HV; 2022 Tundra HV; 2021 - 2024 Venza HV |
| SERVICE CATEGORY: | Engine/Hybrid System |
| SECTION: | Hybrid/Battery Control System |
| MARKET: | USA and Mexico |
| COPYRIGHT: | © 2018 Toyota, USA License Agreement TMS1002 |
APPLICABILITY
| YEAR(S) | MODEL(S) | ADDITIONAL INFORMATION |
|---|---|---|
| 2019 - 2022 | Avalon HV | |
| 2018 - 2024 | Camry HV | |
| 2023 - 2025 | Corolla Cross HV, Crown | |
| 2020 - 2025 | Corolla HV | |
| 2020 - 2025 | Highlander HV | |
| 2021 - 2025 | Mirai | |
| 2016 - 2022 | Prius | |
| 2019 - 2025 | RAV4 HV | |
| 2021 - 2025 | Sienna HV | |
| 2022 | Tundra HV | |
| 2021 - 2024 | Venza HV |
REVISION NOTICE
December 10, 2024 Rev2:
- Applicability has been updated to include 2021 - 2025 model year Mirai; 2023 - 2024 model year Camry Hybrid, and Venza Hybrid; 2023 - 2025 model year Corolla Hybrid, Corolla Cross Hybrid, Crown, Highlander Hybrid, RAV4 Hybrid, and Sienna Hybrid vehicles.
- The Required Tools & Equipment and Rescue Charge at Battery sections have been updated.
- The market has been updated to include the Mexico market.
May 31, 2022 Rev1:
- Applicability has been updated to include 2021 - 2022 model year Sienna Hybrid and Venza Hybrid; and 2022 model year Avalon Hybrid, Camry Hybrid, Highlander Hybrid, RAV4 Hybrid, Prius, and Tundra Hybrid vehicles.
- The Required Tools & Equipment and Rescue Charge at Battery sections have been updated.
Any previous printed versions of this bulletin should be discarded.
INTRODUCTION
This bulletin includes basic procedures for performing a rescue charge at battery on high voltage (HV) Ni-MH and Li-ion batteries. This bulletin should be used in conjunction with the applicable model and model year Repair Manual while performing the battery rescue charge. The GRX-5100 should be used wherever the Repair Manual references the Toyota Hybrid System (THS) charger.
WARRANTY INFORMATION
| OP CODE | DESCRIPTION | TIME | OFP | T1 | T2 |
|---|---|---|---|---|---|
| N/A | Not Applicable to Warranty | - | - | - | - |
REQUIRED TOOLS & EQUIPMENT
| SPECIAL SERVICE TOOLS (SST) | PART NUMBER | QTY | ||
|---|---|---|---|---|
| High Voltage Battery Service Unit(1) | 01413-00002 | 1 | ||
| High Voltage Cable(1) A619 A and B | 01416-00119 | 1 | ||
| Universal High Voltage Cable(1) (V) | 01413-00007 | 1 | ||
| Low Voltage Cable(1) (R) | 01413-00004 | 1 | ||
| Universal Fuse Box(1) | 01413-00010 | 1 | ||
| AC Power Cord(1) (S) | 01413-00005 | 1 | ||
| Banana Jack Extension Cable(1) (X) | 01413-00031 | 1 | ||
| AC Circuit Checker(1) | 01413-00012 | 1 | ||
| Battery Diagnostic Tool(1) | DCA-8000P T | 1 | ||
| High Voltage Cable(1) A940 A and B | A940 | 1 | ||
|
||||
The table below is a cross-reference matrix showing the TMC THS charger part numbers and the equivalent TMNA GRX-5100 charger part numbers. This matrix can be used as a guide to ensure the correct cables are selected when following the applicable model and model year Repair Manual and this Service Bulletin to complete a rescue charge.
| TMC PART NUMBERS(1) | TMNA PART NUMBERS(2) | |||||||||
|---|---|---|---|---|---|---|---|---|---|---|
| SUB-COMPONENTS | IMAGE | DESCRIPTION | MAIN | SUB-COMPONENTS | IMAGE | DESCRIPTION | ||||
| 09881-10041 | THS Charger | 01413-00002 | GRX-5100T | GRX-5100 High Voltage Battery Service Unit (HV/EV Charge/Discharge Tool) | ||||||
| 09881-10081 | THS Charger AC Cable | 01413-00005 | A573 | AC Power Cord (S) | ||||||
| 09882-10070 | Low Voltage Cable | 01413-00004 | A533 | Low Voltage Cable (R) | ||||||
| 09882-10090 | High Voltage Cable | 01416-00119 | A619 | High Voltage Cable A619 A and B | ||||||
| 01413-00031 | A564 | Banana Jack Extension Cable (X) | ||||||||
| 01413-00010 | A296 | Universal Fuse Box | ||||||||
| 01413-00007 | A571 | Universal High Voltage Cable (V) | ||||||||
| 09882-10100 | High Voltage Cable | - | A940 | High Voltage Cable A940 A and B (Pack High Voltage Harness #8) | ||||||
| 01413-00031 | A564 | Banana Jack Extension Cable (X) | ||||||||
| 01413-00010 | A296 | Universal Fuse Box | ||||||||
| 01413-00007 | A571 | Universal High Voltage Cable (V) | ||||||||
|
||||||||||


| REQUIRED EQUIPMENT | SUPPLIER | PART NUMBER | QTY | ||
|---|---|---|---|---|---|
| Techstream ADVi(1) | ADE | TSADVUNIT | 1 | ||
| Techstream 2.0 | TS2UNIT | ||||
| Techstream Lite | TSLITEPDLR01 | ||||
| Techstream Lite (Green Cable) | TSLP2DLR01 | ||||
|
|||||
- Only ONE of the Techstream units listed above is required.
- GTS+ software version 2024.03.004.02 or later is required.
- Additional Techstream units may be ordered by calling Approved Dealer Equipment (ADE) at 1-800-368-6787 (USA) or 01-55-50103041 (Mexico) or by visiting TIS - Diagnostics-Tools & Equipment - Techstream Order Portal.
RESCUE CHARGE AT BATTERY
- Inspect the vehicle.
- Inspect the auxiliary battery voltage.
- Test the auxiliary battery using the DCA-8000 Battery Diagnostic Tool to ensure the battery is fully charged.
- Inspect the HV battery.
- Check the charge level of the HV battery.
- Check whether the HV battery warning message is shown in the vehicle's multi-information display.
- Confirm whether the engine starts.
- Does the engine start?
- YES - Go to step 7.
- NO - Continue to step 3.
- Prepare the vehicle for a rescue charge.CAUTION:
- ALWAYS wear the appropriate Personal Protective Equipment (PPE) provided in the HEV Workstation when working with high voltage. (Insulated gloves, insulated apron, and arc protective helmet with face shield.)
- ALWAYS use insulated tools when working with high voltage.
- ALWAYS use the cones, barriers, and high voltage car toppers provided in the HEV Workstation to create a perimeter around the vehicle and work area.
HINT
- Removing the service plug grip interrupts the high voltage circuit.
- High voltage wiring connectors are orange.
NOTE: Do NOT proceed with the Toyota THS charger connection instructions in the Repair Manual. Follow the proceeding steps in this bulletin to correctly use the GRX-5100 instead.Refer to TIS, applicable model and model year Repair Manual:
- 2019 - 2020
Avalon HV:
Engine/Hybrid System - Hybrid/Battery Control -
HV Battery (for Nickel Metal Hydride Battery) - Charging
- 2021/2022
Avalon HV:
Engine/Hybrid System - Hybrid/Battery Control -
HV Battery (for Lithium-Ion Battery) - Charging
- 2018 - 2020/2021 - 2024
Camry HV:
Engine/Hybrid System - Hybrid/Battery Control -
HV Battery (for Nickel Metal Hydride Battery) - Charging
- 2018 - 2020/2021 - 2024
Camry HV:
Engine/Hybrid System - Hybrid/Battery Control -
HV Battery (for Lithium-Ion Battery) - Charging
- 2020 - 2022
Corolla HV:
Engine/Hybrid System - Hybrid/Battery Control -
HV Battery (for Nickel Metal Hydride Battery) - Charging
- 2021 - 2022/2023 - 2025
Corolla HV:
Engine/Hybrid System - Hybrid/Battery Control -
HV Battery (for Lithium-Ion Battery) - Charging
- 2023 - 2025
Corolla Cross HV:
Engine/Hybrid System - Hybrid/Battery Control - HV Battery - Charging
- 2023 - 2024/2025
Crown:
Engine/Hybrid System - Hybrid/Battery Control - HV Battery - Charging
- 2020 - 2022/2023/2024 - 2025
Highlander HV:
Engine/Hybrid System - Hybrid/Battery Control - HV Battery - Charging
- 2021 - 2022 (11/2020 - 11/2021)
Mirai:
Engine/Hybrid System - Hybrid/Battery Control - HV Battery - Charging
- 2022 (11/2021 - 12/2022)
Mirai:
Engine/Hybrid System - Hybrid/Battery Control - HV Battery - Charging
- 2023/2024/2025
Mirai:
Engine/Hybrid System - Hybrid/Battery Control - HV Battery - Charging
- 2016 - 2017/2018/2019 - 2020/2021 - 2022
Prius:
Engine/Hybrid System - Hybrid/Battery Control -
HV Battery (for Nickel Metal Hydride Battery) - Charging
- 2016 - 2017/2018/2019 - 2020/2021 - 2022
Prius:
Engine/Hybrid System - Hybrid/Battery Control -
HV Battery (for Lithium-Ion Battery): - Charging
- 2019 (11/18 - 02/19)
RAV4 HV:
Engine/Hybrid System - Hybrid/Battery Control -
HV Battery (for Nickel Metal Hydride Battery) - Charging
- 2019 (02/19 - 10/19)
RAV4 HV:
Engine/Hybrid System - Hybrid/Battery Control -
HV Battery (for Nickel Metal Hydride Battery) - Charging
- 2020 (10/19 - 06/20)
RAV4 HV:
Engine/Hybrid System - Hybrid/Battery Control -
HV Battery (for Nickel Metal Hydride Battery) - Charging
- 2020 (06/20 - 08/20)
RAV4 HV:
Engine/Hybrid System - Hybrid/Battery Control -
HV Battery (for Nickel Metal Hydride Battery) - Charging
- 2021/2022/2023/2024 - 2025
RAV4 HV:
Engine/Hybrid System - Hybrid/Battery Control -
HV Battery (for Nickel Metal Hydride Battery) - Charging
- 2020/2021/2022/2023/2024 - 2025
RAV4 HV:
Engine/Hybrid System - Hybrid/Battery Control -
HV Battery (for Lithium-Ion Battery) - Charging
- 2021 - 2024/2025
Sienna HV:
Engine/Hybrid System - Hybrid/Battery Control - HV Battery - Charging
- 2022
Tundra HV:
Engine/Hybrid System - Hybrid/Battery Control - HV Battery - Charging
- 2021 - 2022/2023 - 2024
Venza HV:
Engine/Hybrid System - Hybrid/Battery Control - HV Battery - Charging
- Connect the GRX-5100 for a rescue charge.NOTE:
- ALWAYS use Techstream to troubleshoot the hybrid system before attempting an HV battery charge.
- Charging time while using the GRX-5100 is 10 minutes per charge cycle when the battery temperature is above 77°F (25°C).
- If the battery temperature is below 32°F (0°C), then three 10-minute charge cycles may be required for putting the engine in a condition where it can be started (the system can enter the READY ON state).
- The GRX-5100 will automatically stop 10 minutes AFTER charging starts.
- Remove necessary SST cables located in the HEV tool box drawers.NOTE: The required cables are listed in the Required Tools & Equipment table shown on page 3.
- Connect the power input (Cable S) to the GRX-5100 and connect the cable into a grounded AC 100 to 240V receptacle.NOTE: ALWAYS confirm the AC 100 to 240V receptacle has a properly functioning ground by using the AC Circuit Checker provided in the HEV Workstation. The ground is designed to reduce the chance of electric shock if a malfunction occurs. Do NOT use the charger if ANY of the pins on the plug (Cable S) have been damaged or removed.
- Turn the GRX-5100 ON.
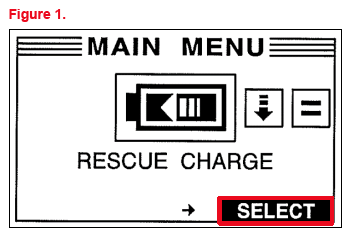
- Select Rescue Charge by using the arrow key, then press Select.
- Confirm you are wearing the appropriate PPE for high voltage service.CAUTION: ALWAYS wear the appropriate PPE when working with high voltage: Insulated gloves, insulated apron, and arc protective helmet with face shield.
- Press Yes.
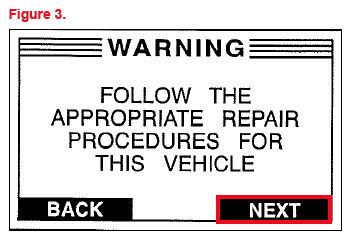
- Press Next.NOTE: Refer to the applicable model and model year Repair Manual for vehicle specific instructions for disassembly and connector locations.
- Ensure the service plug grip is removed, then press Yes.NOTE: Refer to the applicable model and model year Repair Manual in step 3 for the appropriate wait time AFTER the high voltage service plug grip is pulled.
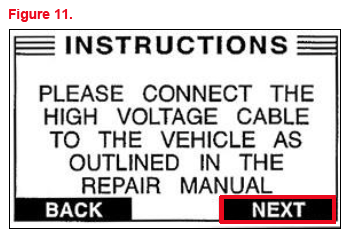
- Connect the High Voltage Cable V to the fuse box.
- Connect the Banana Jack Extension Cable X to the Universal Fuse Box.
- Connect High Voltage Cable V to the GRX-5100.
- Connect the Low Voltage Cable R to the GRX-5100.CAUTION:
- ALWAYS wear insulated gloves and the appropriate PPE provided in the HEV Workstation when working with high voltage.
- ALWAYS use insulated tools provided in the HEV Workstation when working with high voltage.
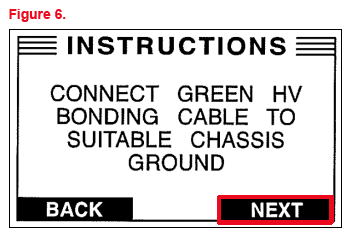
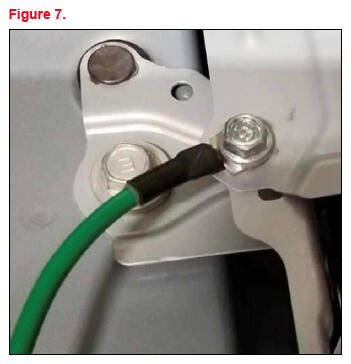
- Connect the green high voltage bonding cable to a suitable chassis ground.
- Press Next.
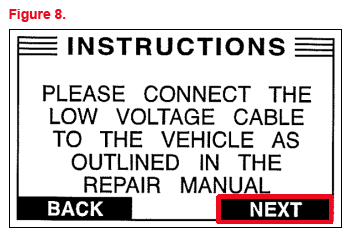
- Connect the low voltage cable as shown in the applicable Repair Manual in step 3.NOTE: The Repair Manual may call this cable "EV bonding cable (green cable)."
- Press Next.
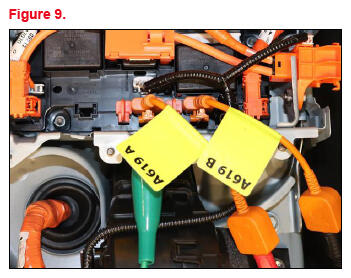
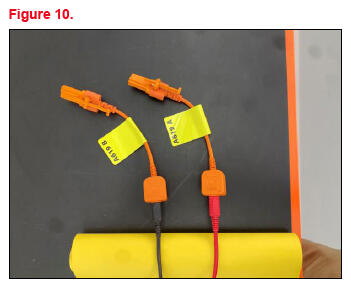
- Plug Cable A619A and Cable A619B OR Cable A940A and Cable A940B into the HV battery location shown in the applicable Repair Manual in step 3.NOTE: Install the HV cables above in the same location on the junction block as the "High voltage cable" listed in the applicable Repair Manual in step 3.
- Connect the red (+) Banana Jack Extension cable into A619A or A940A, and the black (-) banana jack extension cable in A619B or A940B.
- Inspect the connection according to the applicable model and model year Repair Manual found in step 3.NOTE: The Repair Manual will show THS charger usage; please use the GRX-5100 instead.
- Press Next.
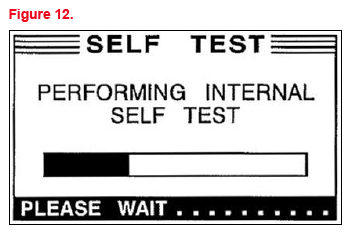
- Wait for the internal test to complete.
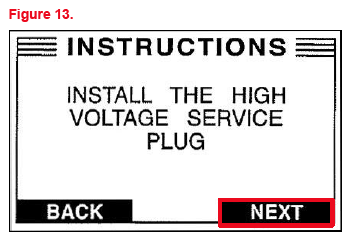
- Install the service plug grip.
- Press Next.NOTE: Make sure the service plug grip's interlock is fully engaged.
- Connect the negative (-) terminal of the auxiliary battery.NOTE: Using the power supply mode, connect the DCA-8000 to the auxiliary battery.
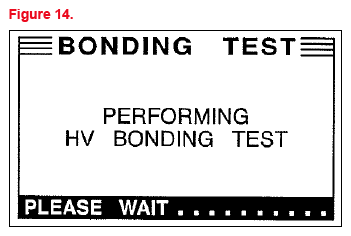
- Wait for the high voltage bonding test to complete.
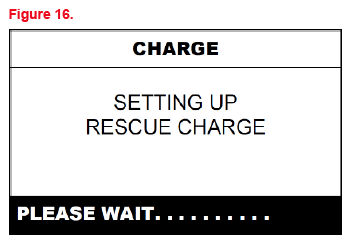
- HV battery rescue charging.
- Turn the vehicle power switch to the IG-ON position.
- Connect Techstream to DLC3.
- Refer to the following menus: Powertrain - Hybrid Control - Active Test - Battery Charge
.
HINT
During the battery charge active test, check the System Main Relay Status -
SMRB and the System Main Relay Status - SMRG on the data list.
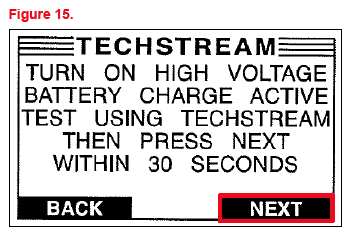
- Open the battery charge active test and click the ON button on Techstream. Then press Next on the GRX-5100 to start HV battery charging within 30 seconds.
HINT
After starting the active test, the SMRs should make an audible "click" when they close.
NOTE:- AFTER the battery charge active test has been turned ON, press Next on the GRX-5100 within 30 seconds. If Next is NOT pressed within 30 seconds, the SMR will open and the GRX-5100 will NOT be able to charge the HV battery.
- If the shielding of the frame wire is NOT securely connected to body ground, the GRX-5100 will NOT operate.
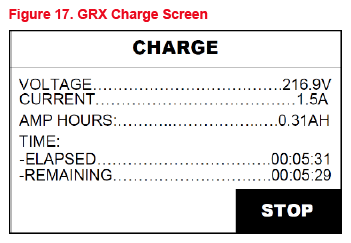
- The GRX-5100 charging condition status will be displayed on the screen of the GRX-5100 while charging the HV battery.
- During the HV battery charge cycle, the voltage and charge current will be recorded on the flash drive.
- The GRX-5100 will automatically stop 10 minutes AFTER charging starts. SMRs will automatically open as soon as the GRX-5100 stops charging.
- If the data list values are NOT as specified in the table below, restart Techstream and cycle the vehicle's power switch to the IG-ON/OFF positions, and then perform the HV battery rescue charging procedure again.
STEP ACTIVE TEST BATTERY CHARGE GRX-5100 START SWITCH DATA LIST SYSTEM MAIN RELAY STATUS - SMRB DATA LIST SYSTEM MAIN RELAY STATUS - SMRG 1 OFF OFF OFF OFF 2 OFF → ON OFF OFF → ON OFF → ON 3 ON OFF → ON ON ON - Wait for the HV battery rescue charge to start.
- Repeat the charge cycle up to three times if required.
HINT
Observe the current (Amp) readings on the GRX charge screen. If the current is zero, then the GRX isn't charging the battery. There might be an open in the GRX Cable charging circuit and/or the SMRs didn't close or didn't stay in the closed position after starting the active test on the scan tool.
NOTE:- Charging time while using the GRX-5100 is 10 minutes per charge cycle when the battery temperature is above 77°F (25°C).
- If the battery temperature is below 32°F (0°C), then three 10-minute charge cycles may be required for putting the engine in a condition where it can be started (the system can enter the READY ON state).
- The GRX-5100 will automatically stop 10 minutes AFTER charging starts.
- There is VERY LITTLE chance of overcharging the HV battery during the second or third charging cycle. The SOC will not likely increase beyond the upper limit because it was low enough to prevent the engine from starting. Even if the SOC were to increase enough to exceed the limit, the hybrid vehicle control ECU will stop the active test to prevent overcharging.
- Cranking the engine once causes the SOC to drop approximately 1%.
- Charging the HV battery once (10 minutes) using the GRX-5100 restores the SOC approximately 2%.
- Reassemble the vehicle.CAUTION:
- ALWAYS wear insulated gloves and the appropriate PPE provided in the HEV Workstation when working with high voltage.
- ALWAYS use insulated tools provided in the HEV Workstation when working with high voltage.
- Turn the GRX-5100 power switch OFF.
- Turn the vehicle power switch OFF.
- Disconnect the 12V auxiliary battery.
- Remove the service plug grip.
- Remove the GRX-5100 cables.
- Reassemble the vehicle following the applicable model and model year Repair Manual found in step 3.
- Install the service plug grip.
- Connect the 12V auxiliary battery.
- Check for ANY DTCs.
- Confirm whether the engine cranks.
Does the engine crank?
- YES - Continue to substep K.
- NO - Repeat steps 3 - 6.
- Confirm whether the engine starts.
Does the engine start?
- YES - Continue to step 7.
- NO - Continue diagnosis using the applicable Repair Manual.
- Allow the vehicle to idle in park "P" until the engine stops. Once the engine stops, self-charge has been completed.