ODOR REMEDIATION PROCESS (DEALER PERFORMED)
ODOR REMEDIATION PROCESS (DEALER PERFORMED)
TECHNICAL SERVICE BULLETIN
Reference Number(s): T-SB-0055-24 Rev1, Date of Issue:
July 29, 2024
| TOYOTA: |
2005 - 2024 4Runner, 86, Avalon, Avalon HV, bZ4X, C-HR, Camry, Camry HV, Celica, Corolla, Corolla Cross, Corolla Cross HV, Corolla Hatchback, Corolla HV, Crown, Echo, FJ Cruiser, GR Corolla, Grand Highlander, Grand Highlander HV, Highlander, Highlander HV, iA, iM, Land Cruiser, Matrix, Mirai, MR2 Spyder, Prius, Prius C, Prius PHV, Prius Prime, Prius V, RAV4, RAV4 EV, RAV4 HV, RAV4 Prime, Sequoia, Sequoia HV, Sienna, Sienna HV, Sienna HV MaaS Package, Solara, Supra, Tacoma, Tacoma HV, Tundra, Tundra HV, Venza, Venza HV, Yaris, Yaris SD MEX-Prod |
| SERVICE CATEGORY: |
Vehicle Exterior |
| SECTION: |
Body Structure |
| MARKET: |
USA |
| COPYRIGHT: |
© 2018 Toyota, USA License Agreement TMS1002 |
Superceded Bulletin(s): T-SB-0055-24, Date of Issue:
June 21, 2024
APPLICABILITY
APPLICABILITY
| YEAR(S) |
MODEL(S) |
ADDITIONAL INFORMATION |
| 2005 - 2024 |
4Runner, 86, Avalon, Avalon HV, bZ4X, C-HR, Camry, Camry HV, Celica, Corolla, Corolla Cross, Corolla Cross HV, Corolla Hatchback, Corolla HV, Crown, Echo, FJ Cruiser, GR Corolla, Grand Highlander, Grand Highlander HV, Highlander, Highlander HV, iA, iM, Land Cruiser, Matrix, Mirai, MR2 Spyder, Prius, Prius C, Prius PHV, Prius Prime, Prius V, RAV4, RAV4 EV, RAV4 HV, RAV4 Prime, Sequoia, Sequoia HV, Sienna, Sienna HV, Sienna HV MaaS Package, Solara, Supra, Tacoma, Tacoma HV, Tundra, Tundra HV, Venza, Venza HV, Yaris, Yaris SD MEX-Prod |
|
REVISION NOTICE
July 29, 2024 Rev1:
- The Reassembly Procedure section has been updated.
Any previous printed versions of this bulletin should be discarded.
INTRODUCTION
Some 2005 - 2024 Toyota vehicles that have undergone water intrusion may exhibit a condition in which a musty odor is present. Follow the procedures in this bulletin to remediate the odor and address this condition. The purpose of this Service Bulletin is to provide general guidelines and procedures for odor remediation. This Service Bulletin provides a guide on how to prepare and treat the interior of the vehicle for odor remediation. Refer to the applicable model and model year Repair Manual and the EPA (Environmental Protection Agency) website for the most up-to-date safety and precautionary guidelines. This Service Bulletin is to provide a general overview and direction for the odor remediation process.
NOTE:
- The procedures described in this service bulletin are NOT applicable to vehicles that have undergone a severe freshwater or saltwater intrusion. Such intrusions could be encountered with floods, storms, hurricanes, typhoons, or other incidents where the vehicle has been submerged or a significant volume of water has entered the interior of the vehicle.
- This bulletin is NOT applicable for general HVAC odor concerns. This bulletin has been developed to address water intrusion-related odors ONLY and should not be used to address HVAC-related odor concerns.
- BEFORE beginning the procedures provided in this service bulletin, the source of water intrusion MUST be identified AND repaired in conjunction with odor remediation. This bulletin does NOT apply if the source of the water leak has not been identified and repaired.
- Follow repair requirements as per Warranty Policies 4.21 and 8.14.
WARRANTY INFORMATION
WARRANTY INFORMATION
| OP CODE |
DESCRIPTION |
TIME |
OFP |
T1 |
T2 |
SUBLET TYPE |
| 743991 |
Odor Remediation (Dealer Performed) |
|
|
66 |
|
ZZ |
APPLICABLE WARRANTY
- This repair is covered under the Toyota Basic Warranty. This warranty is in effect for 36 months or 36,000 miles, whichever occurs first, from the vehicle's in-service date.
- Warranty application is limited to occurrence of the specified condition described in this bulletin.
PARTS INFORMATION
PARTS INFORMATION
| PART NUMBER |
PART NAME |
QTY |
|
High Performance Charcoal Filter |
1 |
|
Insulator Assy., Dash Panel |
1 |
REQUIRED TOOLS & EQUIPMENT
REQUIRED TOOLS & EQUIPMENT
| REQUIRED PERSONAL PROTECTIVE EQUIPMENT (PPE) |
ADDITIONAL INFORMATION |
| 3M™ (or Equivalent) N95 Certified (or Higher) NIOSH Approved Respirator |
As per EPA Standards |
| Safety Goggles/Eye Protection |
| Protective Gloves |
PARTS INFORMATION
| REQUIRED TOOLS & MATERIAL |
PART NUMBER |
QTY |
| 3M™ Quat Disinfectant Cleaner Concentrate 5 |
- |
1 |
| Heavy Duty Cleaner (Like Spray Nine or Similar) |
1 |
| Pump Spray Bottle |
1 |
| Scrub Brush |
1 |
| Painter's Tape |
1 |
| Ozone Machine (or Equivalent) |
RBO5210II |
1 |
NOTE:
An ozone machine and PPE may be ordered by visiting the Approved Dealer Equipment
(ADE) website at Home - Service Resources - Approved Dealer Equipment Website
or by calling 1-800-368-6787.
INSPECTION PROCEDURE
CAUTION:
ALWAYS use proper PPE per current EPA guidelines.
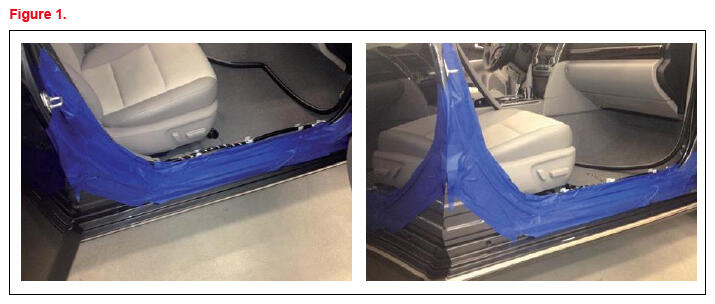
- Prepare the door opening thresholds (e.g., door sills and B and C pillars).
Apply two layers of blue painter's tape to ALL door opening thresholds as shown. This will help minimize damage to the vehicle's painted surfaces during removal and reinstallation of the interior parts.
- Remove ALL parts surrounding the source of the water leak to complete a thorough inspection of the vehicle. Due to the variety of possible water leaks, this process will vary from vehicle to vehicle. In most cases, these items include but are not limited to:
- The right and left front seat assemblies.
- The rear seat assembly.
- The second and third row seat assemblies (if applicable).
- The lower trim panels (e.g., scuff plates, kick panels, pillar garnishes).
- Complete a thorough inspection of the entire interior floorboard area to ensure ALL affected areas are identified.
CAUTION:
ALWAYS use proper PPE per current EPA guidelines.
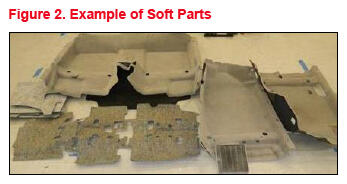
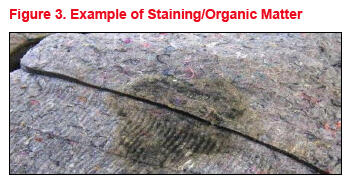
- Inspect ALL soft parts for organic matter growth and/or staining that would indicate water contact.
NOTE:
- Soft parts include items that DO HAVE an absorbent quality that will require them to be removed and replaced with NEW parts if they have come into contact with moisture.
- Keep ALL soft parts that need to be replaced away from ANY parts that will be reused.
Soft parts include:
- Floor mats.
- Carpet/Carpet padding/Jute padding.
- Insulated pads/Styrofoam pads.
- Dash panel insulator assembly (located behind instrument panel/dash pad).
- These parts should NOT be reused and MUST be replaced with NEW parts once the remediation has been completed.
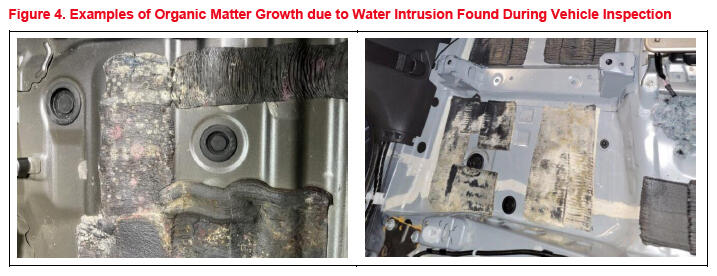
- Inspect ALL hard parts that may have been exposed to surfaces that have had direct contact with water or that have evidence of organic matter growth.
NOTE:
Hard parts include items that DO NOT HAVE an absorbent quality and do NOT need to be replaced.
Hard parts include:
- Plastic garnishes/trim panels (scuff plates, kick panels, center consoles, etc.).
- Plastic ductwork.
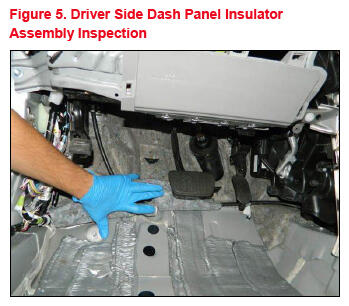
- Inspect the dash panel insulator assembly along the base of the instrument panel and floorboard area for ANY signs of water or organic matter growth. Perform this inspection on BOTH the driver AND passenger sides of the vehicle. If ANY sign of organic matter growth and/or staining that would indicate water contact has occurred is found, the dash panel insulator assembly MUST be replaced.
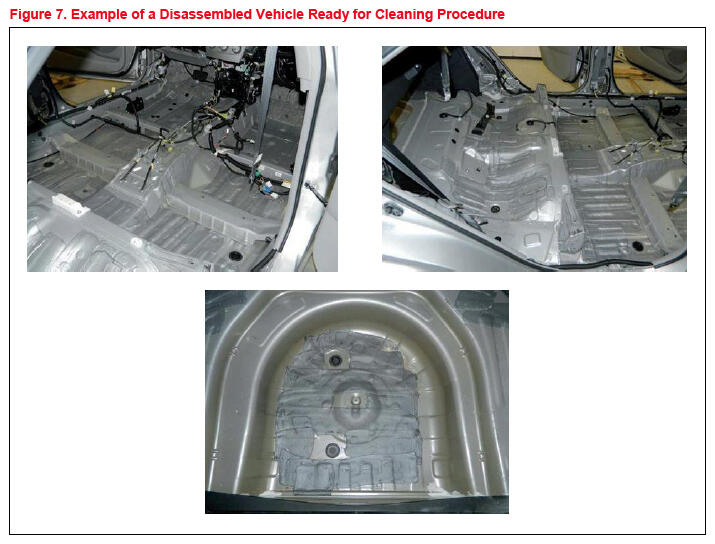
DISASSEMBLY PROCEDURE
Due to the differences in vehicle design and the various water intrusion conditions that may occur, specific steps for disassembly of the vehicle interior may vary. The purpose of the Disassembly Procedure in this Service Bulletin is to provide general disassembly guidelines to prepare the interior of the vehicle for odor remediation services.
NOTE:
Remove HV or EV batteries prior to servicing or cleaning the area where these are present or exposed. Refer to TIS, applicable model and model year Repair Manual and follow ALL recommended safety procedures for HV and EV battery handling.
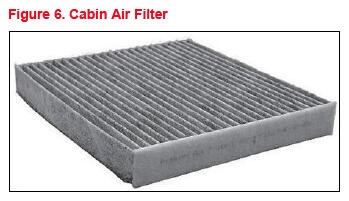
- If equipped, remove the cabin air filter and discard.
NOTE:
- There should NOT be a cabin air filter installed in the HVAC during the remediation process.
- A NEW high-performance charcoal filter should be installed AFTER the entire remediation process has been completed.
- Remove ALL the remaining interior components that cover the affected area on the floor of the vehicle. Refer to TIS, applicable model and model year Repair Manual for interior component removal.
NOTE:
If organic growth is present only in the trunk, remove ONLY the trunk interior components. If the organic growth is present only in the cabin, remove ONLY the cabin interior components. If it is present in both the trunk and cabin, remove interior components from BOTH the trunk and cabin.
NOTE:
If the dash panel insulator assembly requires replacement, it should be removed and replaced with a NEW part BEFORE remediation of the vehicle. On most vehicles, replacement of the dash panel insulator assembly requires removal of the instrument panel/dash pad assembly and the HVAC ducting. Do NOT attempt to cut out affected areas or treat the dash panel insulator assembly.
NOTE:
In most cases, the door panels and headliner can remain installed in the vehicle UNLESS they show evidence of water contact.
- If the dash panel insulator assembly was found to be affected by water contact during the initial inspection, remove and replace the dash panel insulator assembly. Refer to TIS, applicable model and model year Repair Manual for instructions.
CLEANING PROCEDURE
- Remove ANY loose debris from the floor pan.
- Spray and Scrub: Using a heavy-duty cleaner (like Spray Nine, or a similar product), spray the floor pan and any other affected components that will NOT be replaced. Scrub area to remove staining. Repeat as needed on any stubborn areas.
- Spray and Soak: Using 3M™ Quat Disinfectant product, spray the floor pan and ANY other affected components that will NOT be replaced. Floor pan should be visibly wet for at least 10 minutes to ensure proper amount of disinfectant has been used. Let disinfectant soak for at least 30 minutes.
NOTE:
Remember to dilute the 3M™ Quat Disinfectant as instructed in the container.
- After 30 minutes of allowing the disinfectant to soak, wipe the vehicle dry ensuring ALL moisture has been removed.
CLEARANCE TEST (OPTIONAL)
A clearance test is NOT required, but if the dealer or customer would like to have a clearance test complete, consider the following options:
- Inspector Lab (recommended):
- Create a Priority Lab account: https://inspectorlab.com/
- Purchase surface sample tape: https://shop.discoverbreeze.com/products/breeze-e_tape-surface-sampling-tape
- Print out and complete a Chain of Custody document from the Priority Lab account to ship with the sample kit.
- Mold Inspection Network: https://www.amazon.com/Testing-Analysis-Expert-Consultation-included/dp/B016YSY8XQ
REASSEMBLY PROCEDURE
- Reassemble the vehicle interior with the treated hard parts and NEW soft parts once the cleaning procedure has been completed. If a clearance test will be submitted, wait to reassemble until you have received clearance test results showing the cleaning was completed successfully. Refer to TIS, applicable model and model year Repair Manual for instructions.
- Install a NEW high-performance charcoal filter in the vehicle AFTER the vehicle interior has been completely reassembled and proper function of ALL interior systems/parts (e.g., HVAC, manual and power seat adjustment) have been confirmed.
- Confirm normal vehicle operation and clear ANY DTCs AFTER reassembly is complete.
OZONE MACHINE
- After the vehicle has been reassembled, turn the A/C ON in recirculation mode.
- Run the ozone machine for one hour.
- After the ozone machine has run for one hour, turn the machine OFF and allow the vehicle to air out for two hours.