Odor Remediation After Water Intrusion (T-SB-0094-21 REV2)
Reference number: T-SB-0094-21 REV2
Supersedes refnos: T-SB-0094-21, T-SB-0094-21 REV1
ODOR REMEDIATION AFTER WATER INTRUSION
TECHNICAL SERVICE BULLETIN
| TOYOTA: | 2005-2022 4Runner, Avalon, Avalon HV, Camry, Camry HV, Celica, Corolla, Corolla Hatchback, Corolla HV, Echo, FJ Cruiser, Highlander, Highlander HV, iM, Land Cruiser, Matrix, MR2 Spyder, Prius, Prius C, Prius PHV, Prius V, RAV4, RAV4 EV, RAV4 HV, Sequoia, Sienna, Sienna HV, Solara, Tacoma, Tundra, Venza, Yaris |
| SERVICE CATEGORY: | Vehicle Interior |
| SECTION: | Interior Panels/Trim |
| MARKET: | USA |
| COPYRIGHT: | © 2022 Toyota, USA License Agreement TMS1002 |
APPLICABILITY
| YEAR(S) | MODEL(S) | ADDITIONAL INFORMATION |
|---|---|---|
| 2005 - 2022 | 4Runner, Avalon, Avalon HV, Camry, Camry HV, Celica, Corolla, Corolla Hatchback, Corolla HV, Echo, FJ Cruiser, Highlander, Highlander HV, iM, Land Cruiser, Matrix, MR2 Spyder, Prius, Prius C, Prius PHV, Prius V, RAV4, RAV4 EV, RAV4 HV, Sequoia, Sienna, Sienna HV, Solara, Tacoma, Tundra, Venza, Yaris |
REVISION NOTICE
November 29, 2022 Rev2:
- The Warranty Information, Required Tools & Equipment, and Post Remediation Procedures sections have been updated.
May 26, 2022 Rev1:
- The Required Tools & Equipment, SERVPRO™ Remediation Service Request Procedure, and Post Remediation Procedures sections have been updated.
Any previous printed versions of this bulletin should be discarded.
INTRODUCTION
Some 2005 - 2022 model year Toyota vehicles that have undergone water intrusion may exhibit a condition in which a musty smell is present. Follow the procedures in this bulletin to remediate the odor and address this condition. The purpose of this service bulletin is to provide general guidelines and procedures for odor remediation. This service bulletin provides a guide on how to prepare the interior of the vehicle prior to an odor remediation being performed, as well as contact information for an approved vendor who will arrange the remediation, and instructions on how to prepare the interior of the vehicle for reassembly once the remediation has been completed. Refer to all model and model year specific Repair Manuals and the EPA (Environmental Protection Agency) website for the most up-to-date safety and precautionary guidelines. This service bulletin is to provide a general overview and direction for the odor remediation process.
- The procedures described in this service bulletin are NOT applicable to vehicles that have undergone a severe freshwater or saltwater intrusion. Such intrusions could be encountered with floods, storms, hurricanes, typhoons, or other incidents where the vehicle has been submerged or a significant volume of water has entered the interior of the vehicle.
- This bulletin is NOT applicable for general HVAC odor concerns. This bulletin has been developed to address water intrusion-related odors ONLY and should not be used to address HVAC-related odor concerns.
- BEFORE beginning the procedures provided in this service bulletin, the source of water intrusion MUST be identified AND repaired in conjunction with odor remediation. This bulletin does NOT apply if the source of the water leak has not been identified and repaired.
- Follow repair requirements as per Warranty Policies 4.21 and 8.14.
WARRANTY INFORMATION
| OP CODE | DESCRIPTION | TIME | OFP | T1 | T2 | SUBLET TYPE(5) | ||||||||||
|---|---|---|---|---|---|---|---|---|---|---|---|---|---|---|---|---|
| 743991 | Identify & Repair Source of Water Leak, R & R Interior, LASD(1) Removal, and Insulator Assembly Replacement | (2) | (3) | 66 | (4) | EC, ZZ | ||||||||||
|
||||||||||||||||
APPLICABLE WARRANTY
- This repair is covered under the Toyota Basic Warranty. This warranty is in effect for 36 months or 36,000 miles, whichever occurs first, from the vehicle's in-service date.
- Warranty application is limited to occurrence of the specified condition described in this bulletin.
- Per Warranty Policy 5.2, only one warranty claim per warrantable condition will be accepted by Toyota.
PARTS INFORMATION
| PART NUMBER | PART NAME | QTY | ||||||
|---|---|---|---|---|---|---|---|---|
| 58651-22H92 | Floor Silencer Sheet (1.5 mm thick sheet) (3.6 ft x 2.6 ft) | As Needed(1) | ||||||
| 58651-22H91 | Floor Silencer Sheet (3 mm thick sheet) (3.6 ft x 2.6 ft) | As Needed(1) | ||||||
| (2) | High Performance Charcoal Filter | 1 | ||||||
| (3) | Insulator Assy., Dash Panel | 1 | ||||||
|
||||||||
REQUIRED TOOLS & EQUIPMENT
| REQUIRED PPE (PERSONAL PROTECTIVE EQUIPMENT) | ADDITIONAL INFORMATION | ||
|---|---|---|---|
| 3M™ (or equivalent) N95 Certified (or higher) NIOSH Approved Respirator | As per EPA Standards(1) | ||
| Safety Goggles/Eye Protection | |||
| Protective Gloves | |||
|
|||
| REQUIRED TOOLS & MATERIAL | PART NUMBER | QTY |
|---|---|---|
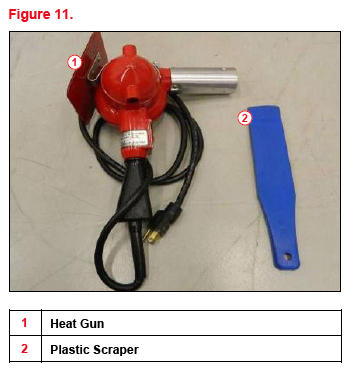
| 1 - 2-in. Flat Bladed Plastic Scraper | - | 1 |
| Heat Gun | 1 | |
| 3M™ Urethane Seam Sealer (or equivalent) | 08361 or 08362 | 1 |
| 3M™ General Trim Adhesive (or equivalent) | 08088 | 18.1-oz. Spray Can |
| Blue Painter's Tape | - | As Needed |
INSPECTION PROCEDURE
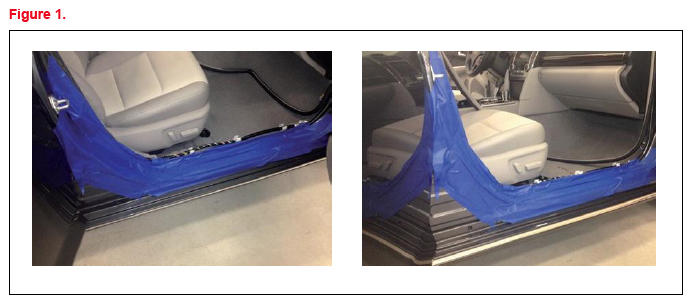
- Prepare the door opening thresholds (e.g., door sills and B and C pillars).
- Apply two layers of blue painter's tape to ALL door opening thresholds as shown. This will help minimize damage to the vehicle's painted surfaces during removal and reinstallation of the interior parts.
- Remove ALL parts surrounding the source of the water leak to complete a thorough inspection of the vehicle. Due to the variety of possible water leaks, this process will vary from vehicle to vehicle. In most cases, these items include but are not limited to:
- The right and left front seat assemblies.
- The rear seat assembly.
- The second and third row seat assemblies (if applicable).
- The lower trim panels (e.g., scuff plates, kick panels, pillar garnishes).
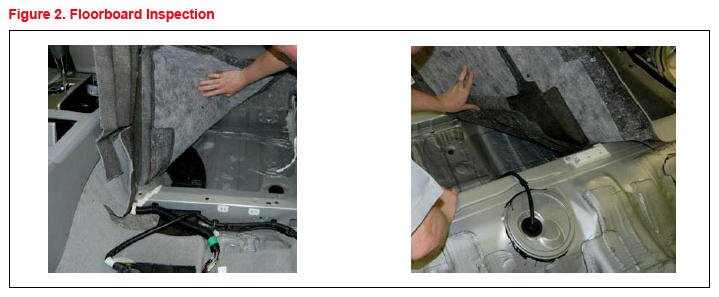
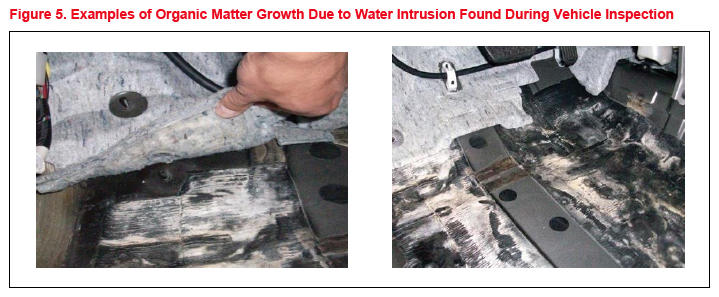
- Complete a thorough inspection of the entire interior floorboard areas to ensure ALL affected areas are identified.CAUTION: ALWAYS use proper PPE per current EPA guidelines.
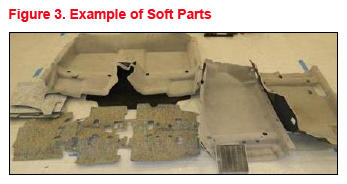
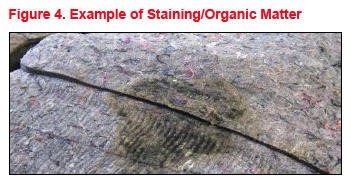
- Inspect ALL soft parts for organic matter growth and/or staining that would indicate water contact.NOTE:
- Soft parts include items that DO HAVE an absorbent quality that will require them to be removed and replaced with NEW parts if they have come into contact with moisture.
- Keep ALL soft parts that will be replaced away from the parts that will be reused. Soft parts include:
- Floor mats.
- Carpet/Carpet padding/Jute padding.
- Insulated pads/Styrofoam pads.
- Dash panel insulator assembly (located behind instrument panel/dash pad).
- These parts should NOT be reused and require replacement with NEW parts once the remediation has been completed.
- Inspect ALL hard parts that may have been exposed to surfaces that have had direct contact with water or that have evidence of organic matter growth.NOTE: Hard parts include items that DO NOT HAVE an absorbent quality and do NOT need to be replaced. ALL hard parts should be organized together in an accessible location near the vehicle, as they will be treated together as part of a later cleaning step performed by SERVPRO™. Hard parts include:
- Plastic garnishes/trim panels (scuff plates, kick panels, center consoles, etc.).
- Plastic ductwork.
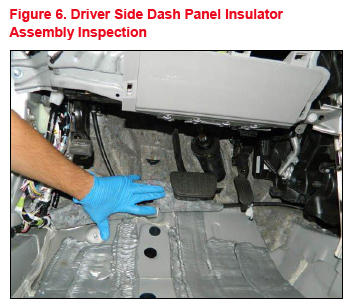
- Inspect the dash panel insulator assembly along the base of the instrument panel and floorboard area for ANY signs of water or organic matter growth. Perform this inspection on BOTH the driver AND passenger sides of the vehicle. If ANY sign of organic matter growth and/or staining that would indicate water contact has occurred is found, the dash panel insulator assembly will need to be replaced.
DISASSEMBLY PROCEDURE
Due to the differences in vehicle design and the various water intrusion conditions that may occur, specific steps for disassembly of the vehicle interior may vary. The purpose of the Disassembly Procedure in this service bulletin is to provide general disassembly guidelines to prepare the interior of the vehicle for remediation services.
- Vehicles with second and third row seats will require removal of ALL seats in order to properly access and remove the LASD from the vehicle, as well as ensure the entire vehicle is remediated during the SERVPRO™ remediation process.
- For hybrid vehicles, the hybrid battery should be removed BEFORE the rest of the disassembly procedure. Please reference applicable Repair Manual and be sure to follow all recommended safety precautions for hybrid battery handling.
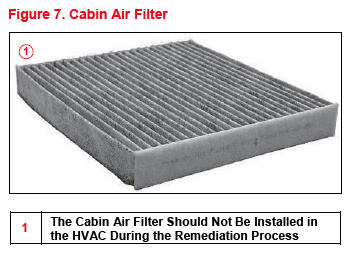
- If equipped, remove the cabin air filter and discard.NOTE:
- There should NOT be a cabin air filter installed in the HVAC during the remediation process.
- A NEW high-performance charcoal filter should be installed AFTER the entire remediation process has been completed.
- Remove ALL remaining interior components that cover the LASD located on the floor of the vehicle. Refer to TIS, applicable model and model year Repair Manual for interior component removal.NOTE: If the dash panel insulator assembly requires replacement, it should be removed and replaced with a NEW part BEFORE remediation of the vehicle. On most vehicles, replacement of the dash panel insulator assembly requires removal of the instrument panel/dash pad assembly and the HVAC ducting. Do NOT attempt to cut out affected areas or treat the dash panel insulator assembly.NOTE: In most cases, the door panels and headliner can remain installed in the vehicle UNLESS they show evidence of water contact.
- If the dash panel insulator assembly was found to be affected by water contact during the initial inspection, remove and replace the dash panel insulator assembly. Refer to TIS, applicable model and model year Repair Manual for instructions.

LASD REMOVAL PROCEDURE
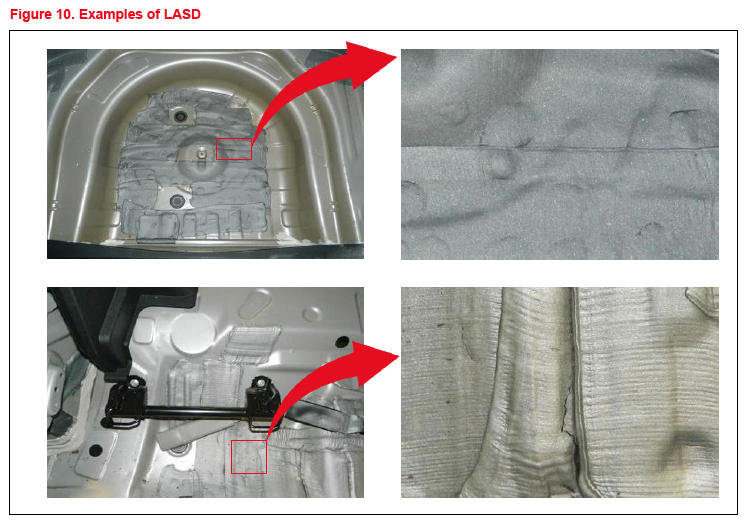
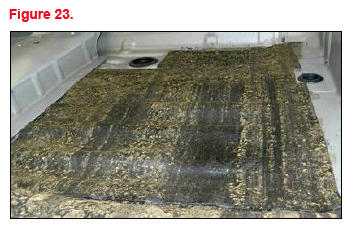
LASD is a vibration damping coating that is used on the floor of vehicles to reduce road noise. To maximize the effectiveness of the remediation, LASD removal is required prior to the remediation process being performed.
- Wear the required PPE (N95 certified respirator, safety goggles, AND protective gloves).
- Ensure the vehicle is in a well-ventilated area, preferably in an area that has good airflow/circulation and is NOT enclosed.
- Avoid scratching or damaging the sheet metal surfaces, as these areas will need to have NEW floor silencer sheets applied once the remediation is complete.
- Do NOT use grinders, abrasive discs, or other similar tools to remove the material, as this can damage the anti-corrosion protection on the sheet metal surfaces.
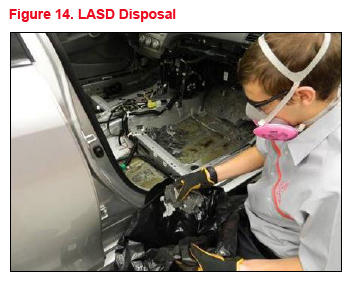
- Once removed, place all LASD debris in a plastic bag, seal the bag, and dispose of as normal refuse/garbage per EPA guidelines. (Do NOT use a vacuum to remove debris or old material left over from the removal process.)
- If equipped, remove the cabin air filter and discard. A NEW high-performance charcoal filter should be installed once the entire remediation process has been completed. There should NOT be a cabin air filter installed in the HVAC during the remediation process.
- To minimize the potential for damage to the threshold areas of the vehicle, it will be necessary to protect those painted surfaces. See step 1 in the Inspection Procedure for more details on this process.
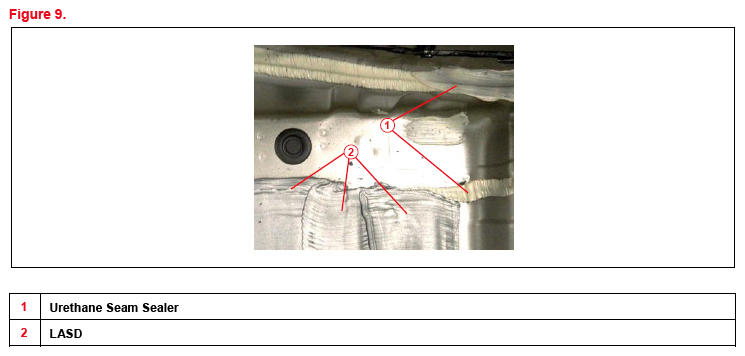
- Avoid removal of the urethane seam sealer where sheet metal panels join. If the urethane seam sealer has been removed during the LASD removal process, it will be necessary to reapply as needed AFTER the remediation process is complete.
The appearance of LASD (color, texture) may vary (smooth vs. rippled) depending on the vehicle and application method.
LASD Removal Procedure (continued)
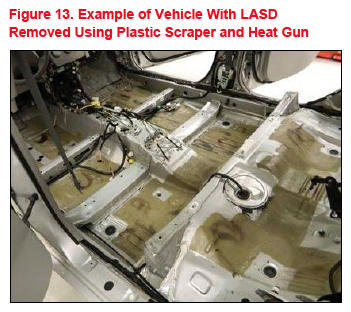
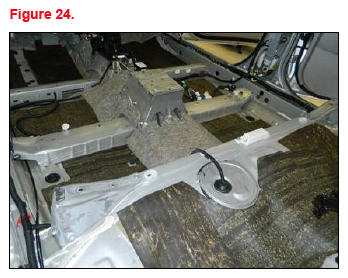
- Remove ALL LASD from the floor pan of the vehicle, including the cargo/trunk compartment, using a flat-bladed plastic scraper and a heat gun.NOTE:
- Using a flat-bladed plastic scraper and a heat gun is the ONLY approved method for removing LASD.
- Ensure ALL LASD is removed.
- Select a square area approximately 6 in. by 6 in. and begin heating the LASD with the heat gun for approximately 30 seconds.
- Check the heated sound deadening material with the plastic scraper to determine if it is pliable enough to remove.
- If the material is soft enough to remove, use the plastic scraper and remove the selected area.
- If the material is still too hard to remove, use the heat gun for an additional 30 seconds to see if the LASD is ready for removal. Keep track of the length of time necessary for effective sound deadening removal and adjust as needed.
NOTE: Do NOT overheat the LASD. Heat the LASD just enough for it to become pliable. - Continue this procedure until ALL LASD is removed from the vehicle, including the cargo/trunk compartment.
- Once removed, place ALL LASD debris in a plastic bag and dispose of it as normal refuse/garbage per EPA guidelines. Use a whisk broom and dustpan to remove ANY small debris on the floor of the vehicle.

PREPARATION FOR SERVPRO™ REMEDIATION PROCEDURE
Prior to the remediation being performed, the instrument panel/dash pad and HVAC MUST be reinstalled and the HVAC made operational. If they were removed during the disassembly process to allow for installation of a NEW dash panel insulator assembly and have NOT been reinstalled, they must be reinstalled at this time. Reassemble the instrument panel/dash pad and confirm that the HVAC is operational. Do NOT install the center console or HVAC floor ducting/ductwork during this procedure. Refer to TIS, applicable model and model year Repair Manual for instructions.
- Adjust the climate control settings.
- Set the HVAC system vents to dash and floor vents. Do NOT set the HVAC system vents to defrost mode.
- Set the temperature to the medium setting (ambient temperature).
- Ensure the controls are NOT set to "Auto."
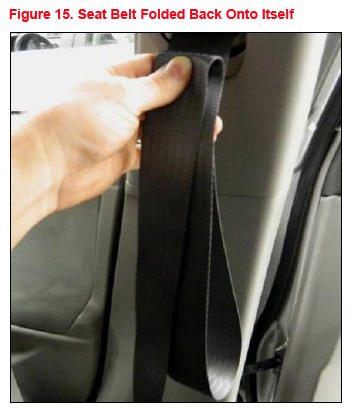
- Prepare ALL seat belts.
- Pull the seat belt from the retractor until it is fully extended.
- Hold the seat belt from the point closest to the retractor and fold over approximately 12 in. of seat belt back onto itself as shown.
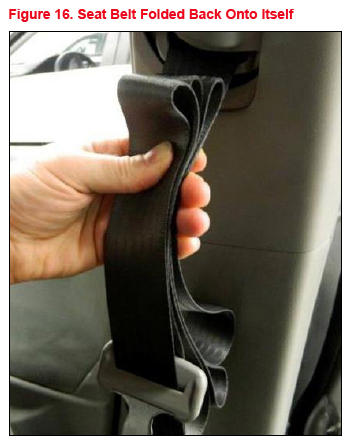
- Continue to fold the seat belt onto itself until the entire seat belt assembly can be held in one hand as shown.
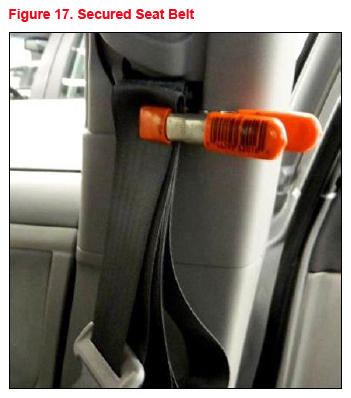
- Using a plastic/rubber-tipped clamp, place the clamp onto the top of the folded seat belt so it is secured and fully extended during the remediation process as shown. For vehicles equipped with second or third row center seat belts that are housed in the seat assemblies or roof, the same process of extending, folding, and clamping the seat belt should be performed.
- Complete step 2 for ALL the remaining seat belts.NOTE: It is recommended that the technician photograph the vehicle interior to document the preparation condition of the interior BEFORE the remediation is performed.
SERVPRO™ REMEDIATION SERVICE REQUEST PROCEDURE
- For remediation service requests related to a field action, refer to the applicable Technical Instruction for directions on how to submit requests.
- Follow the process below if remediation is NOT related to a field action, or the corresponding Technical Instruction does NOT provide direction.
- Confirm the latest procedure on a current version of this service bulletin, as this process is subject to change.
SERVPRO™ Remediation Process
Confirm SERVPRO™ personnel are aware of and have agreed to the Toyota Vehicle Odor Remediation Program - Training & Certification Guide . Toyota strongly recommends the Dealership Service Director, and ANY other dealership personnel, review this document to gain an understanding of the work process completed by SERVPRO™.
Required Action for Dealer Technician
To arrange for remediation services to be performed, please create a TAS (Technical Assistance System) case including justification for the request and confirmation that the source of any water leak has been identified and resolved. The TAS case will be forwarded to relevant FTS (Field Technical Specialist) for review.
Required Action for Field Technical Specialist
After reviewing the TAS case and confirming the vehicle requires remediation and is fully prepped, send an email request to TMNA HQ (Toyota Motor North America Headquarters) at remediationrequests@toyota.com . Communication to TMNA HQ should include the following:
- VIN (Vehicle Identification Number)
- Make
- Model
- Model year
- TAS case
- Dealer name
- Dealer code
- Dealer address
- Email and phone number for preferred contacts below:
- Service manager
- Shop foreman
- Person responsible for invoice
- An email to TMNA HQ should NOT be sent until the vehicle has been FULLY prepped and is ready for the remediation services to be performed.
- If a request to TMNA HQ is submitted and the vehicle preparation has NOT been fully completed, the dealer/requesting facility is at risk of not being able to have the remediation services performed on the vehicle at the requested time and being charged with a service-call fee.
POST REMEDIATION PROCEDURES
Once the remediation process has been performed by SERVPRO™, follow the steps below to prepare the floor pan of the vehicle for reassembly of the vehicle interior.
- Post remediation procedures should NOT be initiated until the dealer has received a clearance report from ServPro Commercial LLC™ stating that vehicle has been cleared and successfully remediated.
- The invoice will be sent directly from the ServPro Commercial LLC™, not the local franchise accounting group, and will be separate from the clearance report. The invoice should be paid by the dealership within 30 days of receipt of invoice or risk rejection of future services.
- Post remediation procedures should be performed AFTER the remediation has been completed.
- Do NOT apply seam sealer or floor silencer sheet to the floor pan BEFORE the remediation process is performed.
Urethane Seam Sealer Application Procedure
- Was urethane seam sealer removed during the LASD removal process?
- YES - Continue to step 2.
- NO - Go to the Floor Silencer Sheet Installation Procedure subsection.
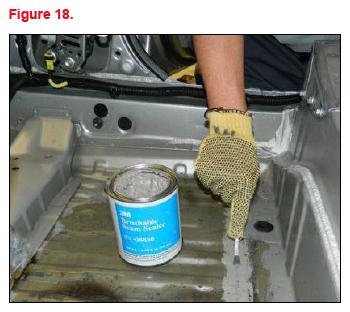
- Ensure the floor pan has been cleaned properly and is free of any dirt, oil, grease, or other debris.
- Apply the urethane seam sealer using a brush to ALL locations where the urethane seam sealer was removed during the LASD removal process.
- Allow the seam sealer to dry for a MINIMUM of 1.5 hours.
Floor Silencer Sheet Installation Procedure
The floor silencer sheet will need to be applied in the areas where LASD was removed to restore the sound deadening function of the removed material. The floor silencer sheet comes in two different thicknesses (1.5 mm and 3.0 mm). Refer to the applicable Collision Repair Manual or New Car Features for details on the required thicknesses for specific locations.
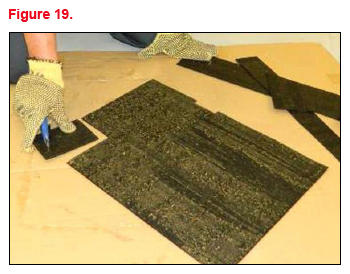
- Draw a rough outline of the area to be covered onto the appropriate thickness of the floor silencer sheet.
- Cut the floor silencer sheet slightly larger than the rough outline drawn using scissors, a utility knife, or other suitable cutting device.CAUTION: Use caution with ANY type of cutter to avoid injury.
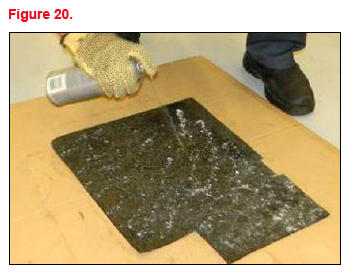
- Spray 3M™ General Trim Adhesive to the back side of the floor silencer sheet and allow it to air dry for five minutes.
Floor Silencer Sheet Installation Procedure (continued)
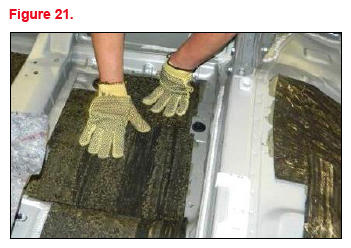
- Place the floor silencer sheet onto the selected area and press it into position.
- Use a heat gun to evenly heat the floor silencer sheet over the entire surface to a temperature of 180°F - 240°F (82°C to 115°C).CAUTION: Use caution and wear proper PPE when operating a heat gun to avoid burns.
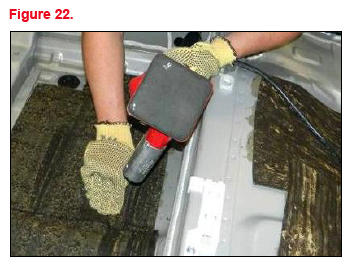
- Force the floor silencer sheet down into the floor pan making sure to form it into ALL the recesses as shown.
HINT
If available, use a rubber seam roller tool as this is an effective way to form the floor silencer sheet into the floor pan.
- Trim ANY excess material from the areas where the floor silencer sheet overlaps onto the painted sheet metal.
- Continue this process until ALL areas where LASD was removed have been completely covered with floor silencer sheets.

REASSEMBLY PROCEDURE
- Reassemble the vehicle interior with the treated hard parts and NEW soft parts once application of the floor silencer sheet has been completed. Refer to TIS, applicable model and model year Repair Manual for instructions.
- Install a NEW high-performance charcoal filter in the vehicle AFTER the vehicle interior has been completely reassembled and proper function of ALL interior systems/parts (e.g., HVAC, manual and power seat adjustment) have been confirmed.
- Confirm normal vehicle operation and clear ANY DTCs AFTER reassembly is complete.