Wire Harness Repair Or Replacement Guide (T-SB-0003-22)
Reference number: T-SB-0003-22
WIRE HARNESS REPAIR OR REPLACEMENT GUIDE
TECHNICAL SERVICE BULLETIN
| TOYOTA: | 2014 - 2022 4Runner, Corolla, Highlander, Highlander HV, Tundra; 2013 - 2022 Avalon, Avalon HV, Land Cruiser, RAV4; 2015 - 2022 Camry, Camry HV; 2022 Corolla Cross; 2020 - 2022 Corolla HV; 2019 - 2022 Corolla Hatchback; 2016 - 2022 Mirai, Prius, RAV4 HV; 2017 - 2022 Prius Prime; 2012 - 2014 RAV4 EV; 2021 - 2022 RAV4 Prime, Sienna HV, Venza HV; 2015 - 2020 Sienna; 2012 - 2022 Tacoma; 2012 - 2019, 2022 Yaris |
| SERVICE CATEGORY: | Power Source/Network |
| SECTION: | Power Distribution |
| MARKET: | USA |
| COPYRIGHT: | © 2022 Toyota, USA License Agreement TMS1002 |
APPLICABILITY
| YEAR(S) | MODEL(S) | ADDITIONAL INFORMATION |
|---|---|---|
| 2014 - 2022 | 4Runner, Corolla, Highlander, Highlander HV, Tundra | |
| 2013 - 2022 | Avalon, Avalon HV, Land Cruiser, RAV4 | |
| 2015 - 2022 | Camry, Camry HV | |
| 2022 | Corolla Cross | |
| 2020 - 2022 | Corolla HV | |
| 2019 - 2022 | Corolla Hatchback | |
| 2016 - 2022 | Mirai, Prius, RAV4 HV | |
| 2017 - 2022 | Prius Prime | |
| 2012 - 2014 | RAV4 EV | |
| 2021 - 2022 | RAV4 Prime, Sienna HV, Venza HV | |
| 2015 - 2020 | Sienna | |
| 2012 - 2022 | Tacoma | |
| 2012 - 2019, 2022 | Yaris |
INTRODUCTION
This Service Bulletin includes guidelines meant to help determine whether to repair or replace a wire harness assembly based on damage type. This Service Bulletin should be used in conjunction with the applicable model and model year Electronic Wiring Diagram (EWD) and/or Repair Manual.
WARRANTY INFORMATION
| OP CODE | DESCRIPTION | TIME | OFP | T1 | T2 |
|---|---|---|---|---|---|
| N/A | Not Applicable to Warranty | - | - | - | - |
PARTS INFORMATION
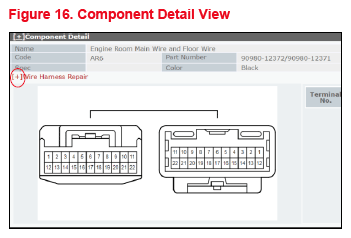
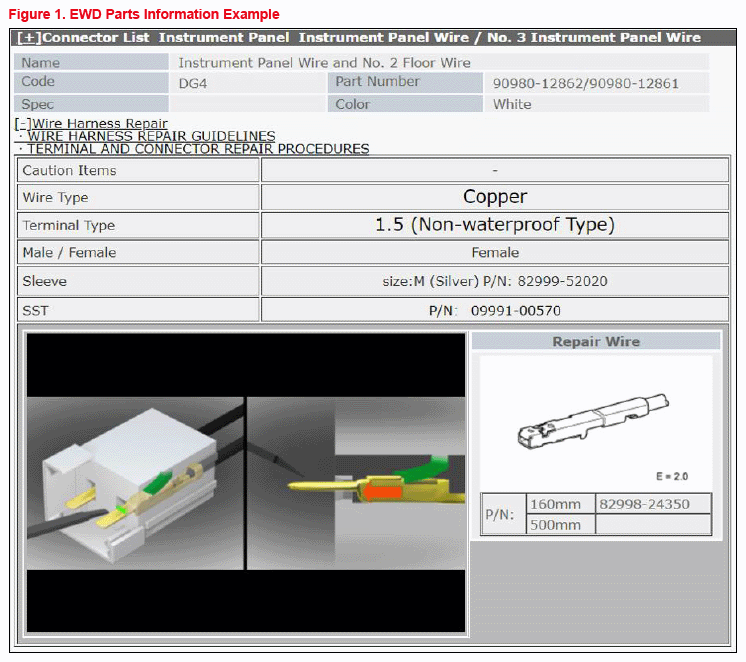
For wire harness assembly replacement, look up the part(s) in the Electronic Parts Catalog (EPC) per the VIN. For wire harness repair parts information, use the wire harness repair information from the EWD component detail/wire harness repair screen. See the figure below for an example of this process.
REQUIRED TOOLS & EQUIPMENT
| SPECIAL SERVICE TOOLS (SST) | PART NUMBER | QTY | ||
|---|---|---|---|---|
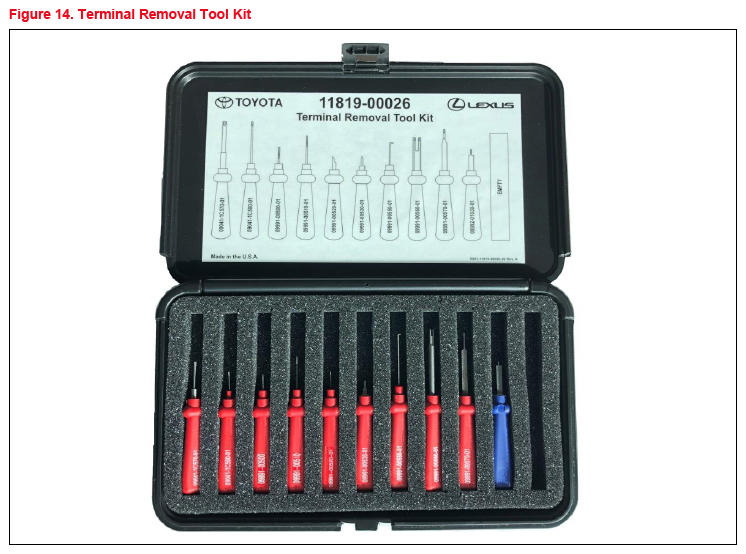
| Terminal Removal Tool Kit(1) | 11819-00026 | 1 | ||
|
||||
REPAIR OR REPLACEMENT GUIDE
BEFORE the wire harness assembly is repaired or replaced, locate the damaged portion and identify the causes of the damage.
| TERMS | REFERENCE IMAGE | TERMS | REFERENCE IMAGE |
|---|---|---|---|
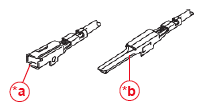
| Terminals *a: Female *b: Male |
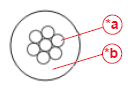
Wires *a: Insulator *b: Core |
||
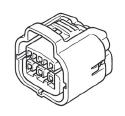
| Connector | Wire Harness Assembly | ||
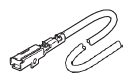
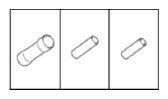
| Repair Wire | Sleeves |

If the wire harness assembly damage is related to ANY of the circumstances below, repair is NOT RECOMMENDED as a quality repair and can NOT be guaranteed:
- Orange wire harness assemblies for high-voltage systems (e.g., hybrid systems)
- Large (greater than or equal to 8 sq. mm, approximately 8 AWG) wire harness assembly for high-current systems (e.g., alternator system)
- Flood-damaged vehicles
- Thermal event damaged vehicles
- Shielded wires, such as antenna cable and video data cable
- Supplemental Restraint System circuits
Wire harness repair instructions for the circumstances above may be found in other publications such as, Recalls, Campaigns, Service Bulletins, Tech Tips, etc. that have been approved to address specific conditions on specific vehicles. The instructions found in these publications should be followed for those specific instances.
If the wire harness assembly damage is NOT related to ANY of the circumstances above, determine the best repair method by using the following information:
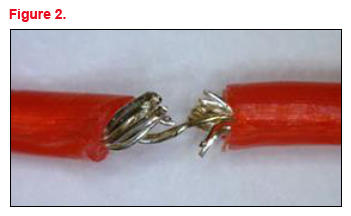
- Broken or separated wire.
Recommended repair methods:
- Wire repair
- Wire harness assembly replacement
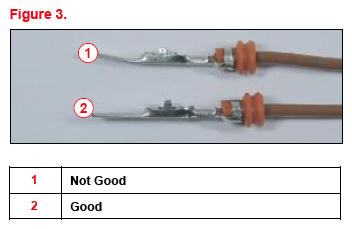
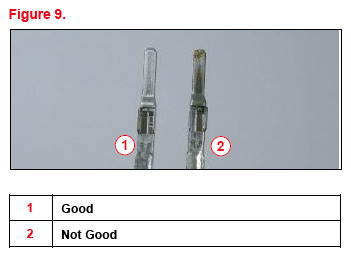
- Bent or damaged male wire terminals.
Recommended repair methods:
- Wire terminal repair
- Wire harness assembly replacement
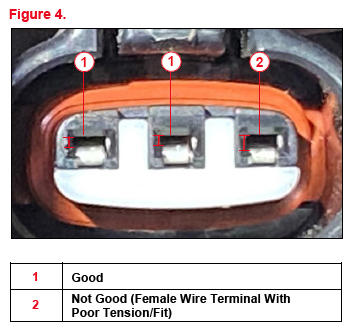
- Loose or damaged female wire terminals with poor tension/fit.
Recommended repair methods:
- Wire terminal repair
- Wire harness assembly replacement
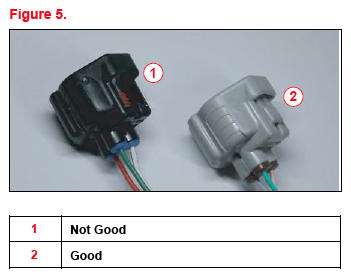
NOTE: Until the wire terminal gauge tool is available, for a suspected poor terminal tension condition, replace the entire wire harness if unable to effectively diagnose by other reasonable methods such as a wiggle test or visual inspection for looseness. - Broken connector-lock tab
Recommended repair methods:
- Connector replacement
- Wire harness assembly replacement
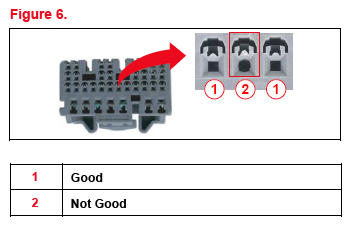
- Connector deformation caused by incorrect terminal probing
Recommended repair methods:
- Connector replacement
- Wire harness assembly replacement
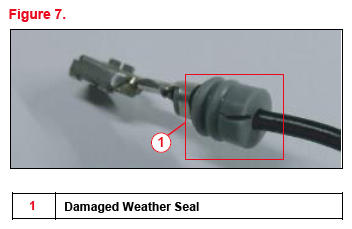
- Damaged weather seal.
Recommended repair methods:
- Repair wire replacement
- Wire harness assembly replacement
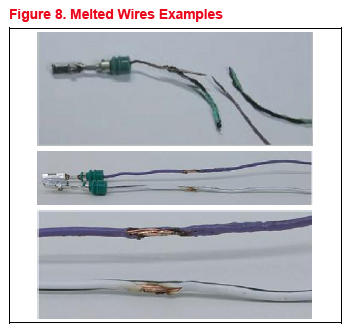
- Melted wires.NOTE:
- It is difficult to precisely locate ALL areas that were damaged.
- Excessive heat impairs the flexibility and electrical conductivity of the wire harness assembly.
Recommended repair method:
- Wire harness assembly replacement.
- Wire terminal discolorationNOTE:
- It is difficult to precisely locate ALL areas that were damaged.
- If a wire harness assembly repair is performed, corrosion or rust may still occur.
Recommended repair method:
- Wire harness assembly replacement
- Wire terminal corrosionNOTE:
- It is difficult to precisely locate ALL areas that were damaged.
- If a wire harness assembly repair is performed, corrosion or rust may still occur.
Recommended repair method:
- Wire harness assembly replacement

PRECAUTIONS FOR REPAIR USING REPAIR WIRES AND/OR CONNECTORS
- Confirm the necessary wire harness assembly repair tools are available.NOTE:
- Wire harness assembly parts may be damaged or broken if the repair is conducted without using the appropriate tools.
- The vehicle repair quality may NOT be achieved if the repair is completed without using the appropriate parts.
- Do NOT repair wires that are meant to bend (such as wires in the door-jamb area).NOTE: Original wire harness assembly routing or layout can NOT be restored, as sleeves can NOT bend. Doing so could cause the sleeve to break and this may lead to other malfunctions or problems.
- Check if the removed protective wire harness assembly covers and clamps can be restored after the completion of the repair. If the protective covers or clamps can NOT be restored, the wire harness assembly may be damaged or produce unusual noise due to vibration or interference with the vehicle body or components. Replace covers and/or clamps as needed.
- Repairing communication wire harness assemblies is NOT recommended, for example, CAN (Controller Area Network) communication. Repair causes the electrical resistance to vary, potentially blocking communication signals.
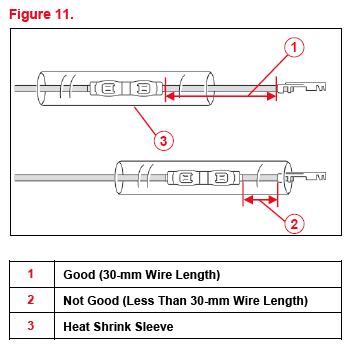
- Ensure the remaining wire length is AT LEAST 30 mm to achieve the waterproof capability and insulation performance of a heat shrink sleeve.
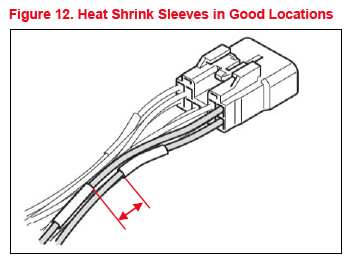
- Avoid the heat shrink sleeves being adjacent to each other when several wires connected to the same connector need to be repaired simultaneously.NOTE: The protective wire harness assembly cover or clamps may NOT be restored if the heat shrink sleeves are adjacent to each other.
- Cut the repaired wire or the existing wire, whichever one will help you to obtain the same wire length as the original one AFTER the repair.
- The repaired wire may have an open or short circuit due to vibration if it is too long.
- The repaired wire may have an open or short circuit due to vibration if it is too short.
- Terminal deformation or poor contact may also result from a repaired wire being too long or too short.

NEW TERMINAL REMOVAL TOOL KIT INFORMATION
A NEW terminal removal tool kit was developed for wire harness repair. This kit includes 10 tools that can be used for multiple terminal and connector types. This section includes instructions for using the NEW wire terminal removal tool kit.
- Confirm terminal type.
- Select the connector that is to be serviced within the EWD and open the component detail view for that connector.
- Within the component detail view, expand the Wire Harness Repair section and confirm the terminal type.
- Select the connector that is to be serviced within the EWD and open the component detail view for that connector.
- Confirm the necessary tool by looking up the corresponding blade part number per terminal type by using the table below.TABLE 2
Illustration Part Number Part Name Notes and Purpose 09991-00500 Lance Canceling Tool For Terminal Removal/0.64 Non-waterproof Type, Female 09991-00510 For Terminal Removal/0.64 Non-waterproof Type, Male 09992-01030 For Terminal Removal/0.64 II Non-waterproof Type, Male 0.64 II Non-waterproof Type, Female 09991-00520 Lance Canceling Tool No. 1 For Terminal Removal/0.5 Non-waterproof Type, Female 0.5 W Non-waterproof Type, Female 09991-00530 Lance Canceling Tool No. 2 For Terminal Removal/0.5 II Waterproof Type, Female 0.64 Non-waterproof Type, Female 09991-00560 Lance Canceling Tool No. 3 For Terminal Removal/0.64 Waterproof Type, Male 09991-00570 Lance Canceling Tool No. 4 For Terminal Removal/1.5 Non-waterproof Type, Male 1.5 Non-waterproof Type, Female 09041-1C570 Minus screwdriver 1.8 mm For Terminal Removal (to Release Retainer)/0.64 II Male, Mainly 2.3 - 8.0, etc. 09041-1C580 Minus Screwdriver 0.9 mm For Terminal Removal (to Release Retainer)/Mainly 1.0 - 2.3 II, etc. 09991-00550 Retainer Remover A For Retainer Release/0.64 Waterproof Type, Male - Use the corresponding tool(s) to dissemble the connector and remove the terminal. Use the procedures taught in the Toyota Technical Training E-Learning Module TEC306A and the "QT621A Wire Harness Repair Quick Training Guide
."NOTE: Wire harness assembly parts may be damaged or broken if this tool kit is NOT used correctly and carefully.