DSD Information System
Home >> Toyota >> 2021 >> Highlander LE, 4WD >> Repair and Diagnosis >> Body & Frame >> Exterior/Interior Trim >> Interior Body Panels / Trim - Service Information (2 Of 2) >> Front Console Box >> Installation [10/2022 - ] >> Procedure

Installation [10/2022 - ]: Procedure

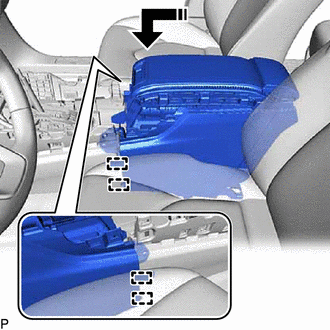
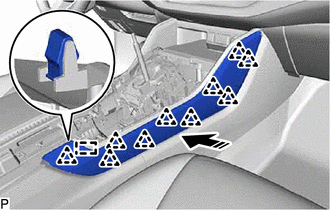
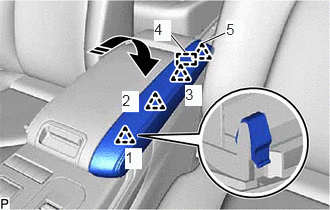
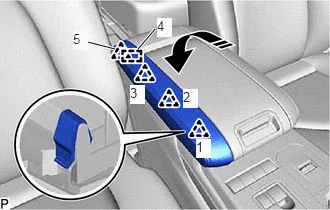
  1. INSTALL CONSOLE BOX ASSEMBLY 
    1. Engage the 4 guides as shown in the illustration.
      GTY886310Courtesy of © TOYOTA, LICENSE AGREEMENT TMS1002
      Install in this Direction
    2. Connect each connector.
    3. Install the console box assembly with the 4 bolts and 2 screws.
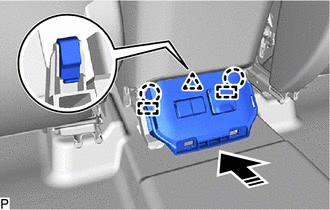
  2. INSTALL NO. 2 CONSOLE BOX HOLE COVER 
    1. Connect each connector.
      GTY1017023Courtesy of © TOYOTA, LICENSE AGREEMENT TMS1002
      Install in this Direction
    2. Engage the 2 guides, clip and 2 claws as shown in the illustration to install the No. 2 console box hole cover.
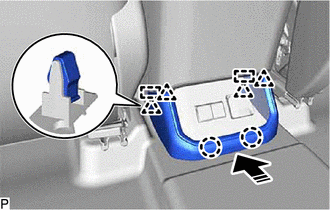
  3. INSTALL REAR CONSOLE LOWER BOX 
    1. Engage the 2 guides, 4 clips and 2 claws as shown in the illustration to install the rear console lower box.
      GTY930757Courtesy of © TOYOTA, LICENSE AGREEMENT TMS1002
      Install in this Direction
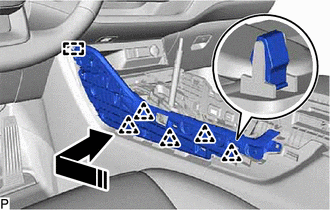
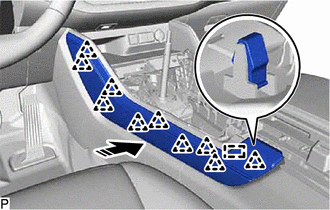
  4. INSTALL NO. 2 INSTRUMENT PANEL GARNISH SUB-ASSEMBLY 
    1. Engage the guide and 5 clips as shown in the illustration.
      GTY849280Courtesy of © TOYOTA, LICENSE AGREEMENT TMS1002
      Install in this Direction
    2. Install the No. 2 instrument panel garnish sub-assembly with the screw.
  5. INSTALL NO. 1 INSTRUMENT PANEL GARNISH SUB-ASSEMBLY 
    1. Engage the guide and 5 clips as shown in the illustration.
      GTY940342Courtesy of © TOYOTA, LICENSE AGREEMENT TMS1002
      Install in this Direction
    2. Install the No. 1 instrument panel garnish sub-assembly with the screw.
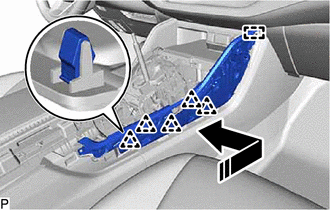
  6. INSTALL NO. 2 LOWER INSTRUMENT PANEL PAD SUB-ASSEMBLY 
    1. Engage the guide and 10 clips as shown in the illustration to install the No. 2 lower instrument panel pad sub-assembly.
      GTY886311Courtesy of © TOYOTA, LICENSE AGREEMENT TMS1002
      Install in this Direction
  7. INSTALL NO. 1 LOWER INSTRUMENT PANEL PAD SUB-ASSEMBLY 
    1. Engage the guide and 10 clips as shown in the illustration to install the No. 1 lower instrument panel pad sub-assembly.
      GTY876567Courtesy of © TOYOTA, LICENSE AGREEMENT TMS1002
      Install in this Direction
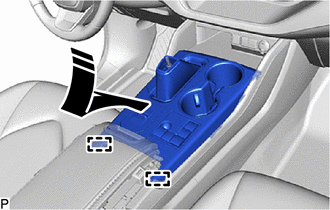
  8. INSTALL CONSOLE BOX CUP HOLDER 
    1. Engage the 2 claws.
    2. Install the console box cup holder with the 4 screws.
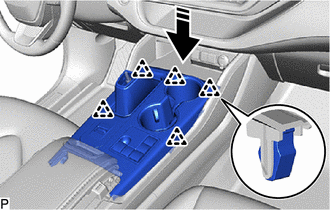
  9. INSTALL CONSOLE PANEL SUB-ASSEMBLY 
    1. Connect each connector.
    2. Engage the 2 guides as shown in the illustration.
      GTY1117418Courtesy of © TOYOTA, LICENSE AGREEMENT TMS1002
      Install in this Direction
    3. Engage the 2 clips.
    4. Engage the 5 clips as shown in the illustration to install the console panel sub-assembly.
      GTY1115231Courtesy of © TOYOTA, LICENSE AGREEMENT TMS1002
      Install in this Direction
  10. INSTALL SHIFT LEVER KNOB SUB-ASSEMBLY 

    for UA81E / UA81F: Refer to PROCEDURE - Step 1

    for P810: Refer to PROCEDURE - Step 1

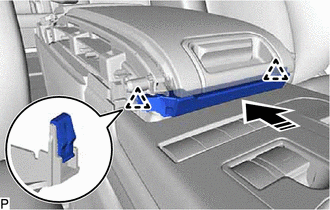
  11. INSTALL FRONT CONSOLE BOX COVER 
    1. Engage the 2 clips as shown in the illustration to install the front console box cover.
      GTY905916Courtesy of © TOYOTA, LICENSE AGREEMENT TMS1002
      Install in this Direction
  12. INSTALL CONSOLE BOX CUSHION 
    1. Engage the guide and 4 clips in the order shown in the illustration to install the console box cushion.
      Fig 1: Console Box Cushion Clip And Guide Engagement Sequence
      GTY894067Courtesy of © TOYOTA, LICENSE AGREEMENT TMS1002
      Install in this Direction
  13. INSTALL NO. 2 CONSOLE BOX CUSHION 
    1. Engage the guide and 4 clips in the order shown in the illustration to install the No. 2 console box cushion.
      Fig 2: No. 2 Console Box Cushion Clip And Guide Engagement Sequence
      GTY933004Courtesy of © TOYOTA, LICENSE AGREEMENT TMS1002
      Install in this Direction