Removal [12/2019 - ]: Procedure
- SECURE VEHICLE
- Fully apply the parking brake and chock a wheel.
- REMOVE FRONT WHEEL OPENING EXTENSION PAD LH
Refer to PROCEDURE - Step 7 [12/2019 - 10/2022] , or refer to PROCEDURE - Step 7 [10/2022 - 11/2023] , or refer to PROCEDURE - Step 7 [11/2023 - ]
- REMOVE FRONT WHEEL OPENING EXTENSION PAD RH
Refer to PROCEDURE - Step 8 [12/2019 - 10/2022] , or refer to PROCEDURE - Step 8 [10/2022 - 11/2023] , or refer to PROCEDURE - Step 8 [11/2023 - ]
- REMOVE NO. 1 ENGINE UNDER COVER
Refer to PROCEDURE - Step 9 [12/2019 - 10/2022] , or refer to PROCEDURE - Step 9 [10/2022 - 11/2023] , or refer to PROCEDURE - Step 9 [11/2023 - ]
- REMOVE NO. 2 ENGINE UNDER COVER ASSEMBLY
Refer to PROCEDURE - Step 10 [12/2019 - 10/2022] , or refer to PROCEDURE - Step 10 [10/2022 - 11/2023] , or refer to PROCEDURE - Step 10 [11/2023 - ]
- REMOVE NO. 1 ENGINE COVER SUB-ASSEMBLY
Refer to PROCEDURE - Step 19 [12/2019 - 10/2022] , or refer to PROCEDURE - Step 19 [10/2022 - 11/2023] , or refer to PROCEDURE - Step 19 [11/2023 - ]
- REMOVE COOL AIR INTAKE DUCT SEAL
Refer to PROCEDURE - Step 1 [12/2019 - 09/2020] , or refer to PROCEDURE - Step 1 [09/2020 - 11/2023] , or refer to PROCEDURE - Step 1 [11/2023 - ]
- REMOVE INLET AIR CLEANER ASSEMBLY
Refer to PROCEDURE - Step 6 [12/2019 - 10/2022] , or refer to PROCEDURE - Step 6 [10/2022 - 11/2023] , or refer to PROCEDURE - Step 6 [11/2023 - ]
- REMOVE AIR CLEANER ASSEMBLY WITH AIR CLEANER HOSE
Refer to PROCEDURE - Step 7 [12/2019 - 10/2022] , or refer to PROCEDURE - Step 7 [10/2022 - 11/2023] , or refer to PROCEDURE - Step 7 [11/2023 - ]
- DISCONNECT TRANSMISSION CONTROL CABLE ASSEMBLY
- Move the shift lever to N.
- Remove the nut and disconnect the transmission control cable assembly from the control shaft lever.
- Using a screwdriver, disengage the 4 claws and disconnect the transmission control cable assembly with the clip from the No. 1 transmission control cable bracket.
- Using a screwdriver, disengage the 2 claws and remove the clip from the transmission control cable assembly.
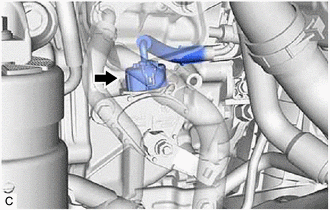
- REMOVE SHIFT LEVER POSITION SENSOR
- Disconnect the shift lever position sensor connector.
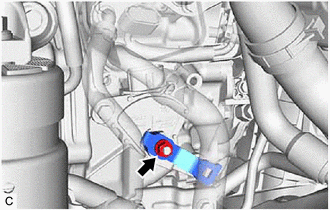
- Remove the nut, washer and control shaft lever from the shift lever position sensor.
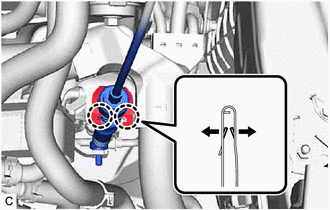
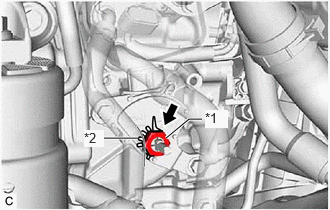
- Using a screwdriver with its tip wrapped with protective tape, pry out the tabs of the lock plate.
*1 Lock Plate *a Protective Tape - Remove the lock nut and lock plate from the shift lever position sensor.
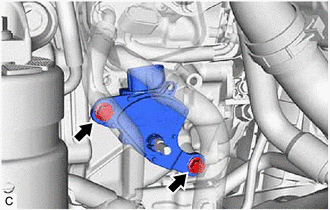
*1 Lock Nut *2 Lock Plate - Remove the 2 bolts and shift lever position sensor from the hybrid vehicle transaxle assembly.
- Disconnect the shift lever position sensor connector.