Replacement [12/2019 - 11/2023]: Procedure
- REMOVE FRONT WHEEL OPENING EXTENSION PAD LH
Refer to PROCEDURE - Step 7 [12/2019 - 10/2022] , or refer to PROCEDURE - Step 7 [10/2022 - 11/2023]
- REMOVE FRONT WHEEL OPENING EXTENSION PAD RH
Refer to PROCEDURE - Step 8 [12/2019 - 10/2022] , or refer to PROCEDURE - Step 8 [10/2022 - 11/2023]
- REMOVE NO. 1 ENGINE UNDER COVER
Refer to PROCEDURE - Step 9 [12/2019 - 10/2022] , or refer to PROCEDURE - Step 9 [10/2022 - 11/2023]
- REMOVE NO. 2 ENGINE UNDER COVER ASSEMBLY
Refer to PROCEDURE - Step 10 [12/2019 - 10/2022] , or refer to PROCEDURE - Step 10 [10/2022 - 11/2023]
- REPLACE HYBRID TRANSAXLE FLUID
- Lift the vehicle. [#1]NOTE:
Set the vehicle on a lift so that the vehicle is kept level when it is lifted up (make sure that the tilt angle from the front to rear of the vehicle is within +/- 1°).
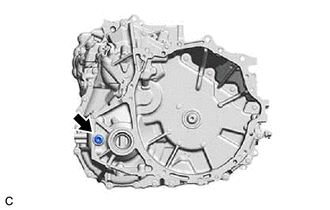
- Using a 10 mm hexagon socket wrench, remove the filler plug and gasket from the hybrid vehicle transaxle assembly. [#2]
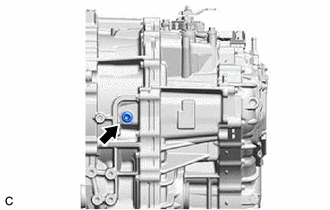
- Using a 10 mm hexagon socket wrench, remove the drain plug and gasket from the hybrid vehicle transaxle assembly and drain the hybrid transaxle fluid. [#3]
- Using a 10 mm hexagon socket wrench, temporarily install the drain plug and gasket to the hybrid vehicle transaxle assembly. [#4]
HINT:
Reuse the old gasket as the drain plug will be removed again.
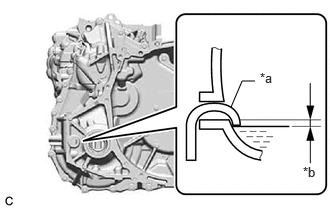
- Add hybrid transaxle fluid until the hybrid transaxle fluid level is between 0 to 10 mm (0 to 0.394 in.) from the bottom lip of the filler plug opening. [#5]NOTE:
- Use Toyota Genuine ATF WS.
Using hybrid transaxle fluid other than the above type may cause abnormal noise or vibration, or ultimately damage the transaxle of the vehicle.
- Be sure to fully insert the filler nozzle into the filler plug opening.
- Be sure to add hybrid transaxle fluid slowly. If hybrid transaxle fluid is added quickly, the hybrid transaxle fluid may hit internal parts and bounce back, resulting in hybrid transaxle fluid coming out of the filler plug opening.
- Be sure to directly check that the hybrid transaxle fluid level is within the specified range.
- Driving the vehicle with an insufficient or excessive amount of hybrid transaxle fluid may damage the hybrid vehicle transaxle assembly.
*a Filler Nozzle *b 0 to 10 mm (0 to 0.394 in.) - Use Toyota Genuine ATF WS.
- Using a 10 mm hexagon socket wrench, temporarily install the filler plug and gasket to the hybrid vehicle transaxle assembly. [#6]
HINT:
Reuse the old gasket as the filler plug will be removed again.
- Lower the vehicle. [#7]
- Start the engine and oil pump with motor assembly. [#8]
- Put the engine in Inspection Mode (Maintenance Mode).
- Idle the engine for 30 seconds with the ignition switch ON (READY).
HINT:
By starting the engine in Inspection Mode (Maintenance Mode), the oil pump with motor assembly operates.
- Turn the ignition switch off.
- Repeat steps [#1] to [#8].
- Repeat steps [#1] to [#3].
- Using a 10 mm hexagon socket wrench, install the drain plug and a new gasket to the hybrid vehicle transaxle assembly.
Torque: 50 N.m (510 kgf/cm, 37 ft.lbf)
- Using a 10 mm hexagon socket wrench, temporarily install the filler plug and gasket to the hybrid vehicle transaxle assembly.
HINT:
Reuse the old gasket as the filler plug will be removed again.
- Lift the vehicle. [#1]
- ADD HYBRID TRANSAXLE FLUID
Refer to PROCEDURE - Step 6
- INSPECT HYBRID TRANSAXLE FLUID
Refer to PROCEDURE - Step 5
- INSPECT FOR HYBRID TRANSAXLE FLUID LEAK
- INSTALL NO. 2 ENGINE UNDER COVER ASSEMBLY
Refer to PROCEDURE - Step 62 [12/2019 - 10/2022] , or refer to PROCEDURE - Step 62 [10/2022 - 11/2023]
- INSTALL NO. 1 ENGINE UNDER COVER
Refer to PROCEDURE - Step 63 [12/2019 - 10/2022] , or refer to PROCEDURE - Step 63 [10/2022 - 11/2023]
- INSTALL FRONT WHEEL OPENING EXTENSION PAD RH
Refer to PROCEDURE - Step 65 [12/2019 - 10/2022] , or refer to PROCEDURE - Step 65 [10/2022 - 11/2023]
- INSTALL FRONT WHEEL OPENING EXTENSION PAD LH
Refer to PROCEDURE - Step 64 [12/2019 - 10/2022] , or refer to PROCEDURE - Step 64 [10/2022 - 11/2023]