Removal [10/2022 - ]: Procedure
- RECOVER REFRIGERANT FROM REFRIGERATION SYSTEM
See step 1
- REMOVE PIPING CLAMP (for Suction Hose Sub-assembly Side)
- for Low Pressure:
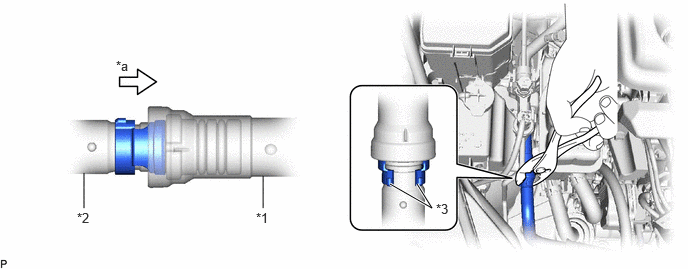
- While pressing the end of the suction hose sub-assembly into the end of the No. 2 air conditioner tube and accessory assembly, use pliers to squeeze together both sides of the piping clamp until it breaks apart.
*1 No. 2 Air Conditioner Tube and Accessory Assembly *2 Suction Hose Sub-assembly *3 Piping Clamp - - *a Press In - - NOTE:- If any foreign matter is attached to the connected parts, brush it off or use compressed air to remove it before disconnecting the parts.
- Make sure that fragments of the piping clamp do not enter the piping.
- Disconnect the suction hose sub-assembly.NOTE:
Remove any foreign matter from the connecting parts of the suction hose sub-assembly and No. 2 air conditioner tube and accessory assembly.
- Remove the 2 O-rings from the suction hose sub-assembly.NOTE:
Seal the openings of the disconnected parts with vinyl tape to prevent entry of moisture and foreign matter.
- Remove the piping clamp.
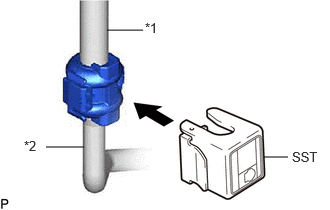
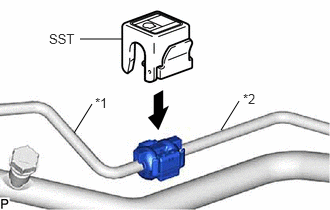
- Install SST to the piping clamp as shown in the illustration.
*1 No. 2 Air Conditioner Tube and Accessory Assembly *2 No. 1 Air Conditioning Accessory Assembly - SST: 09870-00015
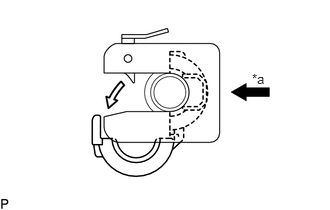
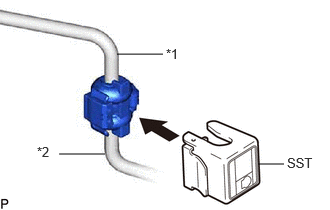
- Hold the No. 2 air conditioner tube and accessory assembly and No. 1 air conditioning accessory assembly with each hand and push in SST with both thumbs.NOTE:
Do not apply excessive force to the No. 2 air conditioner tube and accessory assembly or No. 1 air conditioning accessory assembly as they may bend.
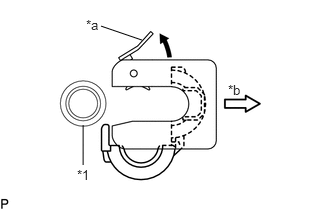
*a Push in - Raise the stopper of SST and remove SST and the piping clamp together from the No. 1 air conditioning accessory assembly.
*1 No. 1 Air Conditioning Accessory Assembly *a Stopper *b Pull off - Remove the piping clamp from SST.
- Disconnect the No. 2 air conditioner tube and accessory assembly.NOTE:
Remove any foreign matter from the connecting parts of the No. 1 air conditioning accessory assembly and No. 2 air conditioner tube and accessory assembly.
- Remove the 2 O-rings from the No. 2 air conditioner tube and accessory assembly.NOTE:
Seal the openings of the disconnected parts using vinyl tape to prevent entry of moisture and foreign matter.
- While pressing the end of the suction hose sub-assembly into the end of the No. 2 air conditioner tube and accessory assembly, use pliers to squeeze together both sides of the piping clamp until it breaks apart.
- for High Pressure:
- Install SST to the piping clamp as shown in the illustration.
*1 Air Conditioning Tube Assembly *2 No. 2 Air Conditioner Tube and Accessory Assembly - SST: 09870-00025
- Hold the No. 2 air conditioner tube and accessory assembly and air conditioning tube assembly with each hand and push in SST with both thumbs.NOTE:
Do not apply excessive force to the No. 2 air conditioner tube and accessory assembly or air conditioning tube assembly as they may bend.
*a Push in - Raise the stopper of SST and remove SST and the piping clamp together from the No. 2 air conditioner tube and accessory assembly.
*1 Air Conditioning Tube Assembly *a Stopper *b Pull off - Remove the piping clamp from SST.
- Disconnect the No. 2 air conditioner tube and accessory assembly.NOTE:
Remove any foreign matter from the connecting parts of the air conditioning tube assembly and No. 2 air conditioner tube and accessory assembly.
- Remove the 2 O-rings from the No. 2 air conditioner tube and accessory assembly.NOTE:
Seal the openings of the disconnected parts using vinyl tape to prevent entry of moisture and foreign matter.
- Install SST to the piping clamp as shown in the illustration.
*1 No. 2 Air Conditioner Tube and Accessory Assembly *2 No. 1 Air Conditioning Accessory Assembly - SST: 09870-00025
- Hold the No. 2 air conditioner tube and accessory assembly and No. 1 air conditioning accessory assembly with each hand and push in SST with both thumbs.NOTE:
Do not apply excessive force to the No. 2 air conditioner tube and accessory assembly or No. 1 air conditioning accessory assembly as they may bend.
*a Push in - Raise the stopper of SST and remove SST and the piping clamp together from the No. 1 air conditioning accessory assembly.
*1 No. 1 Air Conditioning Accessory Assembly *a Stopper *b Pull off - Remove the piping clamp from SST.
- Disconnect the No. 2 air conditioner tube and accessory assembly.NOTE:
Remove any foreign matter from the connecting parts of the No. 1 air conditioning accessory assembly and No. 2 air conditioner tube and accessory assembly.
- Remove the 2 O-rings from the No. 2 air conditioner tube and accessory assembly.NOTE:
Seal the openings of the disconnected parts using vinyl tape to prevent entry of moisture and foreign matter.
- Install SST to the piping clamp as shown in the illustration.
- for Low Pressure:
- REMOVE PIPING CLAMP (for Cooler Refrigerant Liquid Pipe A Side)
Refer to PROCEDURE - Step 18