Installation [12/2019 - ]: Procedure
- INSTALL PIPING CLAMP (for Suction Hose Sub-assembly Side)
- for Low Pressure:
- Remove the vinyl tape from the No. 2 air conditioner tube and accessory assembly and suction hose sub-assembly.
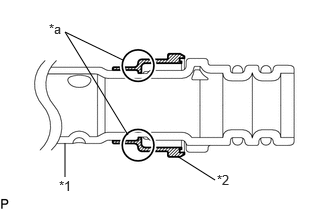
- Install a new piping clamp to the suction hose sub-assembly.
*1 Suction Hose Sub-assembly *2 Piping Clamp *a Groove NOTE:- Securely engage the piping clamp to the groove of the suction hose sub-assembly.
- Do not open the piping clamp more than the diameter of the suction hose sub-assembly when installing it.
- Do not install the piping clamp with the large diameter section facing the wrong direction.
- Sufficiently apply compressor oil to 2 new O-rings and the fitting surfaces of the suction hose sub-assembly.
Compressor Oil
ND-OIL 12 or equivalent
- Install the 2 O-rings to the suction hose sub-assembly.NOTE:
Keep the O-rings and O-ring fitting surfaces free from dirt and foreign matter.
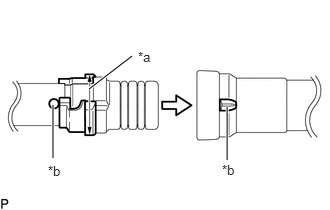
- Align the alignment marks and connect the suction hose sub-assembly to the No. 2 air conditioner tube and accessory assembly.
*a Large Diameter Section of Piping Clamp *b Alignment Mark NOTE:Connect the parts by holding the tubes, not the piping clamp.
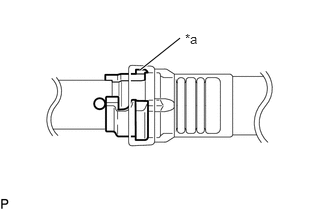
- Securely insert the piping clamp to the point where the large diameter section of the piping clamp is covered by the No. 2 air conditioner tube and accessory assembly.
*a Large Diameter Section of Piping Clamp NOTE:- When inserting, make sure that a click sound is heard.
- Check that the suction hose sub-assembly is securely connected by pulling it.
- for High Pressure:
- Remove the vinyl tape from the No. 2 air conditioner tube and accessory assembly and air conditioning tube assembly.
- Sufficiently apply compressor oil to 2 new O-rings and the fitting surfaces of the No. 2 air conditioner tube and accessory assembly.
Compressor Oil
ND-OIL 12 or equivalent
- Install the 2 O-rings to the No. 2 air conditioner tube and accessory assembly.NOTE:
Keep the O-rings and O-ring fitting surfaces free from dirt and foreign matter.
- Connect the No. 2 air conditioner tube and accessory assembly to the air conditioning tube assembly.
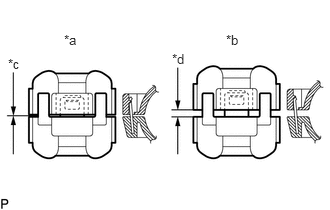
- Install the piping clamp to the air conditioning tube assembly.NOTE:
Make sure that the piping clamp is engaged securely with no gap.
*a Correct *b Incorrect *c No Gap *d Gap
- for Low Pressure:
- INSTALL PIPING CLAMP (for Air Conditioning Tube Assembly Side)
Refer to PROCEDURE - Step 3 [12/2019 - 09/2020] , or refer to PROCEDURE - Step 3 [09/2020 - 10/2022] , or refer to PROCEDURE - Step 3 [10/2022 - ]
- CHARGE AIR CONDITIONING SYSTEM WITH REFRIGERANT
See step 2
- WARM UP ENGINE
See step 3
- INSPECT FOR REFRIGERANT LEAK
See step 5