- REMOVE BACK DOOR SERVICE HOLE COVER LH
Refer to PROCEDURE - Step 5 [12/2019 - 10/2022]
, or refer to PROCEDURE - Step 5 [10/2022 - 11/2023]
- REMOVE BACK DOOR SERVICE HOLE COVER RH
HINT:
Use the same procedure as for the LH side.
- REMOVE BACK DOOR TRIM PANEL ASSEMBLY
Refer to PROCEDURE - Step 7 [12/2019 - 10/2022]
, or refer to PROCEDURE - Step 7 [10/2022 - 11/2023]
- REMOVE TELEVISION CAMERA ASSEMBLY WITH NOZZLE (w/o Digital Inner Mirror)
- Disconnect the washer hose.
HINT:
Use a container to collect the windshield washer fluid.
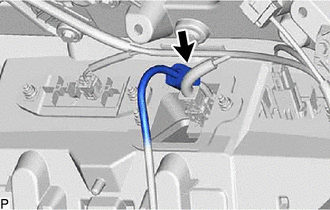 Courtesy of © TOYOTA, LICENSE AGREEMENT TMS1002 Courtesy of © TOYOTA, LICENSE AGREEMENT TMS1002
|
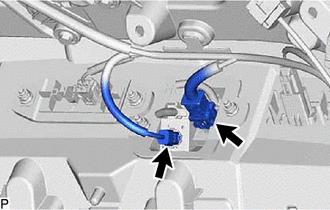
- Disconnect the connector.
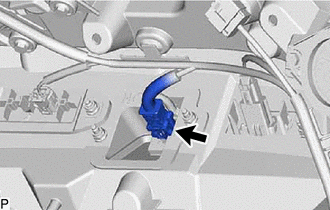 Courtesy of © TOYOTA, LICENSE AGREEMENT TMS1002 Courtesy of © TOYOTA, LICENSE AGREEMENT TMS1002
|
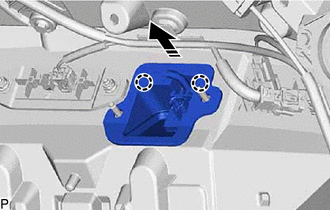
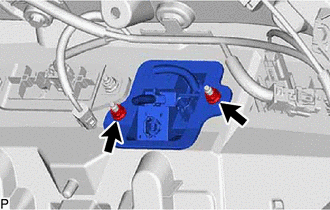
- Remove the 2 nuts.
 Courtesy of © TOYOTA, LICENSE AGREEMENT TMS1002 Courtesy of © TOYOTA, LICENSE AGREEMENT TMS1002
|
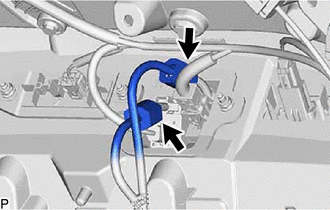
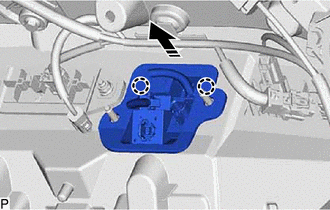
- Disengage the 2 claws and remove the television camera assembly with nozzle as shown in the illustration.
 Courtesy of © TOYOTA, LICENSE AGREEMENT TMS1002 Courtesy of © TOYOTA, LICENSE AGREEMENT TMS1002
|
 |
Remove in this Direction |
- REMOVE TELEVISION CAMERA ASSEMBLY WITH NOZZLE (w/ Digital Inner Mirror)
- Disconnect the 2 washer hoses.
HINT:
Use a container to collect the windshield washer fluid.
 Courtesy of © TOYOTA, LICENSE AGREEMENT TMS1002 Courtesy of © TOYOTA, LICENSE AGREEMENT TMS1002
|
- Disconnect the 2 connectors.
 Courtesy of © TOYOTA, LICENSE AGREEMENT TMS1002 Courtesy of © TOYOTA, LICENSE AGREEMENT TMS1002
|
- Remove the 2 nuts.
 Courtesy of © TOYOTA, LICENSE AGREEMENT TMS1002 Courtesy of © TOYOTA, LICENSE AGREEMENT TMS1002
|
- Disengage the 2 claws and remove the television camera assembly with nozzle as shown in the illustration.
 Courtesy of © TOYOTA, LICENSE AGREEMENT TMS1002 Courtesy of © TOYOTA, LICENSE AGREEMENT TMS1002
|
|
Remove in this Direction |
- REMOVE CAMERA CLEANER NOZZLE ASSEMBLY
Refer to PROCEDURE - Step 6
- REMOVE CAMERA CLEANER NOZZLE ASSEMBLY (w/ Digital Inner Mirror)
Refer to PROCEDURE - Step 5
- REMOVE INNER MIRROR CAMERA ASSEMBLY (w/ Digital Inner Mirror)
Refer to PROCEDURE - Step 5
- REMOVE REAR TELEVISION CAMERA ASSEMBLY