DSD Information System
Home >> Toyota >> 2021 >> Highlander LE, 4WD >> Repair and Diagnosis >> Body & Frame >> Exterior/Interior Trim >> Interior Body Panels / Trim - Service Information (1 Of 2) >> Instrument Panel Safety Pad >> Reassembly [11/2024 - ] >> Procedure

Reassembly [11/2024 - ]: Procedure

  1. INSTALL NO. 3 INSTRUMENT PANEL WIRE 
    1. Engage the 4 clamps to install the No. 3 instrument panel wire.
      GTY898205Courtesy of © TOYOTA, LICENSE AGREEMENT TMS1002
  2. INSTALL NO. 1 INSTRUMENT PANEL PIN 
    1. for LH Side:
      1. Install the No. 1 instrument panel pin with the screw <B> or <D>.
        GTY898203Courtesy of © TOYOTA, LICENSE AGREEMENT TMS1002
    2. for RH Side:
      1. Install the No. 1 instrument panel pin with the screw <B> or <D>.
        GTY898206Courtesy of © TOYOTA, LICENSE AGREEMENT TMS1002
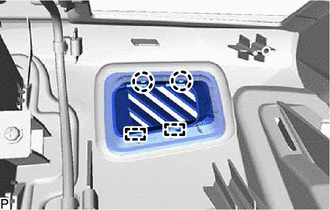
  3. INSTALL INSTRUMENT PANEL PASSENGER AIRBAG ASSEMBLY 

    Refer to PROCEDURE - Step 2

  4. INSTALL NO. 2 METER HOOD RETAINER 
    1. Install the No. 2 meter hood retainer with the screw <B> or <D>.
      GTY898208Courtesy of © TOYOTA, LICENSE AGREEMENT TMS1002
  5. INSTALL NO. 1 METER HOOD RETAINER 
    1. Install the No. 1 meter hood retainer with the screw <B> or <D>.
      GTY898204Courtesy of © TOYOTA, LICENSE AGREEMENT TMS1002
  6. INSTALL NO. 2 SIDE DEFROSTER NOZZLE 
    1. Engage the 2 claws and 2 guides to install the No. 2 side defroster nozzle.
      GTY898209Courtesy of © TOYOTA, LICENSE AGREEMENT TMS1002
  7. INSTALL NO. 1 SIDE DEFROSTER NOZZLE 
    1. Engage the 2 claws and 2 guides to install the No. 1 side defroster nozzle.
      GTY939402Courtesy of © TOYOTA, LICENSE AGREEMENT TMS1002
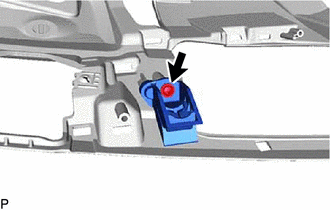
  8. INSTALL NAVIGATION ANTENNA ASSEMBLY WITH BRACKET (w/ Navigation Antenna) 

    w/o Manual (SOS) Switch: Refer to PROCEDURE - Step 3

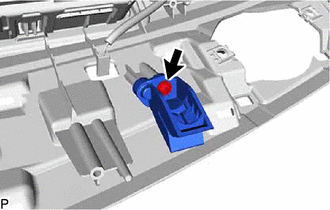
  9. INSTALL TELEPHONE AND GPS ANTENNA ASSEMBLY WITH BRACKET (w/ Navigation Antenna) 

    w/ Manual (SOS) Switch: Refer to PROCEDURE - Step 3

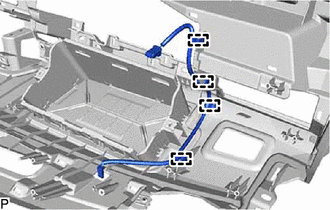
  10. INSTALL ANTENNA CORD SUB-ASSEMBLY 

    Refer to PROCEDURE - Step 6

  11. INSTALL NO. 1 SIDE DEFROSTER NOZZLE DUCT 
    1. Install the No. 1 side defroster nozzle duct with the 4 screws <B> or <D>.
      GTY898207Courtesy of © TOYOTA, LICENSE AGREEMENT TMS1002
  12. INSTALL NO. 2 SIDE DEFROSTER NOZZLE DUCT 
    1. Install the No. 2 side defroster nozzle duct with the 2 screws <B> or <D>.
      GTY898237Courtesy of © TOYOTA, LICENSE AGREEMENT TMS1002
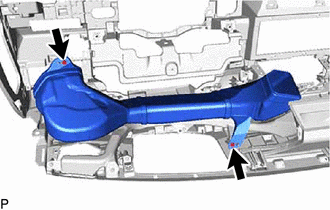
  13. INSTALL DEFROSTER NOZZLE ASSEMBLY 
    1. Install the defroster nozzle assembly with the 4 screws <B> or <D>.
      GTY939409Courtesy of © TOYOTA, LICENSE AGREEMENT TMS1002
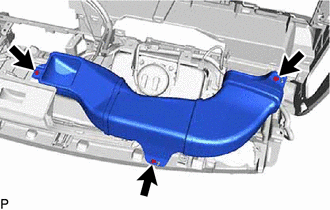
  14. INSTALL NO. 1 HEATER TO REGISTER DUCT 
    1. Install the No. 1 heater to register duct with the 2 screws <B> or <D>.
      GTY898239Courtesy of © TOYOTA, LICENSE AGREEMENT TMS1002
  15. INSTALL NO. 4 HEATER TO REGISTER DUCT 
    1. Install the No. 4 heater to register duct with the 3 screws <B> or <D>.
      GTY939410Courtesy of © TOYOTA, LICENSE AGREEMENT TMS1002