Installation [12/2019 - 11/2023]: Procedure
WARNING: This page is about a different variant/trim than selected.
- INSTALL CAM TIMING CONTROL MOTOR O-RING
- INSTALL CAM TIMING CONTROL MOTOR WITH EDU ASSEMBLY
HINT:
Perform "Inspection After Repair" after removing and installing, or replacing the cam timing control motor with EDU assembly.
Refer to INITIALIZATION [12/2019 - 10/2021] , or refer to INITIALIZATION [10/2021 - ]
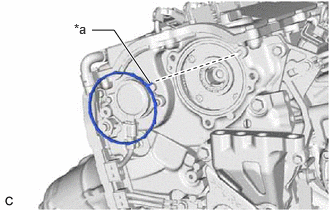
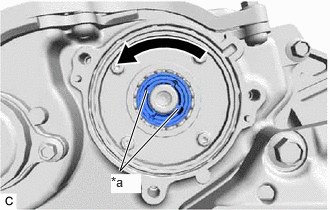
- Turn the cutout of the camshaft timing gear assembly eccentric shaft counterclockwise by hand, and set it to the maximum retard angle position.
*a Cutout HINT:
- If a camshaft lobe is opening a valve, the eccentric shaft will be difficult to turn.
- When the cutout of the camshaft timing gear assembly eccentric shaft cannot be turned any farther, it is set to the maximum retard angle.
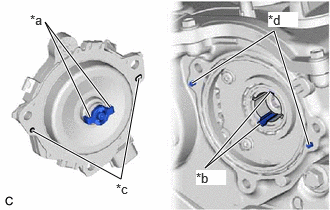
- Install the cam timing control motor with EDU assembly to the No. 2 timing gear cover assembly.NOTE:
- When installing, align the joints of the cam timing control motor with EDU assembly with the cutouts of the camshaft timing gear assembly eccentric shaft.
- Align the pin holes of the cam timing control motor with EDU assembly with the knock pins of the No. 2 timing gear cover assembly when installing the cam timing control motor with EDU assembly.
- Make sure the contact surface of the cam timing control motor with EDU assembly (the surface that contacts the No. 2 timing gear cover assembly) is free of foreign matter.
- When installing the cam timing control motor with EDU assembly, do not use excessive force.
- If the cam timing control motor with EDU assembly has been struck or dropped, replace it.
- Do not disassemble the cam timing control motor with EDU assembly. If disassembled, replace it.
*a Joint *b Cutout *c Pin Hole *d Knock Pin - Install the 3 bolts.
Torque: 21 N.m (214 kgf/cm, 15 ft.lbf)
- Connect the cam timing control motor with EDU assembly connector.
- Turn the cutout of the camshaft timing gear assembly eccentric shaft counterclockwise by hand, and set it to the maximum retard angle position.
- INSTALL NO. 2 EARTH WIRE
See step 3
- CONNECT CABLE TO NEGATIVE AUXILIARY BATTERY TERMINAL
Refer to PROCEDURE - Step 2
- INSTALL BATTERY SERVICE HOLE COVER
Refer to PROCEDURE - Step 3
- INSPECT FOR ENGINE OIL LEAK
Refer to PROCEDURE - Step 6 [12/2019 - 10/2021] , or refer to PROCEDURE - Step 6 [10/2021 - 10/2022] , or refer to PROCEDURE - Step 6 [10/2022 - 11/2023]
- INSTALL NO. 1 ENGINE COVER SUB-ASSEMBLY
Refer to PROCEDURE - Step 66 [12/2019 - 10/2022] , or refer to PROCEDURE - Step 66 [10/2022 - 11/2023]
- PERFORM INITIALIZATION
- Perform "Inspection After Repair" after removing and installing, or replacing the cam timing control motor with EDU assembly.
Refer to INITIALIZATION [12/2019 - 10/2021] , or refer to INITIALIZATION [10/2021 - ]
- Perform "Inspection After Repair" after removing and installing, or replacing the cam timing control motor with EDU assembly.