Installation [12/2019 - 10/2021]: Procedure
WARNING: This page is about a different variant/trim than selected.
- INSTALL EGR VALVE ASSEMBLY
HINT:
Perform "Inspection After Repair" after replacing the EGR valve assembly.
Refer to INITIALIZATION [12/2019 - 10/2021]
- Using an 8 mm socket wrench, install the EGR valve assembly to the EGR valve bracket with the bolt.
Torque: 10 N.m (102 kgf/cm, 7 ft.lbf)
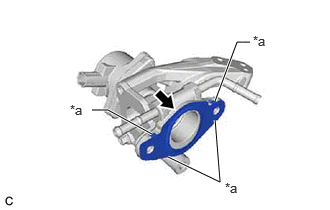
- Install a new EGR valve gasket to the EGR valve assembly.
*a Claw NOTE:Make sure that the claws of the EGR valve gasket are toward the EGR valve assembly side.
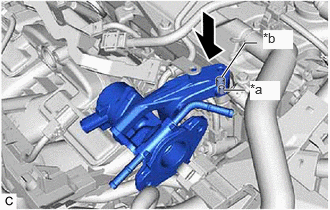
- Align and fit the hole of the EGR valve bracket to the pin of the camshaft housing.
*a Pin *b Hole - Using an 8 mm socket wrench, install the EGR valve assembly with the EGR valve bracket to the camshaft housing with the bolt.
Torque: 10 N.m (102 kgf/cm, 7 ft.lbf)
- for EGR Valve Bracket Connection Type:
- Using an 8 mm socket wrench, connect the fuel pipe sub-assembly to the EGR valve bracket with the bolt.
Torque: 10 N.m (102 kgf/cm, 7 ft.lbf)
- Using an 8 mm socket wrench, connect the fuel pipe sub-assembly to the EGR valve bracket with the bolt.
- Connect the No. 4 water by-pass hose and No. 8 water by-pass hose to the EGR valve assembly and slide the 2 clips to secure them.
- Using an 8 mm socket wrench, install the EGR valve assembly to the EGR valve bracket with the bolt.
- INSTALL NO. 1 EGR PIPE SUB-ASSEMBLY
- Install a new EGR inlet gasket to the intake manifold.
- Install a new EGR valve adapter gasket to the No. 1 EGR pipe sub-assembly.
- Using an 8 mm socket wrench, install the No. 1 EGR pipe sub-assembly to the intake manifold and EGR valve assembly with the 4 bolts.
Torque: 10 N.m (102 kgf/cm, 7 ft.lbf)
- CONNECT EGR COOLER ASSEMBLY
- Connect the EGR cooler assembly to the EGR valve assembly with the 2 bolts.
Torque: 24 N.m (245 kgf/cm, 18 ft.lbf)
- Connect the EGR cooler assembly to the EGR valve assembly with the 2 bolts.
- CONNECT ENGINE WIRE
- Engage the 2 wire harness clamps to connect the engine wire.
- Install the bolt.
Torque: 10 N.m (102 kgf/cm, 7 ft.lbf)
- Connect the EGR valve assembly connector.
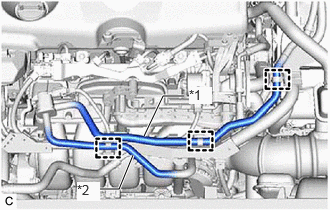
*1 No. 1 Fuel Vapor Feed Hose *2 No. 2 Fuel Vapor Feed Hose Engage the 3 hose clamps to connect the No. 1 fuel vapor feed hose and No. 2 fuel vapor feed hose.
- ADD ENGINE COOLANT (for Engine)
Refer to PROCEDURE - Step 2
- INSPECT FOR COOLANT LEAK (for Engine)
Refer to PROCEDURE - Step 1
- INSPECT FOR EXHAUST GAS LEAK
Refer to PROCEDURE - Step 6
- PERFORM INITIALIZATION
- Perform "Inspection After Repair" after replacing the EGR valve assembly.
Refer to INITIALIZATION [12/2019 - 10/2021]
- Perform "Inspection After Repair" after replacing the EGR valve assembly.