Installation [12/2019 - ]: Procedure
WARNING: This page is about a different variant/trim than selected.
- INSTALL EXHAUST PIPE GAS CONTROL ACTUATOR
- Clean the installation surfaces and bolt holes of the exhaust pipe gas control actuator sub-assembly and front exhaust pipe assembly (TWC: Rear Catalyst).NOTE:
Make sure no foreign matter enters the exhaust pipe gas control actuator sub-assembly and front exhaust pipe assembly (TWC: Rear Catalyst).
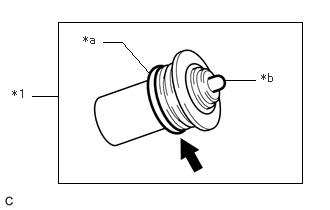
- Apply clean engine coolant to the O-ring.
*1 Exhaust Pipe Gas Control Actuator *a O-ring *b Piston NOTE:- When installing the exhaust pipe gas control actuator, do not push on the piston.
- Make sure that the exhaust pipe gas control actuator is free of oil.
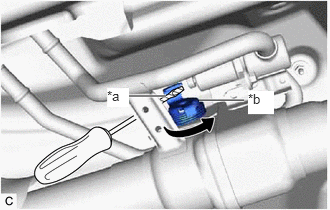
- Using a screwdriver with its tip wrapped with protective tape, secure the exhaust gas control valve in the open position as shown in the illustration.
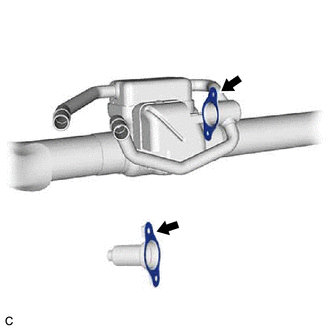
*a Protective Tape *b Exhaust Gas Control Valve - Install a new exhaust pipe gas control actuator gasket and the exhaust pipe gas control actuator sub-assembly with the 2 bolts.
Torque: 5.0 N.m (51 kgf/cm, 44 in.lbf)
NOTE:- Check that the O-ring is not deformed, cracked or swollen.
- Make sure that the exhaust pipe gas control actuator gasket and exhaust pipe gas control actuator sub-assembly are free of oil.
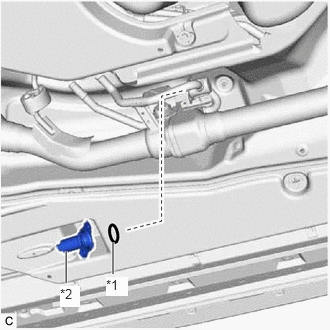
*1 Exhaust Pipe Gas Control Actuator Gasket *2 Exhaust Pipe Gas Control Actuator Sub-assembly - Connect the outlet heater water hose D and inlet heater water hose D to the No. 2 outlet water pipe and inlet water pipe and slide the 2 clips to secure them.NOTE:
When installing the outlet heater water hose D and inlet heater water hose D, ensure that the exhaust heat recirculation system is filled with coolant. Otherwise, the engine water pump assembly may be damaged.
- Clean the installation surfaces and bolt holes of the exhaust pipe gas control actuator sub-assembly and front exhaust pipe assembly (TWC: Rear Catalyst).
- ADD ENGINE COOLANT (for Engine)
Refer to PROCEDURE - Step 2
- INSPECT FOR COOLANT LEAK (for Engine)
Refer to PROCEDURE - Step 1