Installation [12/2019 - ]: Procedure
WARNING: This page is about a different variant/trim than selected.
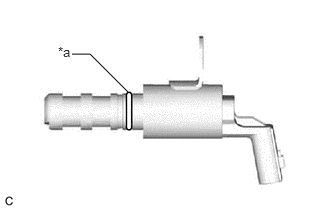
- INSTALL OIL PRESSURE CONTROL VALVE ASSEMBLY
- Apply a small amount of engine oil to the O-ring of the oil pressure control valve assembly.
*a O-ring - Using an 8 mm socket wrench, install the oil pressure control valve assembly to the timing chain cover assembly with the bolt.
Torque: 10 N.m (102 kgf/cm, 7 ft.lbf)
NOTE:- When reusing the oil pressure control valve assembly, inspect the O-ring.
- Make sure that the O-ring is not cracked or does not move out of place during installation.
- Connect the oil pressure control valve assembly connector.
- Apply a small amount of engine oil to the O-ring of the oil pressure control valve assembly.
- INSPECT FOR ENGINE OIL LEAK
Refer to PROCEDURE - Step 6 [12/2019 - 10/2021] , or refer to PROCEDURE - Step 6 [10/2021 - 10/2022] , or refer to PROCEDURE - Step 6 [10/2022 - 11/2023] , or refer to PROCEDURE - Step 6 [11/2023 - ]
- INSTALL FRONT FENDER APRON SEAL RH
Refer to PROCEDURE - Step 61 [12/2019 - 10/2022] , or refer to PROCEDURE - Step 61 [10/2022 - 11/2023] , or refer to PROCEDURE - Step 59 [11/2023 - ]