Removal [11/2023 - ]: Procedure
WARNING: This page is about a different variant/trim than selected.
- PRECAUTION NOTE:
After turning the ignition switch off, waiting time may be required before disconnecting the cable from the negative (-) auxiliary battery terminal.
- DISCHARGE FUEL SYSTEM PRESSURE
Refer to PRECAUTION [11/2023 - ]
- REMOVE BATTERY SERVICE HOLE COVER
Refer to PROCEDURE - Step 4
- DISCONNECT CABLE FROM NEGATIVE AUXILIARY BATTERY TERMINAL
Refer to PROCEDURE - Step 3
- REMOVE INTAKE MANIFOLD
Refer to REMOVAL [10/2021 - ]
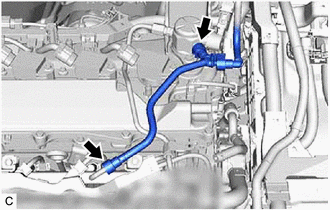
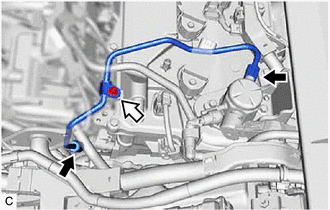
- DISCONNECT FUEL TUBE SUB-ASSEMBLY
- Remove the fuel pipe clamp from the fuel tube connector.
- Disconnect the fuel tube sub-assembly from the fuel pump assembly and fuel delivery pipe sub-assembly.
Refer to PRECAUTION [11/2023 - ]
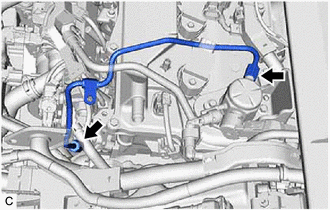
- Remove the fuel pipe clamp from the fuel tube connector.
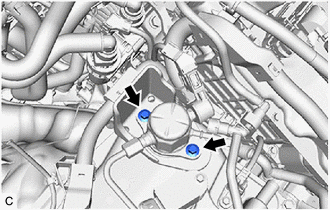
- REMOVE NO. 1 FUEL PIPE SUB-ASSEMBLY WARNING:
To prevent serious injury due to fuel spray from the high-pressure fuel lines, always discharge fuel system pressure before removing any fuel system components.
- REMOVE FUEL (ENGINE ROOM SIDE) PUMP ASSEMBLY
Refer to REMOVAL [11/2023 - ]
- REMOVE FUEL DELIVERY PIPE NOTE:
When replacing the fuel delivery pipe, it is necessary to replace the No. 1 fuel pipe sub-assembly with a new one.
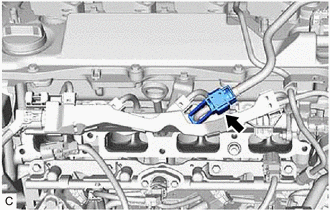
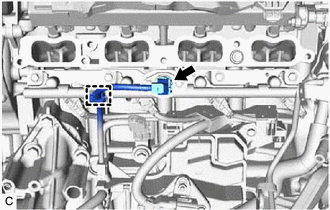
- Disconnect the fuel pressure sensor connector.
- Disengage the clamp to disconnect the sensor wire from the fuel delivery pipe.
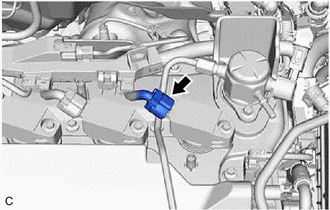
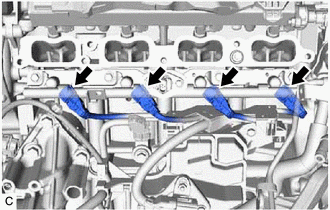
- Disconnect the 4 direct fuel injector assembly connectors.NOTE:
Make sure to disconnect the connectors carefully.
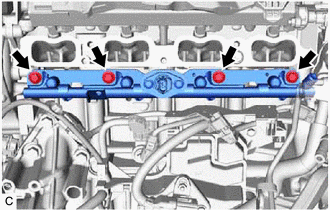
- Remove the 4 bolts and fuel delivery pipe with the 4 direct fuel injector assemblies from the cylinder head sub-assembly.NOTE:
- If fuel intrudes into the combustion chamber, there may be adverse effects to the engine main body.
- Make sure not to touch or strike the tips of the direct fuel injector assemblies.
- Pull and remove the fuel delivery pipe in a straight line without tilting it.
- Disconnect the fuel pressure sensor connector.
- REMOVE DIRECT FUEL INJECTOR ASSEMBLY
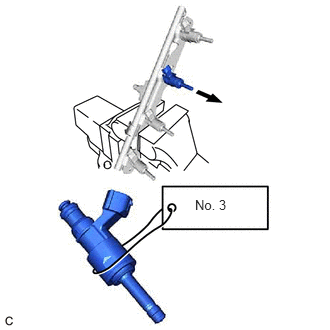
- Secure the fuel delivery pipe in a vise between aluminum plates and pull out the 4 direct fuel injector assemblies.NOTE:
- Pull and remove each direct fuel injector assembly in a straight line to avoid damaging the seal surface of the fuel delivery pipe O-ring.
- After removing the direct fuel injector assemblies, remove any O-rings, No. 1 fuel injector back-up rings and No. 3 fuel injector back-up rings remaining on the fuel delivery pipe side.
- Attach a tag or label with the corresponding cylinder number to each direct fuel injector assembly so that they can be installed to their original locations.
- Cover the tip of each direct fuel injector assembly to prevent it from being damaged.
- Remove the nozzle holder clamp from each direct fuel injector assembly.
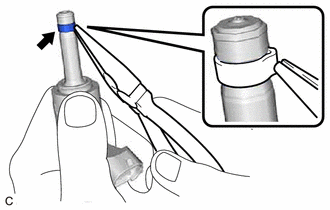
- Using needle nose pliers, remove the No. 3 fuel injector back-up ring from each direct fuel injector assembly.NOTE:
Do not damage the area that contacts the O-ring.
- Remove the O-ring and No. 1 fuel injector back-up ring from each direct fuel injector assembly.
- Remove the C-ring and injector vibration insulator from each direct fuel injector assembly.
- Secure the fuel delivery pipe in a vise between aluminum plates and pull out the 4 direct fuel injector assemblies.
- REMOVE FUEL INJECTOR SEAL
- Using the tip of needle nose pliers, pinch and pull the fuel injector seal at several points to stretch it.NOTE:
- Excessively pinching the fuel injector seal may damage the groove of the direct fuel injector assembly.
- If a direct fuel injector assembly is dropped or the tip of the direct fuel injector assembly is struck, replace it with a new one.
- Remove the fuel injector seal from each direct fuel injector assembly.
- Using the tip of needle nose pliers, pinch and pull the fuel injector seal at several points to stretch it.