DSD Information System
Home >> Toyota >> 2021 >> Highlander LE, 4WD >> Repair and Diagnosis (Single Page) >> Accessories & Equipment >> Communication Devices >> Network Gateway Ecu - Service Information >> Network Gateway Ecu >> Removal [11/2023 - ] >> Procedure

Removal [11/2023 - ]: Procedure

  1. REMOVE FRONT DOOR SCUFF PLATE RH 

    HINT: 

    Use the same procedure as for the LH side.

    Refer to PROCEDURE - Step 9

  2. REMOVE COWL SIDE TRIM SUB-ASSEMBLY RH 

    HINT: 

    Use the same procedure as for the LH side.

    Refer to PROCEDURE - Step 10

  3. DISCONNECT FRONT DOOR OPENING TRIM WEATHERSTRIP RH 

    Refer to PROCEDURE - Step 28

  4. REMOVE INSTRUMENT PANEL FINISH END PANEL RH 

    Refer to PROCEDURE - Step 29

  5. REMOVE NO. 2 INSTRUMENT PANEL UNDER COVER SUB-ASSEMBLY 

    Refer to PROCEDURE - Step 30

  6. REMOVE LOWER INSTRUMENT PANEL SUB-ASSEMBLY 

    Refer to PROCEDURE - Step 31

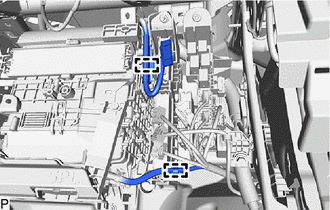
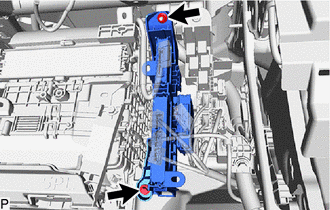
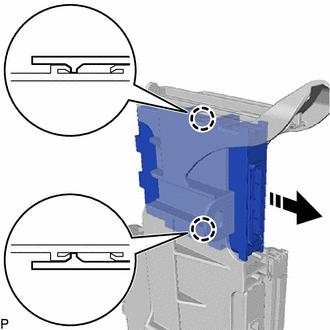
  7. REMOVE ECU INTEGRATION BOX RH 
    1. Disconnect each connector.
    2. Disengage the 2 clamps.
      GTY1180275Courtesy of © TOYOTA, LICENSE AGREEMENT TMS1002
    3. Remove the nut, bolt and ECU integration box RH.
      GTY1180276Courtesy of © TOYOTA, LICENSE AGREEMENT TMS1002
  8. REMOVE CENTRAL GATEWAY ECU (NETWORK GATEWAY ECU) 
    1. Disengage the 2 claws to remove the central gateway ECU (network gateway ECU) as shown in the illustration.
      GTY1179660Courtesy of © TOYOTA, LICENSE AGREEMENT TMS1002
      Remove in this Direction
      NOTE:
      • If the ECU integration box RH is deformed or damaged, replace it.
      • Do not bend the 2 claws more than necessary.