Installation [10/2021 - ]: Procedure
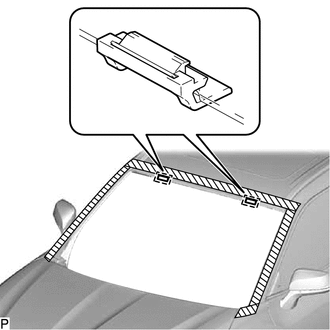
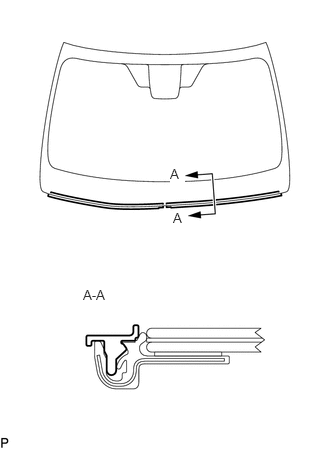
- INSTALL NO. 1 WINDSHIELD GLASS STOPPER (for 2-piece Type)
- INSTALL NO. 2 WINDSHIELD GLASS STOPPER (for 2-piece Type)
- Using a brush or sponge, coat the installation area of 2 new No. 2 windshield glass stoppers with glass primer.NOTE:
- Do not apply too much glass primer.
- Allow the glass primer to dry for 3 minutes or more.
- Throw away any leftover glass primer.
HINT:
If an area other than specified is coated by accident, wipe off the glass primer with a clean piece of cloth before it dries.
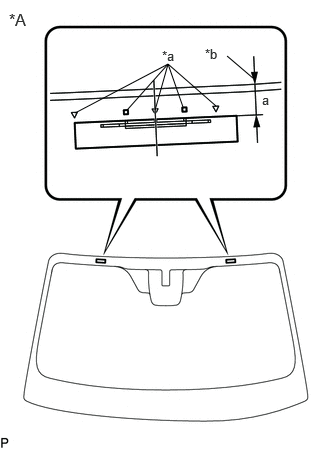
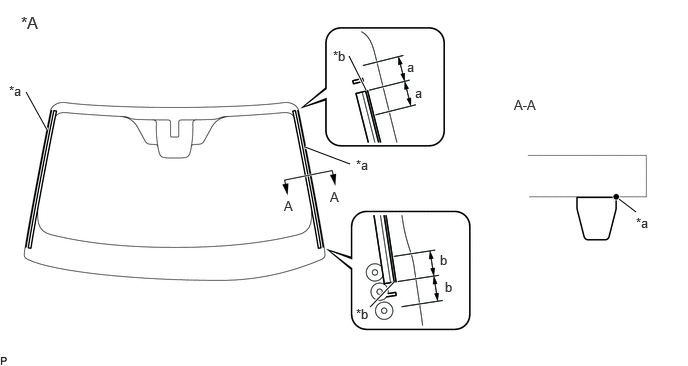
- Install the 2 No. 2 windshield glass stoppers to the windshield glass as shown in the illustration.
*A Back Side *a Ceramic Notch *b Windshield Glass Edge Side Standard Dimension
Area Dimension a 13.7 to 14.7 mm (0.539 to 0.579 in.) HINT:
Only 2-piece type windshield glass stoppers are provided as supply parts. Use 2-piece type stoppers as replacements even if 1-piece type stoppers were originally installed.
- Using a brush or sponge, coat the installation area of 2 new No. 2 windshield glass stoppers with glass primer.
- INSTALL WINDSHIELD OUTSIDE UPPER MOULDING
- Using a brush or sponge, coat the installation area of a new windshield outside upper moulding with glass primer.NOTE:
- Do not apply too much glass primer.
- Allow the glass primer to dry for 3 minutes or more.
- Throw away any leftover glass primer.
HINT:
If an area other than specified is coated by accident, wipe off the glass primer with a clean piece of cloth before it dries.
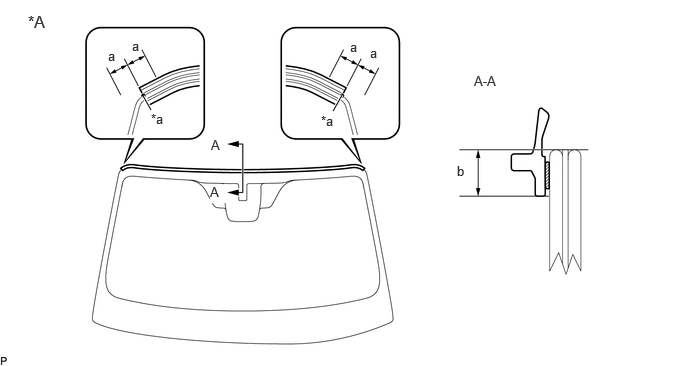
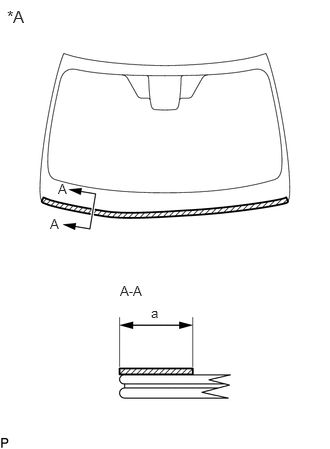
- Install the windshield outside upper moulding to the windshield glass as shown in the illustration.
*A Back Side - - *a Alignment Position (Edge Of Curved Surface) - - Reference Measurement / Standard Dimension
Area Measurement Area Dimension a 2.0 mm (0.0787 in.) b 7.0 mm (0.276 in.)
- Using a brush or sponge, coat the installation area of a new windshield outside upper moulding with glass primer.
- INSTALL WINDOW GLASS ADHESIVE DAM
- Using a brush or sponge, coat the installation area of 3 new window glass adhesive dams with glass primer.NOTE:
- Do not apply too much glass primer.
- Allow the glass primer to dry for 3 minutes or more.
- Throw away any leftover glass primer.
HINT:
If an area other than specified is coated by accident, wipe off the glass primer with a clean piece of cloth before it dries.
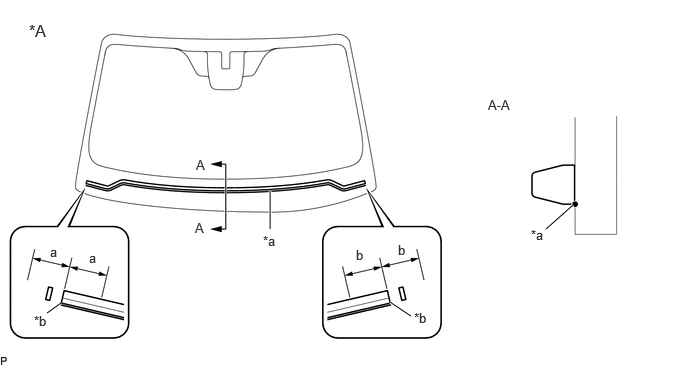
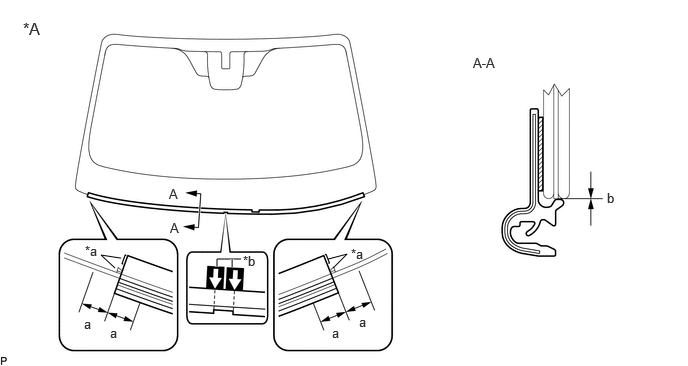
- Install the window glass adhesive dam to the windshield glass as shown in the illustration.
*A Back Side - - *a Indicated Line *b Alignment Position (End Of Indicated Line) Reference Measurement
Area Measurement Area Measurement a 20.0 mm (0.787 in.) b 5.0 mm (0.197 in.) - Install the 2 window glass adhesive dams to the windshield glass as shown in the illustration.
*A Back Side - - *a Indicated Line *b Alignment Position (End Of Indicated Line) Reference Measurement
Area Measurement Area Measurement a 5.0 mm (0.197 in.) b 8.0 mm (0.315 in.)
- Using a brush or sponge, coat the installation area of 3 new window glass adhesive dams with glass primer.
- INSTALL FRONT WINDOW INNER CENTER MOULDING
HINT:
Perform the following procedure only when replacement of the front window inner center moulding is necessary.
- Using a brush or sponge, coat the installation area of a new front window inner center moulding with glass primer.
Standard Dimension
Area Dimension a 17.5 to 20.5 mm (0.689 to 0.807 in.) NOTE:- Do not apply too much glass primer.
- Allow the glass primer to dry for 3 minutes or more.
- Throw away any leftover glass primer.
HINT:
If an area other than specified is coated by accident, wipe off the glass primer with a clean piece of cloth before it dries.
*A Back Side 
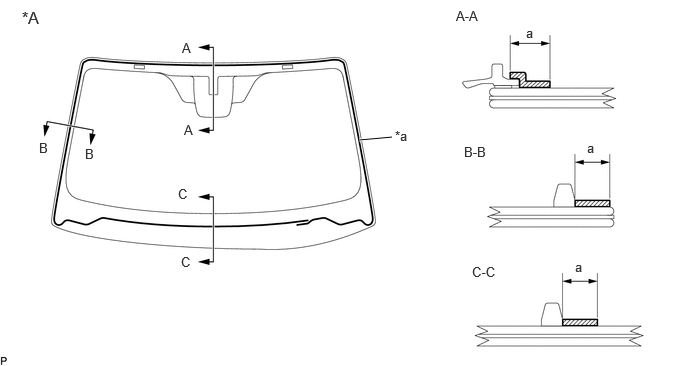
Glass Primer - Install the front window inner center moulding to the windshield glass as shown in the illustration.
*A Back Side - - *a Alignment Mark (Ceramic Notch) *b Matchmark Reference Measurement / Standard Dimension
Area Measurement Area Dimension a 2.0 mm (0.0787 in.) b 0 to 0.6 mm (0 to 0.0236 in.) NOTE:Do not damage the front window inner center moulding.
- Using a brush or sponge, coat the installation area of a new front window inner center moulding with glass primer.
- INSTALL WINDSHIELD GLASS SUB-ASSEMBLY
- Position the windshield glass sub-assembly.
*a Matchmark - Using suction cups, place the windshield glass sub-assembly in the correct position.
- Check that the whole contact surface of the windshield glass sub-assembly rim is perfectly even.
- Align the matchmarks on the windshield glass sub-assembly and vehicle body.NOTE:
Check that the windshield glass stoppers are engaged to the vehicle body correctly.
- Remove the windshield glass sub-assembly.
- Using a brush, coat the installation surface on the vehicle body with body primer.NOTE:
- Do not coat the adhesive with body primer.
- Do not apply too much body primer.
- Allow the body primer to dry for 3 minutes or more.
- Throw away any leftover body primer.
HINT:
If an area other than specified is coated by accident, wipe off the body primer with a clean piece of cloth before it dries.
- Using a brush or sponge, coat the adhesive application area with glass primer.
*A Back Side - - *a Adhesive Application Area - - Glass Primer - - Standard Dimension
Area Dimension - - a 8.0 mm (0.315 in.) or more - - NOTE:- Do not apply too much glass primer.
- Allow the glass primer to dry for 3 minutes or more.
- Throw away any leftover glass primer.
HINT:
- Apply glass primer to the ceramic notches.
- If an area other than specified is coated by accident, wipe off the glass primer with a clean piece of cloth before it dries.
- Apply adhesive to the windshield glass sub-assembly.
Adhesive
Toyota Genuine Windshield Glass Adhesive (High modulus type) or equivalent
- Cut off the tip of the cartridge nozzle as shown in the illustration.
*a Nozzle Standard Dimension
Area Dimension a 12.0 to 15.0 mm (0.472 to 0.591 in.) b 8.0 to 11.0 mm (0.315 to 0.433 in.) - Load the sealer gun with the cartridge.
- Apply adhesive to the windshield glass sub-assembly as shown in the illustration.
*A Back Side - - *a Adhesive Positioning Center - - Adhesive - - Standard Dimension
Area Dimension Area Dimension a 9.5 mm (0.374 in.) b 5.0 mm (0.197 in.) c 6.5 mm (0.256 in.) d 53.8 mm (2.12 in.) HINT:
Apply adhesive to the ceramic notches.
- Cut off the tip of the cartridge nozzle as shown in the illustration.
- Install the windshield glass sub-assembly.
*a Matchmark - Using suction cups, position the windshield glass sub-assembly so that the matchmarks are aligned, and press it in gently along the rim.NOTE:
- Check that the windshield glass stoppers are engaged to the vehicle body correctly.
- Check the clearance between the vehicle body and windshield glass sub-assembly.
- Lightly press the outer surface of the windshield glass sub-assembly to ensure that the windshield glass sub-assembly is securely fit to the vehicle body.
HINT:
Press the glass with a force of 98 N (10 kgf, 22.0 lbf) or more.
- Using a scraper, remove any excess or protruding adhesive.
- Hold the windshield glass sub-assembly using protective tape until the applied adhesive becomes hard.
HINT:
Follow the instructions supplied by the adhesive manufacturer or in the corresponding instruction manual for the minimum amount of time necessary to wait before driving the vehicle.
- Using suction cups, position the windshield glass sub-assembly so that the matchmarks are aligned, and press it in gently along the rim.
- When replacing the windshield glass sub-assembly or front window inner center moulding with a new one:
- w/ Windshield Deicer System:
- Connect the connector.
- Position the windshield glass sub-assembly.
- INSPECT FOR LEAK
- After the adhesive has hardened, apply water from the outside of the vehicle. Check that no water leaks into the cabin.
- If water leaks into the cabin, allow the water to dry and add adhesive.
- Remove the protective tape.
- INSTALL ROOF HEADLINING ASSEMBLY
- Return the front section of the roof headlining assembly to its original position.
- Connect the connector.
- INSTALL VISOR HOLDER
Refer to PROCEDURE - Step 2 [12/2019 - 10/2022] , or refer to PROCEDURE - Step 2 [10/2022 - ]
- INSTALL VISOR ASSEMBLY LH
Refer to PROCEDURE - Step 3 [12/2019 - 10/2022] , or refer to PROCEDURE - Step 3 [10/2022 - ]
- INSTALL VISOR BRACKET COVER LH (w/ Cover)
Refer to PROCEDURE - Step 4 [12/2019 - 10/2022] , or refer to PROCEDURE - Step 4 [10/2022 - ]
- INSTALL ASSIST GRIP SUB-ASSEMBLY
Refer to PROCEDURE - Step 7 [12/2019 - 10/2022] , or refer to PROCEDURE - Step 7 [10/2022 - ]
- INSTALL VISOR ASSEMBLY RH
HINT:
Use the same procedure as for the LH side.
- INSTALL VISOR BRACKET COVER RH (w/ Cover)
HINT:
Use the same procedure as for the LH side.
- INSTALL FRONT PILLAR GARNISH ASSEMBLY LH
Refer to PROCEDURE - Step 49 [12/2019 - 10/2022] , or refer to PROCEDURE - Step 47 [10/2022 - ]
- INSTALL FRONT PILLAR GARNISH ASSEMBLY RH
HINT:
Use the same procedure as for the LH side.
- INSTALL MAP LIGHT ASSEMBLY
Refer to INSTALLATION [12/2019 - ]
- INSTALL FORWARD RECOGNITION CAMERA
Refer to INSTALLATION [09/2020 - 11/2023] , or refer to INSTALLATION [11/2023 - ]
- INSTALL RAIN SENSOR (w/ Rain Sensor)
Refer to INSTALLATION [12/2019 - ]
- INSTALL INNER REAR VIEW MIRROR ASSEMBLY
w/ EC Mirror: Refer to INSTALLATION [12/2019 - 11/2023] , or refer to INSTALLATION [11/2023 - ]
w/o EC Mirror: Refer to INSTALLATION [12/2019 - ]
- INSTALL WINDSHIELD OUTSIDE MOULDING LH
Refer to INSTALLATION [12/2019 - ]
- INSTALL WINDSHIELD OUTSIDE MOULDING RH
HINT:
Use the same procedure as for the LH side.
- INSTALL COWL TOP VENTILATOR LOUVER SUB-ASSEMBLY
Refer to INSTALLATION [12/2019 - ]
- ADJUST FORWARD RECOGNITION CAMERA
- If the forward recognition camera has been replaced with a new one or the windshield glass has been removed and installed, it is necessary to perform Forward Recognition Camera Learning.
HINT:
Forward Recognition Camera Learning can be performed by using either Target Adjustment (One Time Recognition) or Target Adjustment (Sequential Recognition) or Driving Adjustment.
Target Adjustment (One Time Recognition): Refer to TARGET ADJUSTMENT (ONE TIME RECOGNITION) [09/2020 - ]
Target Adjustment (Sequential Recognition): Refer to TARGET ADJUSTMENT (SEQUENTIAL RECOGNITION) [09/2020 - ]
Driving Adjustment: Refer to DRIVING ADJUSTMENT [09/2020 - ]
- If the forward recognition camera has been replaced with a new one or the windshield glass has been removed and installed, it is necessary to perform Forward Recognition Camera Learning.