Removal [12/2019 - ]: Procedure
WARNING: This page is about a different variant/trim than selected.
- DRAIN COOLANT (for Inverter)
Refer to PROCEDURE - Step 1
- REMOVE INVERTER WATER PUMP ASSEMBLY
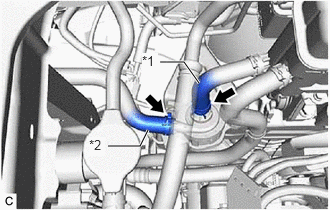
- Slide the 2 clips and disconnect the No. 2 inverter cooling hose and No. 3 inverter cooling hose.
*1 No. 2 Inverter Cooling Hose *2 No. 3 Inverter Cooling Hose NOTE:- Put pieces of cloth into the pipes and disconnected hoses or cover the pipes and hoses with plastic bags to prevent foreign matter from entering the inverter water pump with motor assembly and inverter cooling system.
- Do not apply excessive force to the hoses.
- Disconnect the inverter water pump assembly connector.NOTE:
To prevent coolant from entering the inverter water pump assembly connector, perform the following procedure.
- Wipe off any coolant around the inverter water pump assembly connector before disconnecting it.
- Apply insulating tape to the connectors of the wire harness and inverter water pump assembly to prevent the entry of coolant.
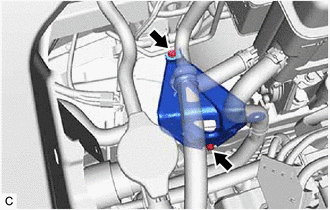
- Remove the 2 bolts and inverter water pump assembly from the HV water pump bracket sub-assembly.NOTE:
If the inverter water pump assembly has been struck or dropped, replace it.
- Slide the 2 clips and disconnect the No. 2 inverter cooling hose and No. 3 inverter cooling hose.
- REMOVE HV WATER PUMP BRACKET SUB-ASSEMBLY
HINT:
Perform this procedure only when replacement of the HV water pump bracket sub-assembly is necessary.