Installation [12/2019 - 09/2020]: Procedure
- INSTALL REAR BUMPER ASSEMBLY
- w/ Kick Sensor:
- Connect the connector.
- Engage the 2 clips and 2 claws.
- Engage the 16 claws.
- Install the 2 screws.
- Install the 5 clips.
- Install the rear bumper assembly with each screw.
- Remove the protective tape.
- w/ Kick Sensor:
- INSTALL REAR COMBINATION LIGHT COVER LH
Refer to PROCEDURE - Step 5
- INSTALL REAR COMBINATION LIGHT COVER RH
HINT:
Use the same procedure as for the LH side.
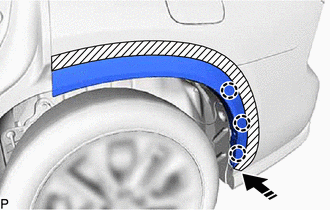
- CONNECT QUARTER PANEL WHEEL OPENING MOULDING LH
- CONNECT QUARTER PANEL WHEEL OPENING MOULDING RH
HINT:
Use the same procedure as for the LH side.
- INSTALL REAR QUARTER PANEL MUDGUARD LH (w/ Mudguard)
See step 1
- INSTALL REAR QUARTER PANEL MUDGUARD RH (w/ Mudguard)
HINT:
Use the same procedure as for the LH side.
- CONNECT CABLE TO NEGATIVE AUXILIARY BATTERY TERMINAL (w/ Kick Sensor)
for 2GR-FKS:
Refer to PROCEDURE - Step 2
for A25A-FXS:
Refer to PROCEDURE - Step 2
- INSTALL BATTERY SERVICE HOLE COVER (w/ Kick Sensor)
for HV Model:
Refer to PROCEDURE - Step 3
- INSPECT KICK DOOR CONTROL SENSOR (w/ Kick Sensor)
Refer to OPERATION CHECK [12/2019 - 11/2023]