Installation [12/2019 - 10/2022]: Procedure
- INSTALL INTERIOR ILLUMINATION LIGHT LENS (for LH Side)
- Engage the 6 guides to install the interior illumination light lens.
- INSTALL NO. 1 INTERIOR ILLUMINATION LIGHT ASSEMBLY (for LH Side)
- Install the No. 1 interior illumination light assembly with the screw.
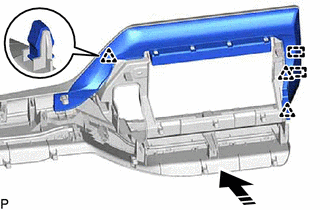
- INSTALL NO. 1 CENTER INSTRUMENT CLUSTER FINISH PANEL (for LH Side)
- Engage the 7 claws to install the No. 1 center instrument cluster finish panel.
- INSTALL INTERIOR ILLUMINATION LIGHT LENS (for RH Side)
- Engage the 8 guides to install the interior illumination light lens.
- INSTALL NO. 1 INTERIOR ILLUMINATION LIGHT ASSEMBLY (for RH Side)
- Install the No. 1 interior illumination light assembly with the screw.
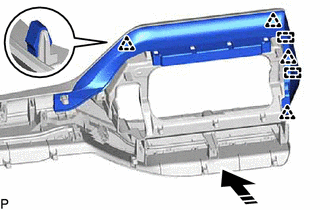
- INSTALL NO. 2 CENTER INSTRUMENT CLUSTER FINISH PANEL (for RH Side)
- Engage the 8 claws to install the No. 2 center instrument cluster finish panel.
- INSTALL INSTRUMENT CLUSTER FINISH PANEL END
- Engage the 9 claws and 10 guides to temporarily install the instrument cluster finish panel end.
- Install the instrument cluster finish panel end with the 3 screws.
- INSTALL UPPER INSTRUMENT CLUSTER FINISH PANEL (for 12.3 Inch Display)
- INSTALL UPPER INSTRUMENT CLUSTER FINISH PANEL (for 8 Inch Display)
- INSTALL NO. 3 INSTRUMENT PANEL REGISTER ASSEMBLY
Refer to PROCEDURE - Step 2
- INSTALL CENTER INSTRUMENT CLUSTER FINISH PANEL ASSEMBLY
Refer to PROCEDURE - Step 21
- INSTALL RADIO AND DISPLAY ASSEMBLY WITH AIR CONDITIONING CONTROL (for 8 Inch Display)
Refer to PROCEDURE - Step 5
- INSTALL MULTI-DISPLAY WITH AIR CONDITIONING CONTROL (for 12.3 Inch Display)
Refer to PROCEDURE - Step 4
- INSTALL CENTER INSTRUMENT CLUSTER FINISH PANEL SUB-ASSEMBLY
Refer to PROCEDURE - Step 24