Removal [11/2023 - ]: Procedure
- REMOVE DECK BOARD ASSEMBLY
Refer to PROCEDURE - Step 1
- REMOVE NO. 3 DECK BOARD SUB-ASSEMBLY (w/o Woofer)
Refer to PROCEDURE - Step 2
- REMOVE TONNEAU COVER ASSEMBLY (w/ Tonneau Cover)
Refer to PROCEDURE - Step 3
- REMOVE BATTERY SERVICE HOLE COVER
Refer to PROCEDURE - Step 4
- REMOVE REAR DECK FLOOR BOX
Refer to PROCEDURE - Step 5
- REMOVE DECK SIDE TRIM BOX LH (w/o Woofer)
Refer to PROCEDURE - Step 6
- REMOVE REAR FLOOR FINISH PLATE
Refer to PROCEDURE - Step 7
- REMOVE REAR NO. 2 SEAT ASSEMBLY
Refer to REMOVAL [12/2019 - ]
- REMOVE REAR OUTER SEAT TRACK BRACKET COVER
Refer to PROCEDURE - Step 13
- REMOVE REAR DOOR SCUFF PLATE
Refer to PROCEDURE - Step 14
- DISCONNECT REAR DOOR OPENING TRIM WEATHERSTRIP
- Disconnect the rear door opening trim weatherstrip.
- REMOVE FRONT DECK SIDE TRIM COVER LH (for LH Side)
Refer to PROCEDURE - Step 31
- REMOVE FRONT DECK SIDE TRIM COVER RH (for RH Side)
Refer to PROCEDURE - Step 41
- DISCONNECT REAR SEAT OUTER BELT ASSEMBLY
- REMOVE NO. 2 DECK SIDE TRIM COVER
Refer to PROCEDURE - Step 33
- DISCONNECT REAR NO. 2 SEAT OUTER BELT ASSEMBLY
See step 16
- REMOVE DECK TRIM POCKET COVER
Refer to PROCEDURE - Step 35
- REMOVE NO. 1 LUGGAGE COMPARTMENT TRIM HOOK
Refer to PROCEDURE - Step 36
- REMOVE ROPE HOOK
Refer to PROCEDURE - Step 37
- REMOVE DECK TRIM SIDE PANEL ASSEMBLY LH (for LH Side)
Refer to PROCEDURE - Step 38
- REMOVE COOLER (NO. 2 ROOM TEMP. SENSOR) THERMISTOR (for RH Side)
w/ Rear Automatic Air Conditioning System
Refer to PROCEDURE - Step 1
- REMOVE DECK TRIM SIDE PANEL ASSEMBLY RH (for RH Side)
Refer to PROCEDURE - Step 49
- REMOVE QUARTER PILLAR GARNISH
Refer to PROCEDURE - Step 39
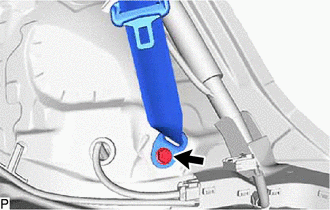
- REMOVE REAR SEAT OUTER BELT ASSEMBLY
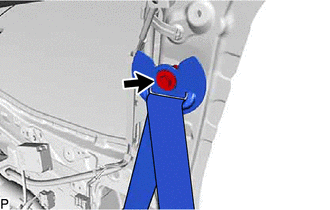
- Loosen the bolt and disconnect the shoulder anchor of the rear seat outer belt assembly.
HINT:
The bolt cannot be removed from the shoulder anchor of the rear seat outer belt assembly.
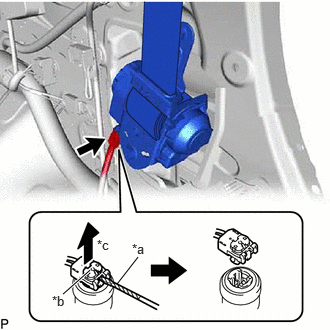
- Using a screwdriver, pull out the locking button as shown in the illustration to release the lock and disconnect the pretensioner connector.
HINT:
Tape the screwdriver tip before use.
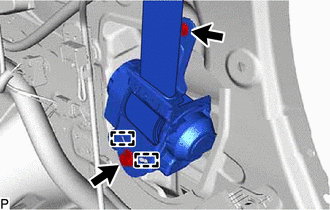
*a Protective Tape *b Locking Button *c Release - Remove the 2 bolts.
- Disengage the 2 guides to remove the rear seat outer belt assembly LH.
- Loosen the bolt and disconnect the shoulder anchor of the rear seat outer belt assembly.